

A static clip can tell a story, but movement can guide the viewer toward the part of that story that matters most. You may want the camera to slowly zoom toward a face, make a product image slide naturally into the frame, move text with the subject, or create a subtle rotation that gives an otherwise still image some energy. This is where CapCut keyframe editing becomes useful.
At first, keyframes can look more technical than they really are. You see a small diamond icon, tap or click it, move the playhead, change something, and suddenly the clip begins moving. The result feels almost automatic, but understanding what is happening between those points is what separates random animation from controlled motion.
The basic idea is simple: a keyframe records the state of a property at a particular moment. Add another keyframe later with a different value, and the editor creates the change between those two points. For example, if a clip starts at its normal size and ends at a larger scale, the result is a gradual zoom. If an image begins on the left side of the canvas and the second keyframe places it on the right, the image travels across the screen.
That means CapCut keyframe editing is not really about adding diamonds to a timeline. It is about deciding where movement begins, where it ends, how far something should travel, and how quickly that change should happen.
Once you understand that relationship, keyframes become far less intimidating. You can use them for subtle zooms, pans, text movement, image overlays, rotations, opacity changes, motion-based transitions, product highlights, social media edits, and many other effects.
This guide focuses on that practical understanding. Instead of showing you only where to click, we will look at how keyframes work, how to add them, how to control their timing, why animations sometimes look rough, and how to make motion feel intentional rather than distracting.
The simple rule: Decide what should change, choose where that change starts and ends, and then use keyframes to control the journey between those two moments.
What Is a Keyframe in CapCut?
A keyframe is a marker that stores the value of an editable property at a specific point in time.
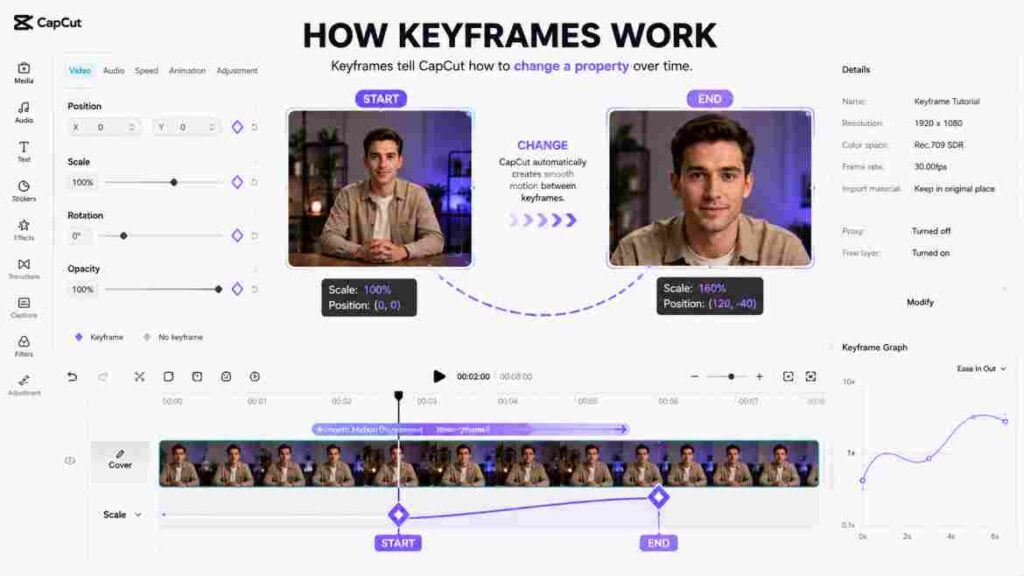
That definition sounds technical, so imagine you have a photo on your timeline. At the beginning of the photo, it fills the screen normally. Two seconds later, you want the viewer to be closer to the person’s face.
You place the first CapCut keyframe at the beginning with the image at its original size. You move the playhead two seconds forward and increase the scale. That second state becomes another keyframe.
The editor now has two instructions:
At the first moment, the image should be this size.
At the second moment, the image should be larger.
Everything between those moments becomes the transition from the first state to the second. Instead of instantly jumping from one size to another, the image progressively enlarges, producing a zoom.
This same principle can be applied to position, rotation, opacity, scale, and other supported parameters depending on the element, editing environment, and current CapCut version. CapCut’s current official material specifically demonstrates keyframing properties such as position, scale, rotation, and opacity.
For additional guidance, you can explore CapCut’s official guide to capcut keyframe animation, which explains how keyframes control properties such as position, scale, rotation, and opacity over time
Think of Keyframes as Instructions, Not Effects
One of the easiest mistakes for beginners is treating a CapCut keyframe like a visual effect.
It is not an effect by itself.
Adding a single keyframe may produce no visible animation because you have only told the editor what a property should be at one moment. For movement to occur, there normally needs to be a difference between states at different points in time.
Consider this simple example:
Your first keyframe places a logo in the center.
Your second keyframe also places the logo in the center.
Nothing meaningful changes.
Now move the logo toward the upper-right corner at the second point. The editor has a starting position and a different ending position, so movement can occur between them.
That difference is the foundation of keyframe animation.
What Happens Between Two Keyframes?
The frames between your defined points are generated as the property changes from one recorded state to another. This process is commonly described as interpolation.
You do not normally need to manually reposition an object on every single frame. You define important states, and the software handles the intermediate change.
Suppose a clip is at 100% scale at 00:00 and 130% scale at 00:03. The CapCut keyframe workflow allows the scale to progressively change during those three seconds rather than requiring you to adjust every individual frame.
This is why two well-placed keyframes can sometimes accomplish more than ten poorly planned ones.
Why Timing Matters as Much as the Values
Keyframes do more than define what changes. Their positions on the timeline also determine how long that change has to happen.
Move the second keyframe closer to the first and the same transformation happens in less time. The animation therefore feels faster.
Move it farther away and the transformation takes longer, creating slower movement.
This gives you a useful mental model:
Distance on the screen controls how far the object moves. Distance on the timeline helps control how quickly that movement happens.
Understanding this relationship makes CapCut keyframe animation much easier to troubleshoot.
If a zoom feels too aggressive, you may not need to remove it. You could reduce the amount of scale change, increase the time between the keyframes, or do both.
Why Use Keyframes Instead of Leaving the Clip Static?
Not every clip needs movement. In fact, adding motion everywhere can make an edit exhausting to watch.
The real value of CapCut keyframe editing appears when movement has a job to do.
A slow zoom can guide attention toward a facial expression. A position change can keep a product visible while text enters the frame. An animated overlay can point toward a specific button in a tutorial. A controlled pan can reveal different parts of a high-resolution photograph.
The objective is not to prove that you know how to animate.
The objective is to make the viewer’s experience clearer or more engaging.
Keyframes Can Direct Attention
Imagine a wide shot containing several people, but one person’s reaction is important to the story. Instead of cutting immediately to another shot, you could gradually zoom toward that person.
The viewer’s eye naturally follows the change.
This is a useful application of CapCut keyframe control because the movement supports the story rather than competing with it.
Keyframes Can Add Life to Still Images
Photos can feel static when placed between moving video clips. A subtle scale or position animation can introduce gentle motion.
For example, a landscape photo can slowly move from left to right. A portrait can gradually zoom in. A product image can begin slightly wider and move closer to reveal detail.
The key word is subtle.
If every photograph flies, spins, zooms, and bounces, the movement quickly becomes more noticeable than the content.
Keyframes Give You Manual Control
Preset animations are useful when you want a quick result. Keyframes are useful when you want to decide exactly when a movement starts and where it ends.
With a CapCut keyframe, the animation can be designed around the specific clip instead of forcing the clip to fit a predetermined animation.
That distinction becomes especially important when editing to music, matching subject movement, creating custom zooms, or coordinating several layers.
Where Is the Keyframe Button in CapCut?
The keyframe control is commonly represented by a diamond-shaped icon.
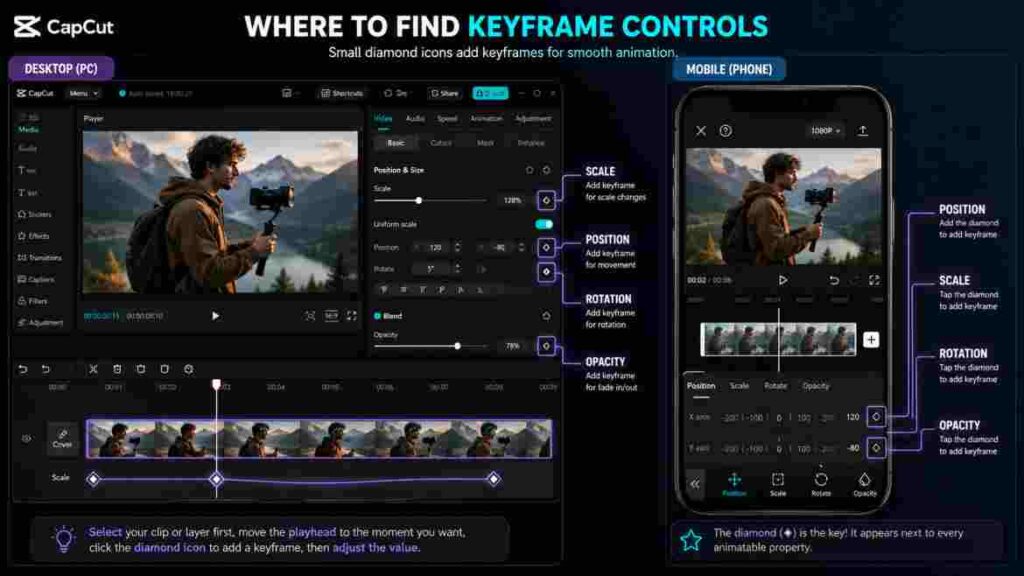
Exactly where you see that icon can vary according to whether you are editing on desktop, mobile, or another CapCut environment. Interface layouts can also change as the application is updated, so it is better to understand what you are looking for rather than memorize one permanent screen location.
Finding Keyframes on CapCut Desktop
On the desktop editor, first select the video, image, text, or other supported element that you want to animate.
This selection step matters.
Once the appropriate timeline element is selected, look at the editing controls associated with properties such as position, scale, rotation, or opacity. CapCut’s current desktop guidance describes diamond-shaped keyframe controls next to these adjustable parameters in the editing panel.
The CapCut keyframe icon belongs to the property you want to animate. That is an important detail because you are not simply telling CapCut, “animate this clip.” You are telling it which value should change over time.
Finding Keyframes on CapCut Mobile
The mobile interface is more compact, so controls are arranged differently from the desktop workspace.
Select the relevant clip or element and inspect the available editing controls for the diamond-shaped keyframe button. Depending on the element, property, app version, and interface layout, the location or available keyframe options may differ.
If a tutorial shows a button in a place that does not match your screen, do not immediately assume the feature has disappeared. Check whether the tutorial is using a different platform or version.
Why You May Not See the Keyframe Icon
A missing CapCut keyframe button does not always mean the application is broken.
Start with the simplest question:
Is the correct element actually selected?
CapCut’s help documentation notes that keyframe controls on PC may not appear when no relevant clip is selected. It also notes that some elements or special assets may not support the expected keyframe controls.
So before reinstalling the app or rebuilding a project, verify the selection and property first.
How to Add Keyframes in CapCut Step by Step
Knowing what a keyframe does makes the actual process much easier.
For this example, imagine we want to create a slow zoom toward a subject.
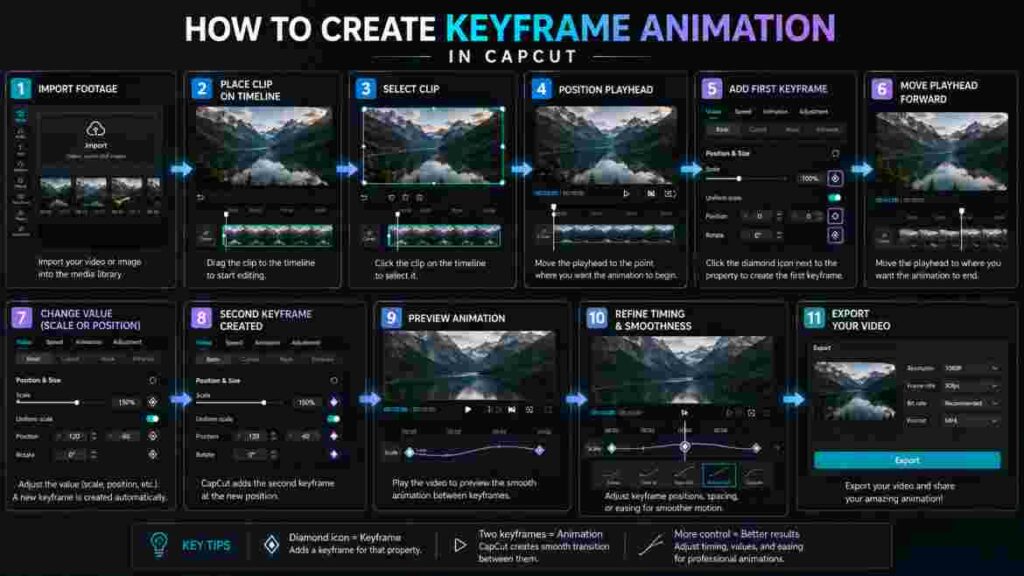
Step 1: Import Your Footage
Open your project and import the video or image you want to animate.
Place the media on the timeline and trim it to the duration you need before spending too much time perfecting the animation.
This matters because major timing changes later can alter the pacing of your keyframes.
Step 2: Select the Clip
Click or tap the clip you want to animate.
The editing controls should now relate to that selected element.
A common beginner problem is changing the wrong layer because several clips, overlays, text elements, or images are stacked around the same part of the timeline.
Before adding a CapCut keyframe, confirm that the correct layer is active.
Step 3: Decide What You Want to Animate
Do not add a keyframe simply because the button is available.
Ask:
What should actually change?
For our example, the answer is scale.
For another animation, the answer might be position, rotation, or opacity.
This one decision keeps the process focused.
Step 4: Move the Playhead to the Starting Point
Position the playhead exactly where you want the movement to begin.
It does not necessarily need to be at the beginning of the clip.
Suppose a person speaks normally for two seconds and then mentions an important detail. You may want the zoom to begin only when that sentence starts.
Place the playhead at that moment.
Step 5: Add the First Keyframe
Use the diamond control associated with the property you want to animate.
This first CapCut keyframe establishes the starting state.
For a zoom, you might leave the clip at its normal scale.
For a moving overlay, you might place the object outside or near the edge of the visible frame.
For a fade, you might begin with lower opacity.
Step 6: Move the Playhead Forward
Move to the point where you want the transformation to finish.
The amount of time between these positions is important.
A large zoom completed in a fraction of a second will feel very different from the same zoom spread across three seconds.
Step 7: Change the Property
Now change the value.
Increase the scale for a zoom.
Move the object for a position animation.
Change the angle for rotation.
Adjust opacity for a fade.
CapCut’s current official instructions describe moving the playhead to another point and adjusting the chosen parameter to create the next state and the transition between keyframes.
Once those different states exist, your CapCut keyframe animation has something meaningful to interpolate between.
Step 8: Preview the Entire Movement
Do not judge the animation while the playhead is sitting on one keyframe.
Play the sequence from before the first keyframe until after the second.
Ask yourself three questions:
Does the movement begin at the right moment?
Does it move at the right speed?
Does the final composition look intentional?
A zoom may be technically smooth but still end with the subject’s head awkwardly cropped. A text animation may move cleanly but cover an important part of the footage.
Technical success is not the same as visual success.
Step 9: Refine the Timing
If the animation feels too fast, move the keyframes farther apart or reduce the size of the change.
If it feels too slow, bring them closer together.
If the movement is too strong, reduce the difference between the starting and ending values.
This is where CapCut keyframe editing becomes more about judgment than buttons.
Step 10: Add More Keyframes Only When Necessary
Two keyframes are enough for many animations.
Add a third when the object needs to change direction, stop temporarily, increase or decrease its movement, or reach another defined state.
For example:
An image starts in the center.
It moves to the left.
It then moves upward.
That path requires additional instructions.
But do not confuse more keyframes with better animation. Every extra point introduces another decision about timing and movement.
For an official walkthrough of the process, you can also follow CapCut’s guide on how to add keyframes in CapCut, which covers the basic keyframe setup and controls.
What Can You Animate With CapCut Keyframes?
The exact parameters available for keyframing can depend on the platform, selected element, feature, and software version. CapCut currently highlights common properties including position, scale, rotation, and opacity in its official keyframe documentation.
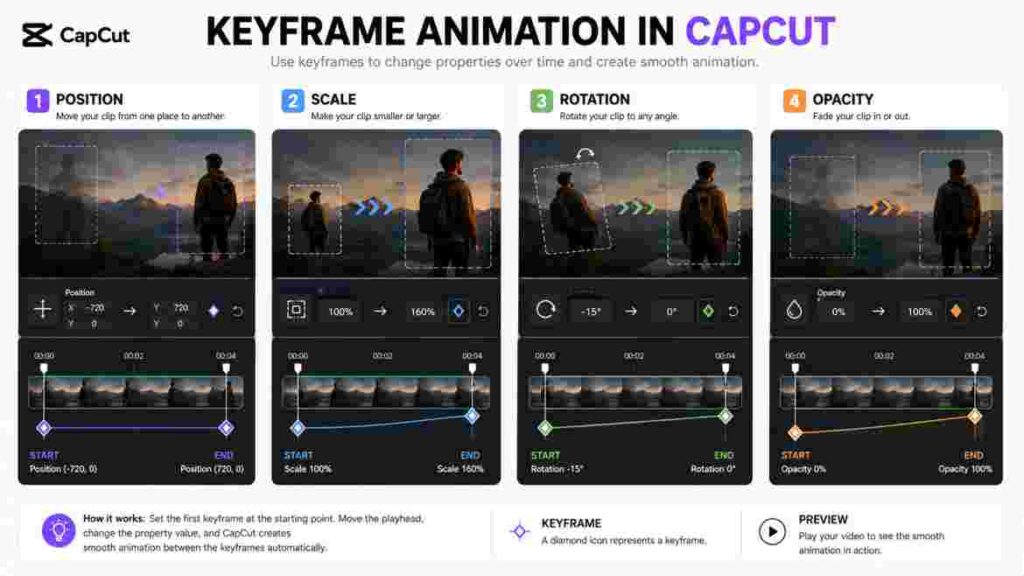
These basic properties already provide a surprisingly large creative range.
Position
Position determines where an element appears in the frame.
Animating position allows an object to travel from one location to another.
A CapCut keyframe position animation can be used to slide text into view, move an image across the canvas, follow a subject, reveal different areas of a photograph, or create custom motion transitions.
The most important question is not simply where the element begins and ends. Think about the path the viewer’s eye will follow.
If something begins on the left and finishes on the right, the motion feels directional.
If the next clip continues moving in the same direction, the cut can feel more connected.
If the following shot suddenly moves the opposite way without a reason, the edit may feel less natural.
Scale
Scale changes the apparent size of the selected element.
This is one of the most practical uses of CapCut keyframe animation because it creates zoom-like movement without requiring the camera itself to have moved during recording.
Scale animation can help emphasize:
a face,
a product,
text,
an interface element,
an object in the background,
or a detail the viewer might otherwise miss.
Be careful with how far you enlarge low-resolution footage. Keyframes control movement, but they cannot create missing image detail. Excessive digital enlargement can make softness or compression more noticeable.
Rotation
Rotation changes the angle of an element.
A small amount can add energy to text, stickers, graphics, or creative social edits. Large continuous rotations can produce more stylized results.
The danger is overuse.
If the subject does not benefit from rotating, adding rotation simply because you can often makes the edit feel less controlled.
Use a CapCut keyframe rotation when the movement supports the visual idea.
Opacity
Opacity determines how visible an element is.
Changing opacity over time can create fades, reveals, disappearances, and softer transitions between layered elements.
For example, an overlay can begin transparent and gradually become visible while the narrator introduces it.
Opacity animation can also be combined with movement. An element might enter from the side while becoming more visible.
Combining properties can create richer motion, but it also increases complexity. Start with one property and add another only when the result genuinely improves.
How to Create a Smooth Zoom With CapCut Keyframe Animation
A zoom is often the easiest place to learn keyframes because the change is visually obvious.
Imagine you have a five-second talking-head clip. The speaker reaches the main point around the second second, and you want a gentle push-in.
Place your first keyframe shortly before the important sentence begins. Keep the scale at its normal framing.
Move forward roughly one or two seconds, depending on the pace you want, and increase the scale moderately.
Now preview.
If the zoom feels like it jumps toward the speaker, you have three main controls:
reduce the scale difference,
increase the time between keyframes,
or refine the motion curve/easing if that control is available in your current workflow.
The CapCut keyframe itself is only part of the solution. Smoothness comes from the relationship between distance, duration, and acceleration.
Keep the Subject Framed During the Zoom
Scaling toward the center of the frame works only when the important subject is already near the center.
Suppose the speaker is standing on the left while text occupies the right side.
Increasing scale alone may push the face toward the edge.
In that situation, animate position along with scale.
As the clip enlarges, reposition it slightly so the subject remains comfortably framed.
This combination is one of the most useful keyframe skills because real footage is rarely composed perfectly for every digital zoom.
Do Not Zoom Just Because the Timeline Feels Empty
A common editing habit is adding a zoom whenever a shot lasts longer than a few seconds.
That can become predictable.
Instead, connect the CapCut keyframe zoom to something happening in the content: an important phrase, emotional reaction, product detail, beat, visual reveal, or shift in the story.
Movement becomes stronger when the viewer can feel why it happened.
How to Pan Across a Photo or Video
A pan changes which area of the visual occupies the frame.
It works especially well with still photographs, screenshots, landscapes, group photos, documents, and wide scenes.
Start by scaling the image enough that movement will not immediately expose empty canvas around its edges.
Place the first CapCut keyframe with the first area of interest visible.
Move the playhead later and reposition the image so the second area of interest becomes prominent.
Play the result.
The viewer should feel as though the camera is travelling across the visual, even though the original image itself is static.
The Biggest Pan Mistake: Moving Too Far Too Fast
A dramatic movement may look exciting while you are editing frame by frame, but the finished animation can become uncomfortable to watch.
For informational content, tutorials, documentaries, product videos, and most professional edits, give the viewer enough time to actually see what the camera is revealing.
If a photograph contains three people and you are moving from one face to another, the animation should not force the eye to race across the frame.
The CapCut keyframe positions should support viewing, not test the viewer’s reaction speed.
How to Animate Text With Keyframes
Text does not always need to appear statically.
You might want a label to slide beside a product, a heading to enter from the bottom, or a short phrase to follow the energy of a social edit.
First create and style the text.
Do that before building complicated motion. If you change the text size, line breaks, or overall design later, its visual position can change and force you to adjust the animation.
Next, select the text element and identify the supported parameter you want to animate.
For a simple entrance, position the text at its starting location and add a CapCut keyframe.
Move forward.
Change the position to where the text should settle.
Preview the result in the context of the actual footage.
Make Text Movement Serve Readability
Text animation fails when the audience spends more effort tracking the words than reading them.
Long sentences usually need more stability than one- or two-word labels.
If the text contains an important instruction, give it enough stationary time after the animation so viewers can absorb it.
For example, a label can slide into place quickly and then remain still for several seconds.
That feels intentional.
Constant movement rarely improves instructional text.
Animate the Container, Not the Reading Experience
Think of text motion as a way to introduce or remove information.
Once the text reaches its destination, readability usually becomes the priority.
A good CapCut keyframe animation can attract attention to a caption without making the caption itself difficult to follow.
How to Animate an Image or Overlay
Image overlays are perfect candidates for controlled keyframe motion.
Suppose you are explaining an app and want a screenshot to appear beside you.
Instead of having it instantly pop onto the screen, you could place the image slightly outside the frame, create the starting point, move forward a short distance, and reposition the image into the available negative space.
The movement now has a clear beginning and destination.
A CapCut keyframe can also scale an overlay while it moves. For example, a product image might begin slightly smaller and increase to its final size as it enters.
This can feel polished when restrained.
Keep Overlay Movement Consistent With the Composition
Before animating an overlay, decide where it should live after the animation.
Do not build the movement first and worry about composition afterward.
Check whether the final position covers:
the speaker’s face,
captions,
important footage,
interface controls,
logos,
or other visual information.
A beautifully animated overlay in the wrong location is still a poor edit.
How to Use Rotation Without Making the Edit Look Cheap
Rotation is visually strong. That is exactly why it should be handled carefully.
For playful short-form edits, a larger rotation can be part of the style. For a product tutorial or professional explainer, a few degrees may be enough to create a sense of movement.
Start with the purpose.
If a graphic is supposed to swing into place, rotation can reinforce the entrance.
If a photograph is simply being shown to provide context, spinning it may have no visual logic.
When using CapCut keyframe rotation, watch the corners of the element as it turns. Rotating and scaling a clip can expose unwanted empty areas around the frame depending on how the media is positioned.
Always inspect the full canvas, not just the center.
How to Create an Opacity Fade
Opacity animation is simple but extremely useful.
Suppose an arrow should gradually appear when the narrator begins discussing a specific object.
Place the playhead shortly before that moment.
Set the starting opacity low or fully transparent where appropriate and establish the first state.
Move forward.
Increase the opacity until the arrow is clearly visible.
The CapCut keyframe transition creates the reveal.
You can reverse the process later to make the arrow disappear.
Why Opacity Often Works Better Than a Flashy Entrance
Not every graphic needs to fly onto the screen.
A subtle fade often keeps the viewer focused on the information rather than the editing technique.
This is especially valuable for educational videos, product demos, business content, screen recordings, and tutorials where clarity matters more than spectacle.
How Keyframe Spacing Controls Animation Speed
This is one of the most important concepts in the entire guide.
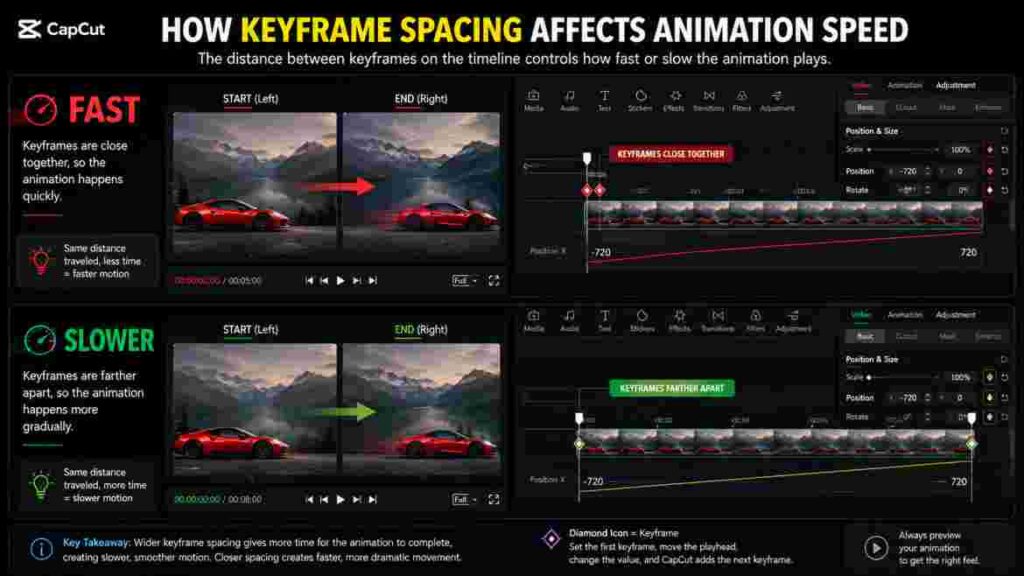
Imagine two keyframes that move an image from the left side of the screen to the right.
If the keyframes are three seconds apart, the object has three seconds to complete the journey.
Move the second CapCut keyframe much closer and the same object must travel the same distance in less time.
It moves faster.
You did not necessarily change the position values. You changed the time available to travel between them.
Fast Motion Is Not Automatically Dynamic Motion
Editors sometimes push keyframes close together because fast movement feels energetic.
But energy should come from the content and rhythm, not from making every object race around the canvas.
Fast movement can work for beat edits, short-form transitions, reveals, or deliberate impact moments.
Slower movement often works better for:
documentary-style photos,
talking-head emphasis,
product details,
tutorial screenshots,
cinematic push-ins,
and background visual motion.
Your CapCut keyframe spacing should match the purpose of the scene.
How to Make CapCut Keyframes Smoother
An animation can move from the correct starting point to the correct ending point and still feel mechanical.
Why?
Because natural-looking movement is not only about location. It is also about acceleration and deceleration.
In the physical world, many objects do not instantly reach full speed and then instantly stop. They accelerate, move, and slow down.
This is where easing or motion-curve controls become valuable when available for the property and current CapCut version.
CapCut’s current official keyframe material discusses using easing/graph or curve-related controls to refine motion, though exact controls can vary by editor and version.
Understand Ease In and Ease Out Conceptually
Even if the interface changes, the concept stays useful.
Ease-in generally describes movement that starts more gradually before accelerating.
Ease-out generally describes movement that slows as it approaches its destination.
Combining controlled acceleration and deceleration can make a CapCut keyframe animation feel less robotic.
The exact curve you need depends on the movement.
A graphic snapping into a beat may intentionally move quickly.
A cinematic zoom usually benefits from softer movement.
Smooth Does Not Mean Slow
This distinction matters.
A movement can be very fast and still have controlled acceleration.
A movement can also be extremely slow and still look awkward.
Smoothness is about how the change flows, not simply how long it takes.
Preview at Normal Playback Speed
Do not spend all your time dragging the playhead slowly through the animation.
Scrubbing is useful for checking individual positions, but the viewer will experience the video in motion.
Play your CapCut keyframe sequence at normal speed repeatedly.
You may discover that a movement that looked perfect while scrubbing feels much too aggressive in playback.
Practical Example: Create a Smooth Push-In on a Talking Head
Suppose your video begins with a medium shot of a presenter.
At four seconds, the presenter says the most important sentence in the introduction.
Instead of cutting to another camera angle, you want a subtle push-in.
Keep the first few seconds unchanged.
Shortly before the important sentence, add your starting CapCut keyframe for scale.
Move forward around a second or more, depending on the desired pace.
Increase the scale slightly.
If the face moves away from the visual center, adjust position as needed.
Now watch the entire section beginning several seconds before the animation.
The zoom should feel connected to the statement rather than appearing as an unrelated editing trick.
After the push-in finishes, consider leaving the framing stable for a while.
Immediately zooming back out can make the motion feel like a pulse rather than intentional emphasis.
Practical Example: Create a Ken Burns-Style Photo Movement
Still photographs often benefit from slow movement.
Place the photo on the timeline and set its duration.
Decide whether the visual story should move toward a detail or travel across the photograph.
For a simple push-in, begin slightly wider and finish closer.
For a pan, start with one side of the image and gradually move toward another.
For a combination, change both scale and position.
Your CapCut keyframe movement should be slow enough that viewers can appreciate the photograph rather than simply notice that it is moving.
Check the image resolution before using a large zoom. Enlarging a small image too aggressively can reduce perceived quality.
Practical Example: Make an Image Slide Into the Frame
Suppose you are creating a product review and want a product photograph to appear beside the presenter.
First find an area of negative space in the footage.
Place the product image there temporarily to determine its final size and position.
Once the destination looks correct, move to the moment where the entrance should begin.
Position the image outside the visible frame or near its edge and add the starting CapCut keyframe.
Move forward a short amount of time and place the image at the destination you already tested.
Preview the entrance.
If it feels abrupt, adjust the timing or available easing.
This destination-first approach is useful because it prioritizes the final composition instead of designing motion blindly.
Practical Example: Create a Custom Zoom Transition
Keyframes can also help create custom transitions between clips.
Near the end of the first clip, establish a normal scale.
Move toward the cut and increase the scale substantially enough to create the desired push.
Then design the opening movement of the next clip so the visual energy continues naturally.
A CapCut keyframe transition gives you more manual control than simply dropping a preset transition between two clips.
But custom does not automatically mean better.
The direction, subject position, speed, and visual similarity between shots still matter.
If the two clips have no visual relationship, an aggressive zoom may simply emphasize the cut rather than hide it.
Practical Example: Create Motion That Matches a Music Beat
Keyframes can be synchronized with audio to create rhythmic movement.
Listen to the track and identify the beats or moments that actually matter.
Do not add movement to every sound.
Instead, choose important accents.
Place your animation so its strongest visual change corresponds with the musical moment.
For example, a scale animation can build before a beat and reach its destination on the beat.
The CapCut keyframe timing should follow the rhythm rather than being added first and forced onto the music later.
This creates a more connected edit.
Practical Example: Make a Callout Follow Attention
Imagine a tutorial showing a complicated interface.
You want an arrow to point toward one control and later move toward another.
Add the arrow as an overlay.
Position it beside the first control and establish a CapCut keyframe.
When the narration shifts to the second control, move the playhead and reposition the arrow.
The arrow now travels between the two areas.
However, ask whether movement is actually helpful.
For precise tutorials, it may be clearer to fade one arrow out and another in rather than send a pointer travelling across the entire screen.
Keyframing gives you options. Good editing means choosing the option that communicates best.
CapCut Keyframes vs Preset Animations
Preset animations and keyframes solve overlapping problems in different ways.
A preset gives you a predesigned motion behavior. You select it, adjust available settings, and use it without building every stage manually.
A CapCut keyframe gives you more direct control over where a property is at selected moments.
Neither method is universally better.
When Preset Animations Make More Sense
Use a preset when you need a quick entrance or exit and the existing movement already matches your style.
This can save time when editing a large volume of short-form content.
Presets are also useful for beginners who want polished movement without designing the animation from scratch.
When Keyframes Make More Sense
Use keyframes when the movement needs to respond to your actual footage.
For example, you may need a zoom to begin exactly when a speaker says a particular word.
You may need an overlay to stop in a specific empty area.
You may need text to travel a custom distance.
You may want an image to move in the same direction as the subject.
These are situations where CapCut keyframe control becomes more valuable than a generic preset.
You Can Use Both
There is no rule saying every animation must be built manually.
A practical editing workflow uses presets where they work and custom keyframes where greater control is necessary.
The viewer does not care which button you used.
They care whether the finished video feels coherent.
CapCut Keyframes vs Transitions
Keyframes and transitions are related but not identical.
A transition usually focuses on how one clip changes into another.
Keyframes control property values over time and can be used within a clip, on an element, or as part of a manually designed transition.
For example, a preset transition may automatically create a zoom between two shots.
Alternatively, you could use a CapCut keyframe to enlarge and reposition the outgoing clip and design corresponding motion around the incoming shot.
The second approach gives you more control but requires more work.
The decision should come after understanding the cut.
If the cut already works cleanly, it may not need a transition at all.
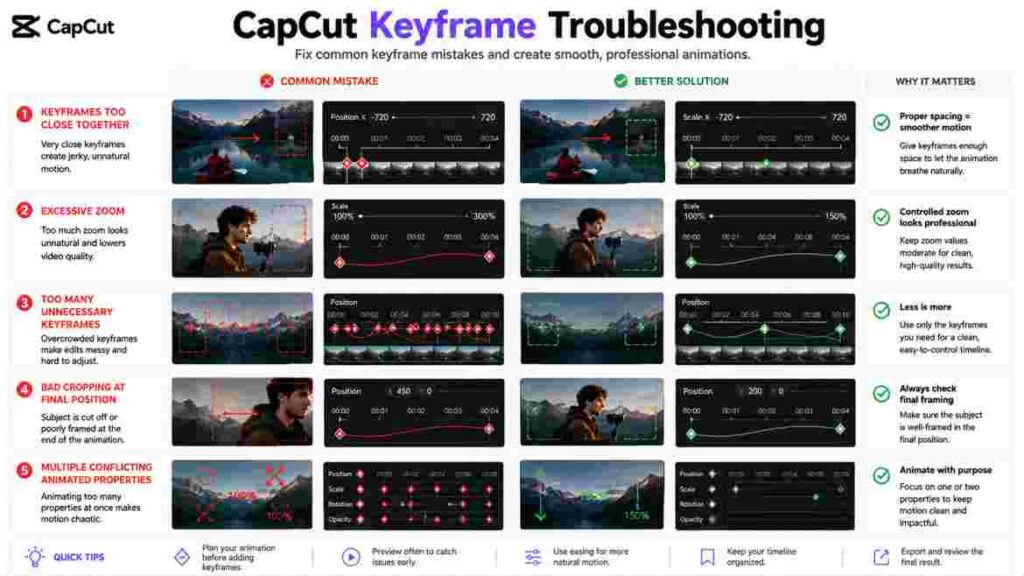
Common CapCut Keyframe Mistakes
Keyframes are easy to add. Good keyframe animation takes more judgment.
Most problems are not caused by the tool itself. They come from timing, composition, excessive movement, or unclear purpose.
Adding Keyframes Without Knowing the Goal
This is probably the biggest mistake.
An editor sees a quiet section of the timeline and thinks, “I should animate something.”
That approach usually produces movement without meaning.
Before adding a CapCut keyframe, finish this sentence:
I want this element to move because…
If you cannot give a useful reason, consider leaving it still.
Placing Keyframes Too Close Together
When keyframes are close together, large transformations happen quickly.
That can create a sudden jump or aggressive movement.
If your animation feels rushed, inspect the timeline spacing before changing everything else.
Move the ending point farther away and preview again.
Making the Change Too Large
Sometimes timing is fine but the transformation itself is excessive.
Going from a normal shot to an extreme digital close-up may feel uncomfortable even over several seconds.
Reduce the difference between the first and second CapCut keyframe values.
Professional-looking movement is often smaller than beginners expect.
Using Too Many Keyframes
More control points do not automatically produce smoother motion.
Imagine an object moving from left to right.
Two keyframes may be enough.
If you add seven unnecessary points along the same route, you create more opportunities for inconsistent speed and accidental direction changes.
Use additional points when the animation actually needs another state.
Ignoring the Final Composition
Editors often concentrate on movement and forget where the animation finishes.
Pause at the final CapCut keyframe.
Look at the frame as if it were a still image.
Is the subject properly positioned?
Is anything cropped awkwardly?
Does the text overlap the face?
Is the product fully visible?
Does the frame still have balance?
The destination matters just as much as the journey.
Animating Too Many Properties at Once
Scale, position, rotation, and opacity can all be useful.
Changing all of them aggressively at the same time can become chaotic.
Start with the property that solves the main problem.
Add another only if it improves the animation.
Making Every Clip Move
If every shot zooms, pans, rotates, and slides, the viewer loses a stable visual reference.
Motion stops feeling important because it is always happening.
Reserve CapCut keyframe animation for moments where movement contributes something.
Stillness is also an editing tool.
Ignoring Motion Direction
Suppose a subject exits toward the right and the next graphic flies in from the left.
That may be intentional, but it may also create visual friction.
Look at how movement continues across cuts.
Matching direction can make sequences feel connected. Reversing direction can create impact or tension.
Neither is inherently wrong.
The mistake is failing to notice.
Why Does My Keyframe Animation Look Choppy?
Choppy motion can come from several different causes, so do not assume the keyframe feature itself is failing.
First inspect the animation design.
Are the points extremely close together?
Is the object travelling a large distance in a tiny amount of time?
Does it repeatedly change direction?
Are there unnecessary intermediate points?
Simplify the CapCut keyframe sequence and test again.
Next, distinguish between animation design and preview performance.
A complex project can sometimes preview less smoothly during editing because the system is handling multiple clips, effects, layers, or other processing. That does not necessarily mean the underlying keyframe positions are wrong.
Review the final output when appropriate before diagnosing a preview-only issue as an animation problem.
Why Is My Keyframe Not Showing in CapCut?
If you cannot find the keyframe control, begin with the selected element.
CapCut’s official help material for desktop specifically identifies clip selection as one reason keyframe controls may not appear. It also notes that some elements, including certain special or grouped assets, may not support keyframes in the expected way.
So check these areas before assuming there is a technical failure:
Confirm that the correct clip or element is selected.
Open the relevant editing controls.
Look beside a property that supports animation.
Check whether the tutorial you are following uses the same platform.
Remember that interface layouts can change with updates.
If a particular CapCut keyframe control still does not appear, consult current CapCut help for your platform rather than relying entirely on an older screenshot.
Why Does the Animation Start Too Early?
Keyframe animation begins according to the positions of your control points.
If movement starts before the moment you intended, look at where the first meaningful change begins on the timeline.
Move the relevant keyframes so the animation aligns with the narration, action, beat, or visual cue.
Do not solve a timing problem by randomly adding more keyframes.
Usually the cleaner solution is to reposition the existing ones.
Why Does My Zoom Move Away From the Subject?
This often happens because scale and position are connected visually.
If the subject is off-center, increasing the scale can make the framing feel as though it is drifting away from the important area.
Use position alongside scale.
At the ending CapCut keyframe, reposition the clip so the subject remains where you want the viewer to look.
This is why zooming is not always just a scale adjustment.
Composition still matters throughout the movement.
Why Does My Animation Suddenly Change Direction?
Inspect the intermediate keyframes.
You may have an extra position point that sends the object somewhere unintended before it reaches the destination.
Move through the sequence one keyframe at a time and check the recorded position at each stage.
If a point has no purpose, remove or correct it.
A simple path is easier to control.
How to Use Multiple Keyframes Without Creating Messy Motion
There are times when two keyframes are not enough.
Suppose a product image needs to enter from the side, pause in the center, then leave upward.
You need multiple states.
The first CapCut keyframe defines the starting position.
The next defines the arrival point.
If you want the object to remain still for a period, the timeline needs to preserve that state before the departure begins.
Later points can then define the upward movement.
The important thing is to think in stages:
enter → settle → hold → exit.
Do not think of the animation as a collection of diamonds.
Think of it as a sequence of intentional states.
How to Make Keyframes Look Professional
Professional motion is rarely about using the largest possible transformation.
It is about control.
Start With the Final Frame
Before designing the movement, decide where the element should end.
This is especially useful for text, product images, screenshots, and overlays.
Once the final composition looks right, work backward to determine where the animation should begin.
This reduces trial and error.
Match Movement to the Content
A high-energy music edit can support fast, punchy motion.
A serious tutorial may need slower and cleaner movement.
A documentary-style sequence often benefits from gentle photo pans.
A product demonstration may use controlled zooms to highlight details.
There is no universally perfect CapCut keyframe speed.
The right speed is the one that fits the visual context.
Use Motion Hierarchy
Not everything should move equally.
If the main subject zooms while text slides and three overlays rotate at the same time, the viewer does not know where to look.
Choose one dominant movement.
Let secondary elements support it.
Leave Room for Stillness
A good animation needs contrast.
If the frame is always moving, movement loses emphasis.
Let important compositions settle.
Allow text to remain readable.
Give the viewer a moment to process the scene before the next transformation begins.
How to Combine Scale and Position for Better Motion
Scale and position are often more useful together than separately.
Consider a shot where the subject is positioned in the lower-left part of the frame.
You want to zoom toward the face.
If you only increase scale, the center of the composition may not move toward the face the way you expect.
Instead, use one CapCut keyframe state to establish the original framing.
At the later state, increase the scale and adjust the position.
Now the animation simultaneously moves closer and reframes the subject.
This creates a more deliberate digital camera movement.
Think Like a Camera Operator
Even though you are manipulating a clip after recording, imagine that you are moving a virtual camera.
Where should it look?
How quickly should it move?
What detail should become more prominent?
Where should it stop?
Thinking in these terms produces better results than simply increasing numerical values.
How to Combine Position and Rotation
Position plus rotation works well for stylized graphics, cards, photographs, stickers, and short-form visual elements.
An image might begin slightly off-screen and tilted.
As it enters, it can move toward the center while rotating into a level orientation.
The effect can feel like a card being placed onto a surface.
But keep the movement readable.
If the object travels a large distance and rotates several times, the audience may focus entirely on the animation.
A controlled CapCut keyframe sequence usually needs less motion than you first imagine.
How to Combine Opacity and Position
This combination is useful for elegant entrances.
Instead of making an element suddenly appear and then move, begin with reduced visibility while it is slightly away from the destination.
As it travels into place, increase opacity.
The result can feel softer than position movement alone.
It works particularly well for labels, callouts, product images, interface screenshots, and supporting graphics.
Again, preview the full scene.
An animation can be smooth by itself but still conflict with other movement happening in the footage.
Keyframes for Talking-Head Videos
Talking-head videos are one of the easiest places to overuse digital zooms.
Creators often add frequent punch-ins to maintain attention.
This can work, but constant zooming quickly becomes predictable.
Instead, use CapCut keyframe motion strategically.
A slow push-in can emphasize an important statement.
A slight reposition can improve framing when an on-screen graphic appears.
A controlled scale change can create visual variation during a longer explanation.
The key is to connect the movement to the communication.
If the speaker is delivering a calm explanation, aggressive repeated zooms may work against the tone.
Keyframes for Product Videos
Product videos benefit from movement because viewers often need to notice specific details.
You can use scale to move closer to a feature.
Position can guide attention across the product.
Overlays can enter beside the item to explain specifications or benefits.
Opacity can reveal supporting labels without abruptly covering the footage.
A CapCut keyframe sequence can also coordinate a product image with text so both elements feel like part of one composition.
Keep the product visible and readable throughout the animation.
The movement should help the viewer inspect the item rather than simply make the video busier.
Keyframes for Tutorials and Screen Recordings
Tutorials have a different priority: clarity.
If you are showing a small interface control, a zoom can help the viewer see it.
If you are moving from one area of the screen to another, a pan can guide attention.
If a pointer or arrow is needed, position keyframes can move it toward the relevant control.
But avoid unnecessary motion.
A tutorial viewer is usually trying to complete a task.
Every CapCut keyframe should make that task easier to understand.
If an animation looks impressive but makes the interface harder to follow, remove it.
Keyframes for Short-Form Social Videos
Short-form editing often uses faster visual pacing.
Keyframes can create punch-ins, image movement, rhythmic scale changes, animated overlays, and custom transitions.
The challenge is maintaining consistency.
If one clip uses a fast zoom, the next uses an unrelated spin, the third slides diagonally, and the fourth shakes, the video may feel like a collection of techniques rather than one visual style.
Develop a motion language.
For example, use scale changes for emphasis and horizontal movement for transitions.
A consistent CapCut keyframe style makes even energetic editing feel more intentional.
Keyframes for Photos and Slideshows
Photos need enough screen time to be understood, but long static holds can sometimes feel visually flat.
Keyframes solve that problem without requiring elaborate effects.
A slow push-in creates intimacy.
A slow pull-out reveals context.
A horizontal pan explores a wide image.
A diagonal movement can work when the composition naturally supports it.
Do not animate every photo in exactly the same way.
Use the CapCut keyframe direction to respond to the photograph itself.
If a person is looking toward the right, for example, consider how movement interacts with that visual direction.
Keyframes for Text and Titles
Titles can use motion to establish hierarchy.
A main heading might enter first.
A smaller supporting line can appear afterward.
A label can move toward an object.
But remember that text exists to be read.
Animation should introduce hierarchy, not compete with the words.
A subtle CapCut keyframe entrance followed by a stable hold is often more effective than continuous text movement.
How Many Keyframes Should You Use?
There is no ideal number that applies to every animation.
The better question is:
How many distinct states does this movement require?
For a basic zoom, two may be enough.
For a movement that changes direction, you need another state.
For an object that enters, pauses, and leaves, more points may be necessary.
Use the minimum number that gives you the control you need.
This keeps your CapCut keyframe timeline easier to understand and reduces accidental motion changes.
Should Every Clip Have Keyframes?
No.
A clip should have keyframes when a changing property improves the scene.
Some of the strongest shots in a video may remain completely static.
Good editing is not measured by how many tools are active.
It is measured by how effectively the final sequence communicates.
If the framing already works and nothing needs to move, leave it alone.
Can You Use Keyframes for a Zoom In and Zoom Out?
Yes.
You can define one state at the normal scale, another at a larger scale, and a later state that returns toward the original framing.
The important question is whether the zoom-out has a reason.
A quick zoom in followed immediately by a zoom out can look like a pulse.
That may be useful for a beat or stylized emphasis.
For a professional talking-head edit, it may be better to zoom in and remain there until a natural cut.
Your CapCut keyframe design should follow the pacing of the content.
Can Keyframes Follow a Moving Subject?
Manual position and scale changes can be used to keep framing aligned with a moving subject, but that should not automatically be confused with dedicated motion-tracking functionality.
With manual keyframing, you decide where the element or framing should be at selected moments.
If the subject moves unpredictably, you may need several adjustments.
For simple movement, this can work well.
For complex tracking, use the most appropriate tracking or motion tools available in your current editor rather than creating dozens of unnecessary manual points.
How to Edit Keyframes More Efficiently
Efficiency becomes important once your projects grow.
First, finish major structural edits before fine-tuning complicated animations.
If you spend ten minutes perfecting movement on a section and later remove half of that clip, much of the work is wasted.
Second, build the simplest version first.
Create the start and end.
Preview.
Only then decide whether the CapCut keyframe sequence needs additional control.
Third, evaluate animations in context.
A movement that looks perfect in isolation may feel too slow once music, captions, effects, transitions, and surrounding clips are present.
Keyframes and Effects: How They Work Together
Effects can change the visual character of footage, while keyframes can provide time-based control over supported properties.
The important principle is restraint.
If a clip already has a strong visual effect, aggressive movement may overload the scene.
If the effect is subtle, controlled keyframing may help direct attention.
Think in layers of importance.
The viewer should first understand the content, then experience the style.
Your CapCut keyframe choices should support that hierarchy.
“If you are still learning how visual effects work independently of animation, our guide to CapCut effects explains how to apply and control them without overwhelming your footage.”
Keyframes and Filters
Filters primarily influence the visual treatment of footage rather than replacing motion design.
A carefully chosen filter can establish mood, while keyframes can control movement.
The two can coexist, but neither should be used to compensate for weak editing decisions.
If a scene already has heavy color treatment, fast zooms and rotations may make it feel even more processed.
Keep the visual system coherent.
Keyframes and Image Overlays
Image overlays are one of the most practical places to use keyframes.
An overlay can enter, scale, move, rotate, or fade depending on the controls available for that element.
The biggest mistake is designing the animation without considering where the overlay ends.
Establish the final layout first.
Then use CapCut keyframe motion to bring the overlay into that layout.
This produces cleaner compositions and makes the animation easier to control.
Keyframes become especially useful when working with graphics and pictures. If you are new to layering visuals, first learn how to add image overlays in CapCut, then use keyframes to animate their position, scale, or visibility.
Keyframes and Transitions
Transitions connect clips. Keyframes can help create custom movement around those cuts.
If you already use transitions in your project, avoid making every cut a competition between preset effects and manual motion.
Sometimes a clean cut is enough.
Sometimes a subtle keyframed zoom creates the connection.
Sometimes a dedicated transition works better.
Choose after looking at the two clips together.
If your goal is to create smoother movement between separate clips rather than animate one element, our CapCut transitions guide explains when a transition works better than manual keyframe motion.
A Better Workflow for CapCut Keyframe Editing
Instead of adding keyframes randomly as you edit, use a repeatable process.
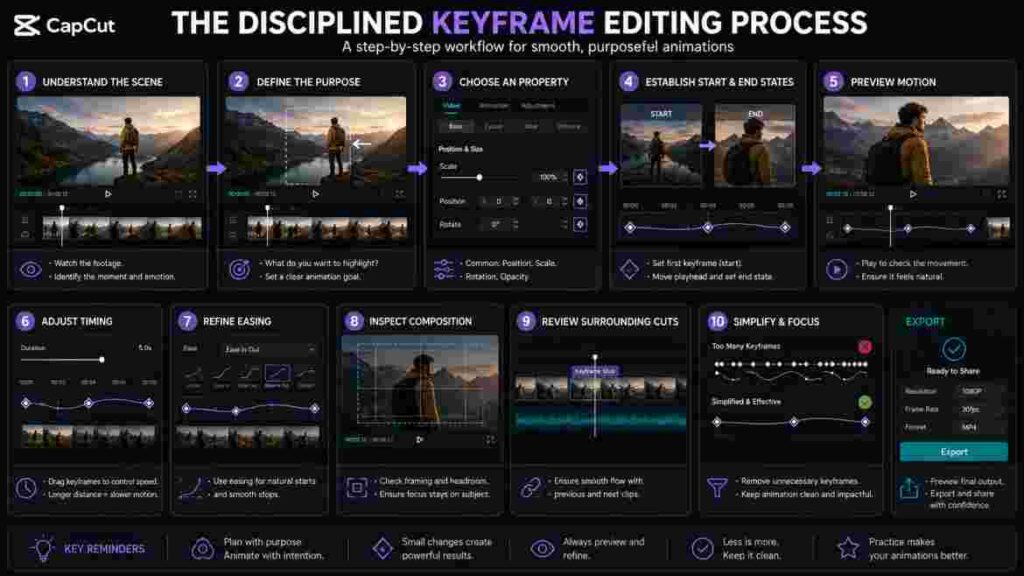
First, Understand the Scene
Watch the clip without adding anything.
Identify the subject, important moment, available negative space, and direction of existing movement.
Second, Define the Purpose
Decide what the animation should accomplish.
Should it emphasize?
Reveal?
Reframe?
Introduce?
Remove?
Guide attention?
If you cannot define the purpose, reconsider the animation.
Third, Choose One Main Property
Start with scale for a zoom, position for movement, rotation for angular change, or opacity for visibility.
Do not animate everything at once.
Fourth, Establish Start and End
Create the starting state and destination.
This basic CapCut keyframe pair tells you whether the idea works.
Fifth, Preview Before Adding Complexity
Watch it at normal speed.
If two keyframes solve the problem, stop.
Sixth, Refine Timing
Change the spacing based on how fast the movement should feel.
Seventh, Refine the Motion
Where supported and appropriate, adjust easing or related motion controls to make acceleration and deceleration fit the scene.
Eighth, Check the Composition
Inspect both the starting and ending frames.
Ninth, Watch the Surrounding Cuts
The animation should work with the clips before and after it.
Tenth, Simplify
Remove anything that draws attention away from the message.
This final step is often what makes the difference between an edited-looking video and a polished one.
How to Know When Your Keyframe Animation Is Finished
It is easy to keep tweaking movement because there is always another small adjustment you could make.
Instead, use practical criteria.
The animation should begin at an intentional moment.
It should direct attention where you want it.
The speed should match the scene.
The destination should be well composed.
The movement should not make text harder to read.
It should not conflict with another important animation.
And most importantly, the CapCut keyframe should not make the viewer think about the editing unless the editing itself is intentionally part of the style.
When all of those conditions are satisfied, more adjustment may not make the video better.
A Simple Professional Rule for Keyframes
There is one principle worth remembering after all the technical details:
Choose the movement after understanding the moment—not before.
Do not begin with, “I want to use a zoom.”
Begin with, “The viewer needs to notice this expression.”
Then decide whether a zoom is the best solution.
Do not begin with, “I want an image to fly onto the screen.”
Begin with, “This product image needs to appear beside the presenter without covering anything important.”
Then design the movement.
This mindset transforms CapCut keyframe editing from decoration into communication.
Final Quality-Control Checklist Before Exporting
Before exporting a keyframe-heavy project, watch the complete video without stopping.
Do not focus only on individual animations.
Look at the rhythm of the whole edit.
Check whether too many consecutive clips move in similar ways. Look for sudden changes in direction. Watch for overlays that briefly cross faces or captions. Check the beginning and ending frame of every important zoom. Make sure digital enlargement has not reduced the apparent image quality too much.
Listen to the audio at the same time.
Motion should align naturally with narration, music, reactions, and cuts where that relationship matters.
Then watch the most complicated CapCut keyframe sections again.
If you notice the technique before you notice the content, ask whether the animation needs to be simplified.
Finally, export using settings appropriate for your intended destination and inspect the resulting video rather than relying only on the editing preview.
Is CapCut Keyframe Editing Worth Learning?
Absolutely, if you want more control over movement.
Preset animations can help you work quickly, but they cannot anticipate every composition, subject position, narration cue, or visual idea.
Keyframes give you a way to respond to the footage in front of you.
More importantly, learning keyframes teaches concepts that extend beyond one editing application: timing, interpolation, movement, composition, acceleration, visual hierarchy, and purposeful animation.
Once you understand why an object moves from one state to another, the diamond icon stops feeling like an advanced feature.
It becomes a simple instruction point.
That is the real advantage of mastering CapCut keyframe editing.
Final Thoughts
The most useful thing to understand about CapCut keyframe animation is that the tool itself is simple. The creative decisions around it are where the real skill develops.
A keyframe defines a state at a particular moment. Another keyframe defines a different state later. The change between those states creates the motion.
From that simple idea, you can create slow zooms, photo pans, animated text, moving overlays, fades, rotations, custom transitions, product highlights, tutorial callouts, and much more.
But professional editing is not about making everything move.
Start by asking what the viewer needs to notice. Decide where the movement should begin and where it should end. Control the distance and timing. Refine the acceleration when appropriate. Check the final composition. Then remove anything that does not improve the scene.
If your CapCut keyframe animation helps viewers understand, notice, or feel something more clearly, it is doing its job.
If it only proves that you know how to animate, it probably needs another edit.
The best keyframe animation often feels almost invisible. The viewer follows the movement naturally without stopping to wonder how it was created.
And that is the point.