A transition lasts only a moment, but that moment can completely change how a video feels.
Place the right transition between two clips and the edit can feel smooth, intentional, energetic, cinematic, or almost invisible. Choose the wrong one and even good footage can suddenly look distracting or overedited.
That is why CapCut transitions are more than decorative effects placed between clips. They help control how viewers move from one shot to another. Whether you are editing a TikTok, Instagram Reel, YouTube Short, vlog, product video, travel montage, tutorial, or longer story, transitions can influence pacing and continuity.
The difficult part isn’t simply finding the transition button. It is knowing which transition to use, where to use it, how long it should last, and when a normal cut would actually work better.
CapCut makes experimenting relatively easy because you can preview different transition styles and adjust their timing without rebuilding your entire edit. However, having many choices creates another problem: it becomes tempting to use too many.
This guide takes a practical approach to CapCut transitions. You will learn how transitions work, how to add them on different CapCut platforms, how to choose styles for different videos, how to make them feel smoother, how to synchronize transitions with music, what mistakes to avoid, and what to check when a transition does not appear or work as expected.
The goal isn’t to make every cut noticeable.
It is to make every cut feel right.
What Are CapCut Transitions?
CapCut transitions are editing tools used to control the visual change from one clip to another. Instead of the first shot ending instantly and the second beginning immediately, a transition creates a short visual connection between them.
Imagine you have two clips from a travel video.
The first shows you walking toward a beach. The second shows the ocean from the shoreline. With a standard cut, the beach clip simply replaces the walking clip. Add a transition and the first image might fade, blur, slide, zoom, distort, or move into the second one.
Neither approach is automatically better.
The purpose of a transition is not to prove that editing has taken place. It should help the viewer move between shots in a way that fits the story, movement, music, or overall visual style.
How Transitions Connect Two Clips
Most conventional transitions work at the point where two clips meet on the timeline.
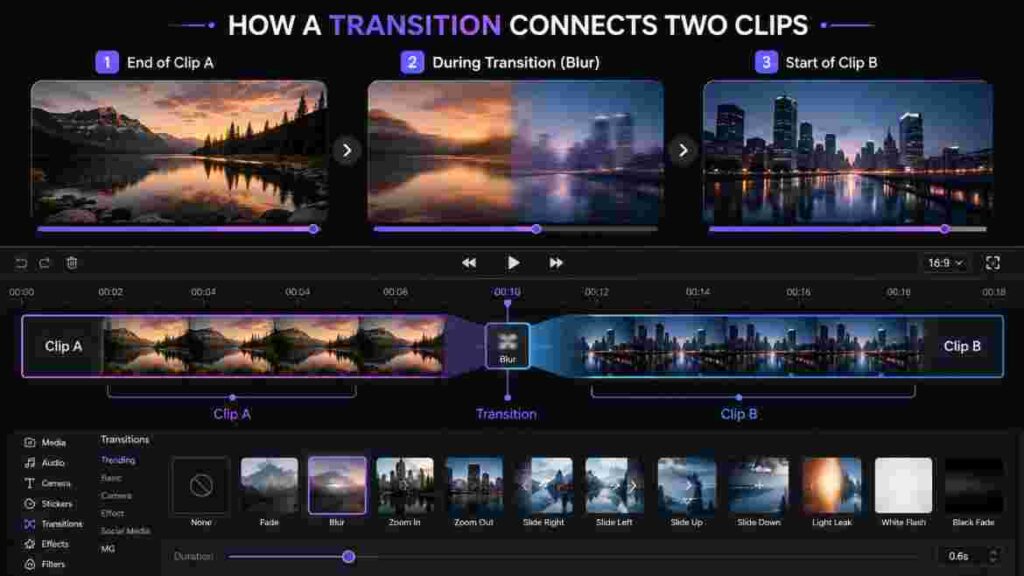
Think of the timeline like this:
Clip A → Transition → Clip B
The transition uses the end of Clip A and the beginning of Clip B to create the visual change.
This distinction matters because users sometimes try to apply CapCut transitions to a single isolated clip and then wonder why the normal transition control is unavailable. If there is no second adjacent clip, there may be nothing for a standard between-clip transition to connect.
Before choosing any style, therefore, arrange and trim your clips first.
Transitions Are Not Required Between Every Clip
One of the biggest misconceptions in beginner editing is that every two clips need a transition.
They don’t.
A simple cut is itself an editing choice, and often the strongest one.
For example, imagine a fast talking-head video:
“Here are three ways to improve your videos.”
The editor cuts from the speaker to a close-up after the word “three.”
Adding a large spinning transition there may interrupt the sentence and distract viewers. A direct cut could maintain energy much better.
Now imagine a travel montage moving from a wide mountain landscape to another sweeping landscape. A subtle fade, blur, or movement-based transition might complement the change.
The question isn’t:
“Where can I add a transition?”
Ask:
“Does this scene change need a transition?”
That small change in thinking leads to much more professional editing.
Why Good Video Transitions Matter
Transitions influence more than appearance. They can affect pacing, continuity, emotional tone, and even how easily viewers understand the relationship between scenes.
Used intentionally, CapCut transitions can solve several editing problems.
They Can Smooth Abrupt Scene Changes
Sometimes two clips belong together but feel visually disconnected.
Perhaps Clip A ends with a fast camera movement while Clip B begins with another moving shot. A carefully selected motion transition can help connect that energy.
Likewise, a gentle fade may make a slower scene change feel less abrupt.
They Can Help Establish Pacing
Short, energetic transitions can support fast content. Slower transitions can contribute to a calmer mood.
That does not mean every fast video needs flashy transitions or every cinematic video needs long fades. It simply means transition timing becomes another part of your pacing.
They Can Signal a Change
A transition can tell viewers that something has changed:
- location
- time
- subject
- mood
- chapter
- perspective
- sequence
This is particularly useful in storytelling, tutorials, travel videos, and before-and-after edits.
They Can Support Music
Music-driven edits often feel better when important visual changes correspond with beats, drops, or changes in musical phrasing.
In these situations, CapCut transitions can reinforce rhythm rather than appearing randomly.
They Can Create a Consistent Editing Style
Repeated use of a small transition vocabulary can contribute to visual identity.
A clean educational creator might rely mostly on cuts, subtle fades, and restrained movement.
A gaming editor might intentionally use faster zooms or digital distortion.
A luxury product video may favor controlled, subtle changes.
Consistency matters more than using as many transition types as possible.
How to Add Transitions in CapCut
The basic process is straightforward: arrange at least two clips, locate the point where they meet, choose a transition, adjust its duration, and preview the result.
However, the exact interface can vary between CapCut mobile, desktop, and web, and CapCut may change menu placement or available transition libraries through updates.
So rather than memorizing a button location forever, understand the workflow behind it.
How to Add CapCut Transitions on Mobile
Mobile is where many creators first encounter CapCut transitions, especially when editing TikTok videos, Reels, Shorts, and casual social content.
Step 1: Start or Open a Project
Open CapCut and create a new project or continue editing an existing one.
Import the clips you want to use and place them in the desired order on your timeline.
Before worrying about transitions, do a rough edit.
Remove unwanted beginnings and endings, cut pauses, and decide where each shot should change.
This prevents you from designing transitions around footage you may later remove.
Step 2: Place Two Clips Next to Each Other
Look at the timeline and make sure the two clips you want to connect are adjacent.
If a gap exists between them, close it.
The transition belongs at their meeting point.
Step 3: Select the Transition Point
Between neighboring clips, CapCut typically provides a small transition control or icon. Tap the control at the cut.
This opens the available transition options.
Depending on your app version, device, region, or current CapCut interface, the exact categories and transition names you see can differ.
Step 4: Explore Transition Styles
Preview several options rather than selecting the first dramatic transition that catches your attention.
Ask yourself:
- Does it match the direction of movement?
- Does it fit the video’s pace?
- Does it complement the music?
- Does it distract from the subject?
- Is the transition appropriate for the audience?
- Would a normal cut look cleaner?
Those questions matter more than whether the transition looks impressive in isolation.
Step 5: Adjust the Duration
After choosing a transition, adjust how long it lasts if the available controls allow it.
Transition duration can dramatically change the result.
A movement transition that feels energetic at a short duration might feel sluggish when extended. A subtle transition that feels elegant at a moderate duration could become almost invisible when made extremely short.
There is no universal perfect duration for CapCut transitions.
Judge the timing in context.
Step 6: Preview the Complete Sequence
Don’t preview only the half-second around the transition.
Play several seconds before and after it.
This reveals whether the transition works with:
- dialogue
- music
- subject movement
- camera direction
- captions
- other effects
- the following edit
A transition can look good by itself but feel wrong when viewed as part of the complete video.
Step 7: Refine or Remove It
If the transition feels distracting, shorten it, choose something simpler, or remove it.
Removing an unnecessary transition is not a failure.
It is editing.
How to Add CapCut Transitions on Desktop
The desktop version provides more screen space, which can make detailed timeline work easier.
The overall logic remains the same.
1. Import Your Footage
Bring your videos into the project and place them on the timeline.
Organize the clips in sequence.
2. Complete the Rough Cut
Trim each shot before spending significant time on transitions.
If the actual cut is badly timed, even an impressive transition usually won’t rescue it.
3. Open the Transition Library
Locate the transitions section in your current desktop interface.
Browse the available options and preview styles that fit your edit.
4. Apply the Transition at the Cut
Place or apply your chosen transition where the two clips meet.
Make sure you are working on the intended cut. In a large project with many clips, it is surprisingly easy to modify the wrong point in the timeline.
5. Adjust Timing
Fine-tune the duration according to the pace and movement of the surrounding shots.
Desktop editing makes it easier to inspect the timeline closely, so use that extra space to judge timing precisely.
6. Watch the Result at Normal Speed
Repeatedly scrubbing frame by frame can make editors lose perspective.
After making adjustments, play the sequence normally.
Your audience will watch the finished video in motion, not as a collection of individual timeline frames.
How to Use CapCut Transitions on the Web Version
If you use CapCut through a browser, the general workflow remains familiar:
- Upload or import your footage.
- Arrange your clips.
- Trim them to create the desired cut.
- Locate the transition tools available in the web editor.
- Choose an appropriate style.
- Apply it between compatible clips.
- Adjust available settings.
- Preview the sequence.
- Continue refining your edit.
The important point is that CapCut transitions may not look identical across mobile, desktop, and web interfaces.
A tutorial recorded on one platform may therefore show controls or transition options that don’t exactly match yours.
If that happens, don’t immediately assume you are doing something wrong. Check whether the tutorial is using the same platform and a reasonably current CapCut version.
Types of CapCut Transitions and When to Use Them
Choosing transitions becomes easier when you stop thinking only about individual names and start thinking about transition families and visual behavior.
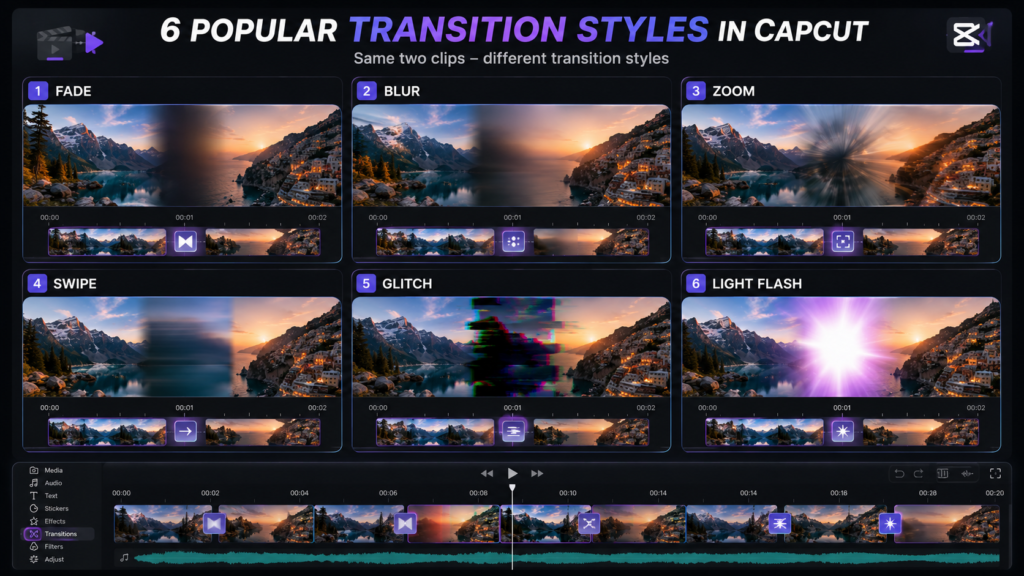
Names and libraries can change. The visual principles behind them are much more stable.
Here are some of the most useful categories to understand.
1. Fade and Dissolve-Style Transitions
Fade-style changes are among the simplest options.
Instead of dramatically moving the frame, they create a softer visual progression between scenes.
These transitions work particularly well when you want:
- a gentle mood
- a sense of time passing
- a softer scene change
- an emotional transition
- a restrained visual style
Imagine a wedding video moving from an outdoor establishing shot to a quiet indoor moment.
A dramatic glitch would probably clash with the mood.
A subtle fade may feel far more appropriate.
That illustrates an important rule for CapCut transitions:
The transition should serve the footage, not compete with it.
2. Blur Transitions
Blur can hide some of the visual harshness between two shots while maintaining a sense of motion.
It can work well when both clips already contain movement.
For example, if Clip A ends while the camera moves quickly to the right and Clip B begins with similar movement, a brief blur-based transition may make the connection feel more natural.
But blur isn’t automatically smooth.
If the first shot is completely static and the next clip suddenly explodes into fast movement, adding blur may simply disguise the mismatch rather than solve it.
3. Zoom Transitions
Zoom transitions create the feeling of moving rapidly toward or away from the image.
They are popular in energetic edits because they can create momentum.
Possible use cases include:
- travel montages
- fitness edits
- fashion videos
- event highlights
- short-form social videos
- music-driven edits
The danger is repetition.
If every clip zooms into the next, viewers quickly become aware of the technique instead of the content.
Use zoom-style CapCut transitions where the visual energy supports them.
4. Swipe and Slide Transitions
Swipe or slide transitions move the frame in a direction, making them useful for edits with strong directional movement.
Suppose a person walks out of frame to the right.
The next shot also begins with rightward movement.
A transition following that same direction may preserve momentum.
Now reverse the second shot so everything suddenly moves left. The transition could feel less natural because the visual direction changes.
This is why good transition editing involves looking at movement inside the footage, not merely choosing an effect from a menu.
5. Camera and Movement-Based Transitions
Movement transitions can imitate pans, shakes, spins, pushes, pulls, or other camera behavior.
These can be effective when they connect to actual movement in your footage.
For example:
Clip A: Camera pans rapidly upward.
Transition: Continues the upward motion.
Clip B: Begins with an upward-moving shot.
The three elements can feel like one continuous movement.
Compare that with placing the same transition between two stationary talking-head clips. It might feel unnecessary.
The effect itself hasn’t changed.
The context has.
6. Glitch and Digital Transitions
Glitch-style transitions deliberately introduce distortion, digital artifacts, displacement, or electronic-looking changes.
They can suit:
- gaming
- technology content
- energetic music edits
- cyber-inspired visuals
- certain fashion edits
- stylized social content
They are less suitable when viewers need visual calm or when the subject requires a polished, conservative presentation.
Using glitch effects in a soft family memory video simply because they look exciting in the transition library would likely create a tonal mismatch.
7. Light and Flash Transitions
Flash and light-based transitions use brightness or light movement to connect shots.
These can work with footage containing:
- camera flashes
- bright skies
- stage lights
- sunlight
- rapid movement
- high-energy beats
The transition becomes more convincing when there is a visual reason for the brightness.
That principle applies to many CapCut transitions: whenever possible, motivate the transition using something already happening in the scene.
8. Overlay-Style Transitions
Some transitions visually overlap, layer, or blend elements from adjacent shots.
These can create a more stylized result than a standard cut.
They work best when the compositions of the two clips complement one another.
Pay attention to subject placement. If the subject occupies opposite sides of consecutive frames, the transition may feel more chaotic than expected.
9. Beat-Oriented Transitions
A beat transition isn’t necessarily one specific effect.
It is a way of timing visual changes to music.
The transition might be:
- a zoom
- blur
- flash
- movement
- shake
- simple cut
What matters is when it happens.
A simple cut placed perfectly on an important beat can feel more powerful than an elaborate transition that arrives slightly late.
How to Choose the Best CapCut Transitions
There is no transition that is universally best.
The best choice depends on what happens before the cut, what happens after it, and what you want the viewer to feel.
Instead of searching endlessly for the “best” CapCut transitions, evaluate five factors.
1. Movement
Look at the direction and speed of movement in both clips.
If the camera moves right in one clip and the next continues that direction, a directional transition may strengthen continuity.
If both clips are stationary, something subtle may work better.
2. Pace
Fast edits can generally support faster visual changes.
Slow storytelling usually benefits from more restraint.
A high-energy 15-second montage and a calm five-minute tutorial should not automatically use the same transition strategy.
3. Music
Listen before choosing.
If the music contains strong beats or changes, they can provide natural points for cuts and transitions.
If the soundtrack is soft and continuous, aggressive transitions may feel disconnected from the audio.
4. Content Type
The expectations of the audience matter.
A gaming montage can tolerate visual aggression that might feel inappropriate in a professional business presentation.
Likewise, a cinematic travel video can use techniques that would unnecessarily slow down a fast tutorial.
5. Story
Most importantly, ask why the scene is changing.
If you’re changing locations, showing time passing, introducing a new idea, revealing a product, or increasing energy, the transition can reinforce that purpose.
If nothing meaningful changes, a normal cut may be enough.
Best CapCut Transitions for TikTok, Reels, and YouTube Shorts
Short-form content moves quickly, but “quick” does not automatically mean “use as many transitions as possible.”
The first priority is keeping the viewer oriented.
For TikTok, Instagram Reels, and YouTube Shorts, CapCut transitions generally work best when they support the video’s existing rhythm.
Fast Talking-Head Videos
For talking-head content, use transitions sparingly.
Jump cuts are often enough because the viewer’s attention should remain on the speaker, captions, and information.
Consider a transition when:
- moving into B-roll
- changing location
- introducing a new section
- showing an example
- revealing a result
If every sentence has a zoom or spin, the editing can compete with the message.
Short Montages
Montages provide more room for creative transitions.
Match movement and cut on meaningful beats.
For example:
Clip 1: Shoe steps toward camera
Clip 2: Door opens
Clip 3: Exterior location
Clip 4: Main activity begins
Rather than selecting four unrelated transitions, build continuity.
The foot moving toward the lens might naturally create an occlusion. The door movement could motivate the next scene. A simple cut might handle another change.
Professional-looking editing often combines transitions with ordinary cuts rather than treating them as alternatives.
Before-and-After Videos
Before-and-after content benefits from transitions that make the transformation easy to understand.
The transition should enhance the reveal, not make viewers wonder what they just saw.
A clean movement, flash, cover, or direct cut timed with an action can work well.
Product Videos
Product content requires clarity.
If you are showing details, viewers need enough time to understand the object.
Use CapCut transitions to connect angles without sacrificing visibility.
For example, you might move from:
wide product shot → detail → use case → result.
A consistent visual language will usually look more premium than using a completely different transition for every angle.
Best CapCut Transitions for Vlogs
Vlogs combine storytelling, talking, movement, B-roll, and location changes. That makes them an ideal environment for several transition techniques—but also an easy place to overedit.
Use Simple Cuts During Conversation
When someone is speaking, the message should normally lead.
Jump cuts, cutaways, and B-roll can maintain pace without requiring an obvious transition every time.
Use Movement for Location Changes
Walking, turning the camera, opening doors, passing objects, vehicles, and environmental movement can all create natural opportunities.
Suppose you finish one clip by moving the camera behind a wall.
Start the next clip with a similar obstruction moving away.
The scene change can feel motivated even before you add a digital transition.
Use Fades for Time or Mood Changes
Moving from an energetic daytime sequence into a calm evening scene may justify a softer transition.
The transition now communicates something.
That is more valuable than using CapCut transitions simply because the feature is available.
Best CapCut Transitions for Travel Videos
Travel footage often contains movement naturally:
- walking
- driving
- trains
- planes
- panning landscapes
- waves
- doors
- crowds
- buildings passing the camera
Use those elements.
Match Camera Direction
If one landscape shot pans left, consider beginning the next with similar motion.
Use Foreground Objects
A person, tree, wall, vehicle, bag, hand, or other object can briefly cover the camera.
That gives you a natural hiding point for the cut.
Match Similar Shapes
A circular object in one location can transition to another circular object elsewhere.
A bright sky can connect with another bright frame.
A doorway can lead into another doorway.
These techniques can make CapCut transitions feel integrated into the footage instead of pasted on afterward.
Don’t Transition Every Scenic Shot
Beautiful footage needs room to breathe.
Sometimes a simple cut from one landscape to another lets viewers appreciate both images better than a complex animation between them.
Best CapCut Transitions for Cinematic Videos
“Cinematic” is often misunderstood as “more effects.”
In practice, cinematic editing usually depends much more on composition, movement, pacing, sound, lighting, color, and storytelling.
Transitions are only one piece.
For a cinematic approach:
- favor motivated transitions
- maintain directional continuity
- consider sound before visuals
- use fades deliberately
- match movement
- avoid unnecessary effects
- allow strong compositions to remain visible
A subtle edit that viewers barely notice can be more cinematic than a technically complicated transition.
This is one reason learning restraint is essential when working with CapCut transitions.
Best CapCut Transitions for Product and Promotional Videos
Promotional content has a different priority: communicate value clearly while maintaining visual energy.
Transitions can help move between:
- product angles
- features
- demonstrations
- close-ups
- lifestyle footage
- text sections
- before-and-after comparisons
But clarity comes first.
Imagine advertising a watch.
If every transition contains aggressive blur, shake, and distortion, viewers may struggle to see the details that make the product desirable.
Instead, use motion already present in the footage.
A hand moving across the frame can hide a cut. A rotating product can lead into another angle. A camera push can connect with a close-up.
The viewer should remember the product—not just the edit.
How to Make CapCut Transitions Look Smooth
Installing or selecting a transition doesn’t automatically make it smooth.
Smoothness comes from the relationship between the clips.
This is where many editors can dramatically improve their results.
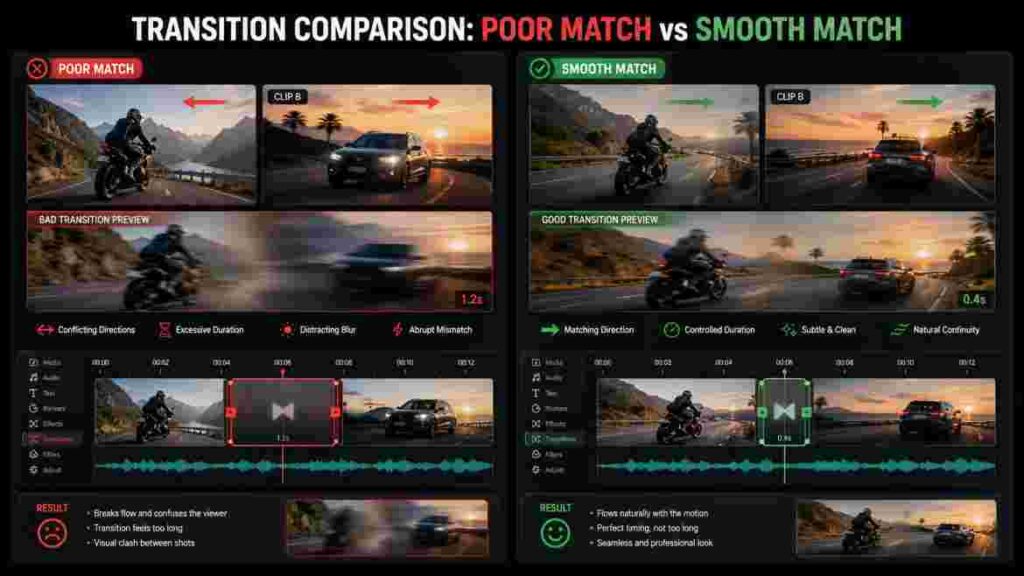
1. Fix the Cut Before Adding the Transition
Start with the underlying edit.
Ask:
Does this cut make sense without an effect?
If the answer is no, adding a transition may only disguise the problem temporarily.
Trim the clips until the change happens at a logical moment.
Then test your transition.
2. Match Movement Across Clips
Movement matching is one of the most reliable ways to improve CapCut transitions.
If Clip A ends with fast movement to the left, Clip B should ideally begin with compatible energy and direction when using a directional transition.
A transition cannot fully compensate for completely contradictory movement.
3. Cut During Motion
Viewers are less likely to focus on a cut while significant movement is happening.
Imagine someone quickly turns their head.
Cutting during that movement can feel smoother than waiting until the person becomes perfectly still.
Likewise, camera movement can provide a natural editing point.
4. Use Similar Composition
Look at where the viewer’s eye is focused.
If the subject is centered in Clip A but suddenly appears at the extreme edge of Clip B, viewers must relocate their attention.
Sometimes that’s intentional.
Often it isn’t.
Matching subject position can make the transition easier to follow.
5. Control Transition Duration
A transition can be too fast or too slow.
Rather than choosing duration according to a fixed formula, consider:
- clip length
- movement speed
- music tempo
- emotional tone
- transition complexity
Fast footage often supports shorter transitions. Slower sequences may tolerate longer ones.
But always preview.
6. Use Fewer Transition Styles
Consistency is a shortcut to cleaner editing.
Choose a limited family of CapCut transitions that suits the video.
For example:
Main edits: standard cuts
Location changes: subtle blur
Major sections: fade
High-energy moments: controlled zoom
That system creates visual logic.
Compare it with:
zoom → glitch → spin → flash → wipe → shake → blur.
The second approach may demonstrate more features, but it doesn’t necessarily produce a better video.
7. Let the Footage Motivate the Effect
If the camera whips sideways, use that movement.
If a hand covers the lens, cut there.
If a bright light fills the screen, a flash-like transition may feel natural.
If an object passes in front of the camera, use the obstruction.
When the footage provides a reason for the transition, viewers are more likely to accept it naturally.
8. Preview on the Intended Screen
A transition that looks impressive on a large desktop monitor may feel overly aggressive on a small phone.
If you’re making vertical social content, preview it at a realistic viewing size.
Check:
- subject visibility
- captions
- motion
- brightness
- transition speed
- text readability
Editing decisions should reflect where people will actually watch.
How to Sync CapCut Transitions With Music
Music synchronization can make a simple edit feel intentionally constructed.
But beat syncing is not the same as adding a transition on every beat.
Start by Listening
Before placing transitions, listen to the track without editing.
Identify:
- strong beats
- drops
- pauses
- changes in instrumentation
- vocal entrances
- chorus changes
- emotional peaks
These are potential editing points.
Mark Important Moments
If your workflow provides beat markers or you manually identify key points, use them to plan scene changes.
Not every marker needs a cut.
Choose the ones that support the visual story.
Cut First, Transition Second
This is crucial.
Get the clips changing at the right musical moments first.
Then decide whether particular cuts need CapCut transitions.
A perfectly timed direct cut often feels more rhythmic than an elaborate effect.
Consider Transition Length
If a transition takes too long, its visual peak may not align with the musical moment you intended.
Preview the beginning, middle, and end of the transition relative to the beat.
Sometimes moving the cut slightly produces a better result than changing the effect itself.
Match Transition Energy to Musical Energy
Soft piano doesn’t usually call for constant shakes and glitches.
A high-energy electronic drop may support stronger movement.
Let the soundtrack inform the visual language.
CapCut Transitions vs. Effects: What’s the Difference?
Transitions and effects are related editing tools, but they solve different problems.
A transition primarily manages how one clip changes into another.
An effect primarily changes how footage looks or behaves, potentially across part or all of a clip.
For example:
You have two shots.
A blur that visually connects the end of Shot A with the beginning of Shot B functions as a transition.
A glow, distortion, shake, or stylized visual treatment applied over footage may function as an effect.
Understanding the distinction prevents you from using CapCut transitions to solve problems that would be better handled with effects, animation, keyframes, overlays, or simply a cleaner cut.
If you want to explore the other side of that editing workflow, our guide to CapCut effects explains how visual effects can be used and controlled without overwhelming the footage.
The two tools can also work together.
You might apply a consistent visual effect to a sequence while using subtle transitions between selected scenes.
The important word is selected.
Stacking a dramatic effect and an equally dramatic transition at every cut can quickly make the video visually exhausting.
Creative Ways to Use CapCut Transitions
Once you understand the fundamentals, you can use transitions more creatively without depending entirely on preset styles.
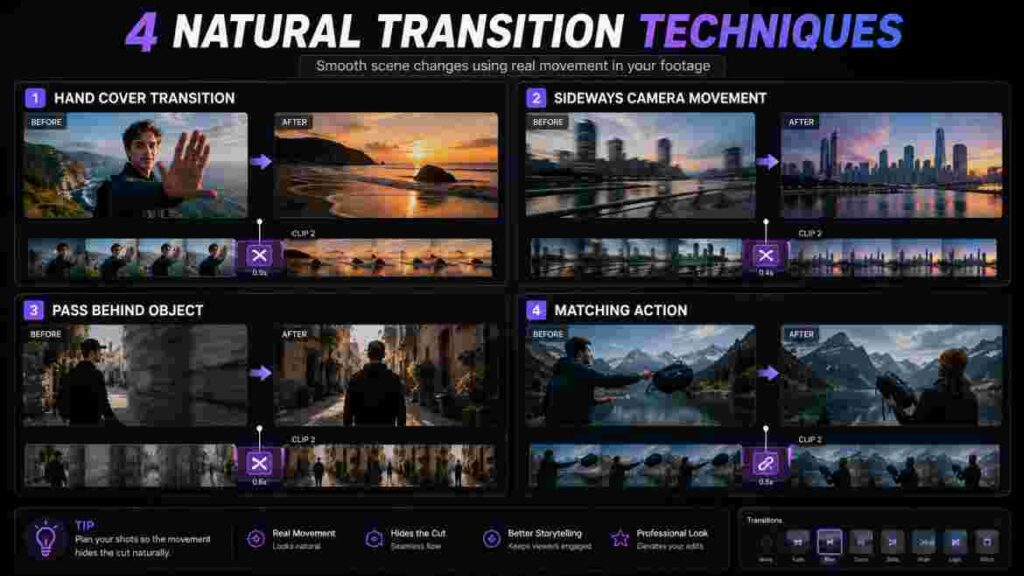
Transition Through an Object
Have an object cover the frame at the end of one clip and reveal the next scene.
Possible objects include:
- a hand
- wall
- bag
- door
- tree
- vehicle
- piece of clothing
- another person
The object creates a natural moment where the scene can change.
Use Camera Movement
End one shot with rapid movement.
Begin the next with compatible movement.
A digital transition can reinforce the connection, but good footage may already do much of the work.
Match Actions
A person sits down in one location and completes the movement somewhere else.
Someone reaches toward the camera and continues the action in another scene.
A door closes in one shot and another opens in the next.
Action matching can make CapCut transitions feel much more intentional.
Match Shapes
Look for visual similarities.
For example:
sun → lamp
wheel → circular sign
eye → camera lens
window → screen
building edge → another vertical line
The cut becomes visually connected through composition.
Use Light as a Bridge
If a clip ends with strong brightness, begin the next with a similarly bright frame.
A light or flash transition can strengthen the illusion.
Use Motion Blur Carefully
Motion blur can help connect fast movement, but adding it to footage with no movement can look artificial.
Build the transition around the action.
Use Sound Before the Visual Change
Sometimes the next scene’s audio begins slightly before the picture changes.
This technique can pull viewers forward and make the transition feel smoother without requiring a dramatic visual effect.
It also demonstrates an important principle:
Great transitions are not only visual.
Sound editing can do as much for continuity as animation.
How to Create Smooth Transitions Without Overediting
One of the biggest improvements a beginner can make is learning when to stop.
CapCut gives you many creative tools. That doesn’t mean they all belong in one project.
When reviewing CapCut transitions, ask three questions.
Does It Improve Understanding?
If the transition clearly indicates a new location, time, topic, or sequence, it has a purpose.
Does It Improve Flow?
If it connects compatible movement or supports pacing, keep it.
Does It Improve Emotion?
If a gentle transition reinforces a reflective moment or an energetic transition supports a musical peak, it may be useful.
If the answer to all three is no, try removing it.
The video may immediately feel cleaner.
Common CapCut Transition Mistakes to Avoid
Most transition problems don’t come from using the “wrong” feature.
They come from using the right feature at the wrong time.
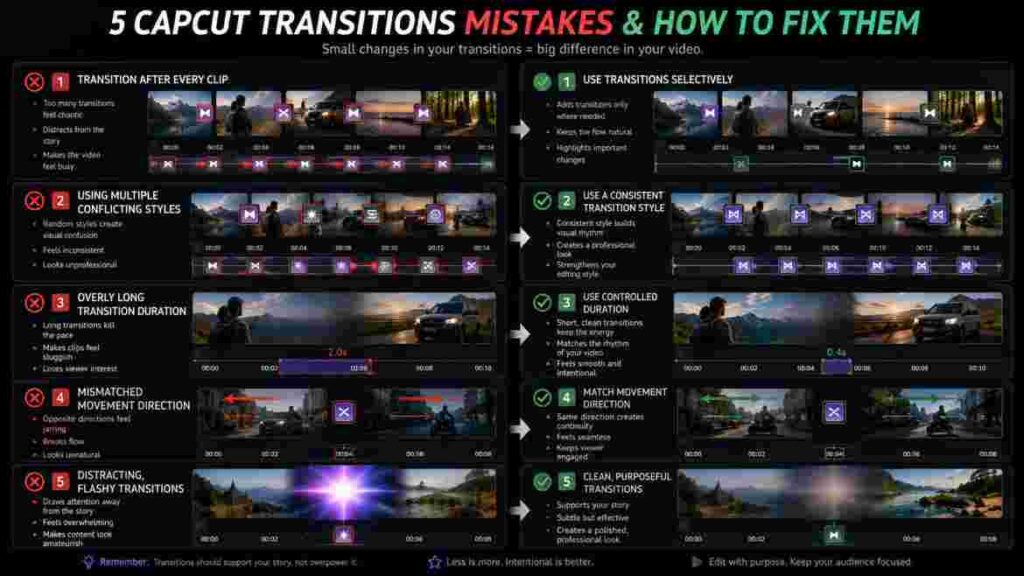
Mistake 1: Adding a Transition Between Every Clip
This is probably the most common beginner mistake.
The viewer never gets a visual break because every scene change announces itself.
Use normal cuts too.
A transition becomes more meaningful when it isn’t constant.
Mistake 2: Using Too Many Different Styles
You find a zoom you like.
Then a glitch.
Then a spin.
Then a blur.
Then a flash.
Individually, each might look interesting. Together, they can make the video feel inconsistent.
Limit your transition vocabulary.
Mistake 3: Making Transitions Too Long
Longer doesn’t necessarily mean smoother.
An overly long transition can interrupt momentum and make short clips feel awkward.
Adjust CapCut transitions according to the surrounding footage instead of automatically maximizing duration.
Mistake 4: Ignoring Direction
If your footage moves one way and the transition strongly pushes another, the viewer may feel a visual jolt.
Check motion before choosing directional effects.
Mistake 5: Choosing a Trend Instead of the Video
A transition may be popular because it works brilliantly in a particular editing trend.
That doesn’t make it suitable for every project.
Choose according to your footage and audience.
Mistake 6: Trying to Fix Weak Footage With Effects
Transitions can’t repair:
- poor framing
- badly timed clips
- unusable camera shake
- weak storytelling
- inconsistent lighting
- confusing sequencing
Fix what you can at the clip level first.
Mistake 7: Forgetting Audio
A visually perfect transition can still feel wrong if the sound cuts awkwardly.
Listen with headphones.
Check whether dialogue, ambience, sound effects, and music support the scene change.
Mistake 8: Editing Each Transition in Isolation
Don’t judge only the individual cut.
Play the entire section.
Three good transitions placed close together can still create an overly busy sequence.
Context matters.
CapCut Transitions Not Showing? Here’s What to Check
You have two clips on the timeline, you’re ready to connect them, but the expected transition control isn’t available.
This can be frustrating, particularly when a tutorial shows something different from your screen.
Before rebuilding the project, work through the problem systematically.
1. Confirm That Two Clips Are Adjacent
Traditional CapCut transitions need a point between compatible clips.
Zoom into your timeline.
Check whether the clips actually touch.
A small gap can be easy to miss when the timeline is zoomed out.
2. Make Sure You’re Looking at the Correct Track
Complex projects can contain:
- main video
- overlays
- audio
- text
- effects
- additional layers
Confirm you’re trying to create the transition between the intended video clips.
3. Check Clip Length
Very short clips can limit what can reasonably happen around a transition.
If you’ve trimmed aggressively, inspect the surrounding footage and test whether slightly adjusting the clips helps.
4. Zoom Into the Timeline
Sometimes the editing point is difficult to select simply because the timeline is compressed.
Zoom in so the cut is easier to see and control.
5. Check the Platform
A mobile tutorial may not exactly match desktop.
A desktop tutorial may not match the web editor.
Even two tutorials recorded months apart may show different interfaces.
When CapCut transitions appear differently from a guide you’re following, verify the platform before assuming the feature is missing.
6. Check for App Updates
Editing applications evolve.
If your interface appears significantly different from current guidance, check whether an update is available through the appropriate official app distribution channel for your device.
Don’t update in the middle of critical work without considering your project workflow, but version differences are worth checking when troubleshooting.
7. Restart the App or Project
Temporary interface or rendering issues can occur.
Save your work appropriately, close the project or application, reopen it, and check again.
For browser-based editing, reloading the editor may help with temporary problems, provided your work is safely saved.
8. Test a Simple Project
Create a small test project with two ordinary clips.
Try adding a transition there.
If it works, the problem may relate to the structure or settings of your main project rather than the entire application.
This is a useful troubleshooting technique because it isolates variables.
CapCut Transitions Not Working Properly? Try These Fixes
A transition can appear on the timeline but still behave unexpectedly.
Maybe playback stutters.
Perhaps the transition looks different from the preview.
Maybe the project becomes laggy.
Here’s how to approach the problem.
Preview Performance vs. Final Output
Editing preview performance can depend on your device, project complexity, media, and other factors.
A laggy preview doesn’t always mean the final exported transition will necessarily behave the same way.
However, don’t assume everything will magically fix itself during export either.
Test a short section when practical.
Reduce Project Complexity Temporarily
If your project contains many layers, effects, overlays, high-resolution files, text elements, and transitions, previewing may become more demanding.
Try temporarily simplifying the section you’re troubleshooting.
Determine whether the transition itself is the issue or whether the project is overloaded.
Check Overlapping Visual Treatments
Stacking multiple strong effects around CapCut transitions can produce unexpected results.
For example:
Clip effect + animation + overlay + transition + adjustment.
Each may work independently but become visually confusing together.
Disable unnecessary layers temporarily and test again.
Reapply the Transition
If one specific transition behaves incorrectly, remove it and apply it again.
This is a simple troubleshooting step, but it can help determine whether the problem is tied to that instance.
Test Another Transition
Apply a basic transition at the same cut.
If the basic option works but another doesn’t, you’ve narrowed down the problem.
If nothing works, investigate the timeline structure, clips, platform, or application state.
Save Before Major Troubleshooting
Before making significant changes, preserve your project according to the saving options available on your platform.
Troubleshooting should solve one problem—not create a larger one.
Why Some CapCut Transitions May Be Missing
You watch a tutorial and see a transition you love.
You open your own editor.
It’s nowhere to be found.
That doesn’t necessarily mean you’re looking in the wrong place.
Transition availability can change over time and may differ depending on factors such as:
- CapCut version
- platform
- device
- account state
- region
- feature rollout
- library updates
For that reason, don’t build your entire editing style around the assumption that one specific named preset will always remain available.
Learn the visual principle behind it.
If a specific zoom transition disappears, ask what made it useful:
- fast scale change?
- directional movement?
- blur?
- speed?
- center focus?
Then look for another current option that creates a similar visual result.
This approach makes your editing skills more durable than memorizing names from the CapCut transitions library.
Mobile vs. Desktop CapCut Transitions
Should you edit transitions on mobile or desktop?
Neither is automatically better for everyone.
The right choice depends on your workflow.
Mobile Advantages
Mobile can be convenient for:
- quick social videos
- editing while traveling
- vertical content
- short projects
- touch-based editing
- rapid publishing workflows
If your footage is already on your phone and you’re making a short Reel, moving everything to a computer may be unnecessary.
Desktop Advantages
Desktop can be helpful for:
- longer timelines
- more precise visual organization
- projects with many clips
- multi-layer edits
- detailed timing
- larger-screen previewing
The extra timeline space makes it easier to inspect cuts and compare CapCut transitions across a larger project.
Don’t Assume the Libraries Are Identical
The most important point is not to assume that every interface, control, category, or preset shown on one platform will be identical on another.
If you’re following a tutorial, check which platform the creator uses.
That simple step can save a lot of confusion.
How to Use Transitions With Text and Captions
Transitions affect more than the video underneath them.
Text can become difficult to read when strong movement occurs behind it.
Suppose a caption appears exactly when the frame spins, zooms, and blurs.
The viewer must process:
- the scene change,
- the movement,
- the new image,
- the caption.
That creates unnecessary competition.
When using CapCut transitions with captions:
- keep important text away from visually chaotic moments
- ensure captions remain on screen long enough to read
- avoid covering key words with aggressive movement
- preview on a phone-sized display
- maintain visual hierarchy
For educational videos, readability should usually win over spectacle.
How to Combine Transitions With Sound Effects
Sound effects can make a transition feel stronger without requiring a more aggressive visual effect.
For example, a subtle whoosh may complement a fast movement.
But sound should be synchronized carefully.
If the sound arrives noticeably before or after the visible motion, the edit may feel disconnected.
Also avoid adding loud sound effects to every transition.
Just like visual effects, repeated sound cues lose impact.
Use them for moments that deserve emphasis.
A restrained visual transition paired with well-timed audio can feel more polished than an extreme animation with no sound logic.
How to Use CapCut Transitions for Storytelling
Transitions can communicate relationships between scenes.
That makes them storytelling tools.
Showing Time Passing
A softer transition may suggest that time has moved forward.
You can strengthen the idea with changes in lighting, location, clothing, sound, or on-screen text.
Changing Location
Movement transitions can help carry the viewer from one environment into another.
Travel videos often benefit from this.
Changing Mood
Suppose a happy scene ends and the next moment becomes serious.
The transition should not accidentally undermine that emotional shift.
A playful spinning effect would probably feel inappropriate.
Creating Surprise
Sometimes an abrupt cut is better than a transition.
If the story depends on surprise, hiding the cut behind a slow effect may weaken the reveal.
This demonstrates why CapCut transitions should never be chosen independently of storytelling.
How to Plan Transitions Before You Start Editing
Some of the best transitions begin during filming.
If you know you want to connect two locations, you can deliberately record compatible movement.
For example:
Scene 1
Move the camera quickly to the right at the end.
Scene 2
Begin with the camera moving quickly to the right.
Now you have footage designed to connect.
Another example:
Scene 1
Cover the camera with your hand.
Scene 2
Start with your hand covering the camera, then move it away.
The edit point becomes easy to hide.
Planning footage around CapCut transitions gives you more control than trying to manufacture every transition after filming.
Before shooting, consider:
- movement direction
- camera speed
- foreground objects
- subject position
- lighting
- framing
- action
- intended next scene
You don’t need to storyboard every social video.
Even thinking one shot ahead can make editing much easier.
Should You Use Templates or Build Your Own Transitions?
Templates can speed up production, especially when you’re learning a style or creating trend-based content.
But they have limitations.
A template controls much of the structure for you.
That can be useful when:
- you need speed
- the format suits your footage
- you’re participating in a visual trend
- you’re learning how an edit is structured
Manual editing gives you more control over:
- clip selection
- timing
- transition placement
- pacing
- music synchronization
- visual consistency
If your goal is to improve your editing ability, don’t only memorize templates.
Study why the transitions work.
Ask:
Where does the cut happen?
What movement hides it?
How long does it last?
What does the music do at that moment?
Where is the subject positioned?
Those lessons transfer to future projects even when particular CapCut transitions or templates change.
How Many Transitions Should You Use in One Video?
There is no correct number.
A 15-second montage might contain several intentional transitions.
A 10-minute tutorial could contain very few.
Instead of counting transitions, measure their usefulness.
After completing the edit, watch it and note every noticeable transition.
For each one, ask:
What would happen if I replaced this with a normal cut?
If the video becomes clearer, faster, or easier to watch, use the cut.
If the transition improves continuity, rhythm, or meaning, keep it.
This review process is one of the simplest ways to avoid overediting.
Do More CapCut Transitions Make a Video More Professional?
No.
More editing does not automatically mean better editing.
Professional-looking videos usually feel intentional.
That can mean sophisticated visual transitions in one project and almost invisible editing in another.
Consider a polished interview.
The editor may primarily use direct cuts and B-roll.
Now consider a fashion montage.
Motion-based CapCut transitions may be central to its identity.
Both can look professional because the editing serves the content.
The mistake is judging quality by how obvious the editor’s work is.
Often, the best editing disappears into the viewing experience.
A Practical CapCut Transition Workflow
If you’re overwhelmed by all the options, follow this workflow.
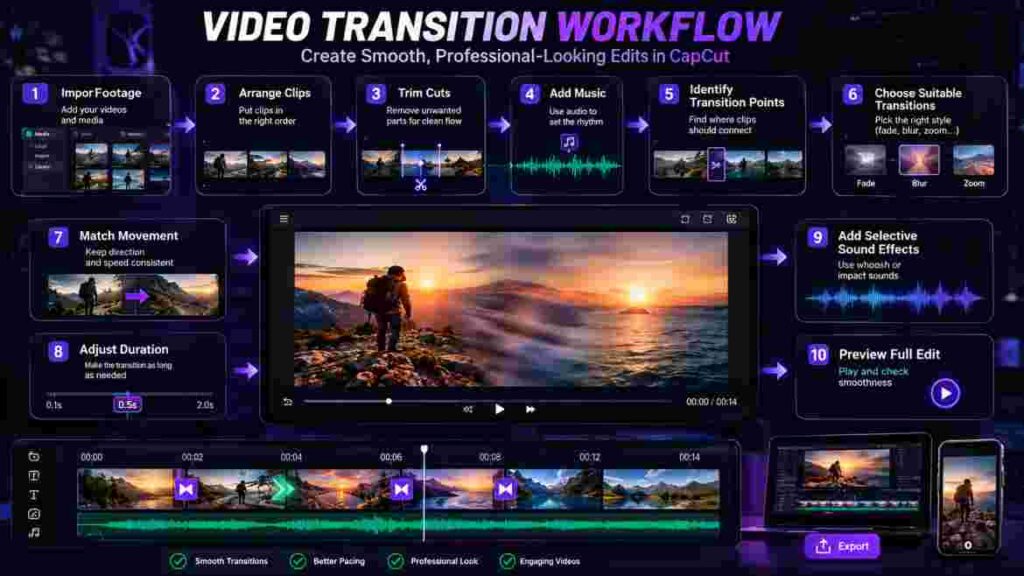
Step 1: Import and Organize
Bring in the footage you actually intend to use.
Remove obvious unusable takes early.
Step 2: Build the Story
Arrange the clips without transitions.
Make sure the sequence makes sense.
Step 3: Trim the Cuts
Adjust beginnings and endings.
Watch the rough sequence.
Step 4: Add Music and Important Audio
Establish the rhythm before designing every visual transition.
Step 5: Identify Problem Cuts
Look for places where the scene change feels unnecessarily abrupt or where a transition could communicate a meaningful change.
Step 6: Choose a Small Transition Vocabulary
Select a few CapCut transitions that match the visual style.
Don’t browse randomly at every cut.
Step 7: Match Movement
Check direction, speed, and subject position.
Step 8: Adjust Duration
Tune each transition according to context.
Step 9: Add Supporting Sound
Use sound effects selectively.
Step 10: Watch the Entire Video
Do not stop every two seconds.
Experience the edit as a viewer.
Step 11: Remove What You Don’t Need
If a transition calls too much attention to itself without contributing anything, simplify it.
Step 12: Quality-Check Before Export
Review:
- transitions
- cuts
- captions
- audio
- effects
- overlays
- spelling
- timing
- framing
Then export using settings appropriate for your intended destination and source footage.
A Better Way to Practice CapCut Transitions
Watching tutorials helps, but practice develops judgment.
Try this exercise.
Take the same three clips and create three different edits.
Version A: Cuts Only
Use no obvious transition effects.
Focus completely on timing.
Version B: Subtle Transitions
Add only restrained transitions.
Focus on continuity.
Version C: High-Energy Transitions
Use stronger movement-based options.
Focus on rhythm.
Now watch all three without looking at the timeline.
Ask:
- Which one communicates best?
- Which one feels fastest?
- Which one feels distracting?
- Where does movement match naturally?
- Which transitions did I actually notice?
- Which version fits the content?
This teaches something a list of the “20 best CapCut transitions” cannot teach:
judgment.
And judgment is what separates selecting effects from actually editing.
Transition Strategy for Different Content Types
Here is a simple framework you can use when starting a project.
| Video Type | Transition Approach | Main Priority |
|---|---|---|
| Talking-head video | Cuts + subtle changes | Clarity |
| TikTok/Reel montage | Fast, rhythmic, selective | Energy |
| Travel video | Movement + natural transitions | Flow |
| Product video | Clean, controlled transitions | Product visibility |
| Tutorial | Minimal transitions | Understanding |
| Cinematic story | Motivated, subtle changes | Emotion |
| Gaming edit | Faster stylized transitions where appropriate | Intensity |
| Before/after | Clear reveal transition | Transformation |
| Vlog | Mix of cuts and movement transitions | Story |
| Business content | Restrained, consistent transitions | Professional clarity |
This isn’t a strict rulebook.
It is a starting point.
If your creative concept calls for something different, use it intentionally.
How to Know When a Transition Is Too Much
Editors spend so much time looking at their projects that they can become accustomed to visual intensity.
A fresh viewer hasn’t had that exposure.
Watch for these signs:
- you stop noticing the actual footage
- captions become difficult to read
- every cut has a different animation
- transitions last almost as long as clips
- movement makes you lose track of the subject
- sound effects fire constantly
- the video feels exhausting
- transitions don’t match the tone
- the effect is more memorable than the message
If several apply, simplify your CapCut transitions.
You don’t necessarily need to remove all of them.
Start by replacing every unnecessary transition with a clean cut.
Then watch again.
Are Smooth Transitions Always Better?
Not necessarily.
Smoothness is useful when continuity is the goal.
But sometimes you deliberately want an abrupt change.
A comedy edit may use a sudden hard cut for timing.
A dramatic reveal may benefit from an immediate scene change.
A fast tutorial may use jump cuts to remove pauses and maintain energy.
A music video may intentionally use chaotic changes.
Editing isn’t about making everything smooth.
It is about making every choice support the desired experience.
That’s why the best CapCut transitions aren’t always the smoothest or most complicated.
Sometimes the best transition is no transition at all.
How to Review Transitions Before Exporting
The final review is where small problems become visible.
Don’t only check technical mistakes.
Review creatively.
First Watch: Story
Ignore individual effects.
Does the video make sense?
Second Watch: Transitions
Focus specifically on scene changes.
Ask:
- Is any transition distracting?
- Does one last too long?
- Is movement inconsistent?
- Are several strong transitions too close together?
- Would any cut work better without one?
Third Watch: Audio
Listen for awkward changes.
Check music and sound effects around transitions.
Fourth Watch: Text
Make sure transition movement doesn’t compromise captions or titles.
Fifth Watch: Different Display Size
For social content, preview vertically and at a phone-like size where possible.
This process catches problems that are easy to miss while constantly adjusting CapCut transitions on the timeline.
CapCut Transitions Troubleshooting Checklist
If something doesn’t look right, use this sequence before randomly changing settings.
- Check the clips. Are there two appropriate clips at the cut?
- Check for gaps. Are the clips actually adjacent?
- Check the timeline. Are you working on the correct track and edit point?
- Check clip length. Have you trimmed too aggressively?
- Check the transition. Does another transition work at the same location?
- Check other layers. Could effects, overlays, or animations be interfering visually?
- Check playback. Is the issue only preview lag?
- Check the platform. Are you following instructions for mobile, desktop, or web?
- Check the version. Could the interface have changed?
- Restart safely. Save your work and reopen the project if appropriate.
- Test separately. Create a simple two-clip project and try the same workflow.
- Simplify. Remove unnecessary complexity and rebuild the problem area.
Troubleshooting systematically is faster than repeatedly applying random CapCut transitions and hoping one works.
Advanced Principle: Transition Into Meaning, Not Just Another Clip
Once you become comfortable with transitions, think beyond movement.
Ask what the next shot means.
Suppose a creator says:
“But that was only the beginning.”
The next shot reveals a much larger challenge.
A transition placed there isn’t merely connecting two clips. It reinforces the narrative shift.
Or imagine a travel video:
A close-up of a train ticket changes into a wide view of the destination.
The relationship between the shots makes the edit satisfying.
This is where editing becomes storytelling rather than decoration.
Good CapCut transitions can help establish those relationships, but the idea must come first.
Why Timing Matters More Than the Transition Name
Creators often ask:
“What’s the name of that transition?”
That’s understandable, but it focuses on only one part of the result.
Two editors can use the exact same preset and get completely different results.
Why?
Because one might have:
- better cut timing
- matching movement
- better footage
- stronger music synchronization
- consistent framing
- better sound design
- more appropriate duration
The other simply applies the preset.
This is why copying a transition name doesn’t guarantee the same look.
When studying CapCut transitions, pay attention to everything surrounding the effect.
The surrounding footage often does more work than the preset itself.
Why Your Transition Looks Different From a Tutorial
You follow every step.
You choose what appears to be the same transition.
Yet yours looks different.
Several factors may explain the difference.
Different Footage
A transition designed around rapid movement looks different on static footage.
Different Clip Length
Timing changes the perceived speed and intensity.
Different Framing
A centered subject and an off-center subject react differently to visual movement.
Different Speed
The tutorial creator may have changed clip speed before adding the transition.
Additional Effects
What looks like one transition may actually combine:
- a preset
- keyframes
- blur
- animation
- sound design
- speed changes
- overlays
- camera movement already captured in the footage
Different CapCut Version
Libraries and controls can evolve.
So don’t assume the CapCut transitions preset alone created everything you saw.
Reverse-engineer the complete edit.
How Beginners Should Learn CapCut Transitions
If you’re new to editing, don’t try to master every transition category immediately.
Start with three concepts.
1. Learn Clean Cuts
Before fancy transitions, learn when to cut.
Remove dead space.
Cut on action.
Maintain continuity.
2. Learn One Subtle Transition
Understand how duration changes its feel.
Practice using it only when necessary.
3. Learn One Movement Transition
Shoot footage specifically designed for matching movement.
Once you can make those three approaches look good, expand your toolkit.
This foundation makes advanced CapCut transitions easier because you understand why you’re using them.
How Experienced Editors Can Improve Their Transition Choices
If you already know how to add transitions, your next improvement probably won’t come from learning where another button is located.
It comes from refinement.
Try these challenges:
Use Half as Many Transitions
Take an existing edit and remove half of the noticeable transitions.
Compare the result.
Match Motion More Precisely
Instead of relying on the preset to create movement, use clips with compatible movement.
Design Around Sound
Build a sequence where audio leads the transition strategy.
Shoot for the Edit
Plan transitions while recording.
Maintain One Visual Language
Limit yourself to a few transition behaviors for the entire project.
Constraints often produce more coherent editing.
CapCut Transitions and Viewer Attention
Every strong visual event asks for attention.
Transitions are visual events.
If your transition is dramatic, viewers briefly focus on the change itself.
Sometimes that’s desirable.
Sometimes you need their attention somewhere else.
Imagine an educational video with a critical sentence appearing as text while the background simultaneously spins into a new scene.
The transition competes with the information.
Now imagine the same text over a simple cut.
The message becomes easier to process.
When deciding whether to use CapCut transitions, think about the viewer’s attention as a limited resource.
Spend it carefully.
Should You Follow Transition Trends?
Trends can be useful.
They teach new editing techniques, introduce visual styles, and can help content feel familiar to a particular audience.
But trends have a short shelf life.
Instead of only copying them, study them.
Ask:
- Why does this transition feel satisfying?
- Is it synchronized to movement?
- Is there a hidden cut?
- Does the music create the impact?
- Is the camera movement real or digital?
- Does the transition depend on specific framing?
Learning the mechanics gives you something useful even after the trend fades.
That approach also prevents your knowledge of CapCut transitions from depending entirely on temporary preset names.
How to Keep Transitions Consistent Across a Long Video
Longer projects need consistency.
Create simple rules before you edit deeply.
For example:
Normal conversation: direct cuts
B-roll changes: subtle transition when needed
New chapter: fade
Major location change: movement transition
Montage: beat-driven cuts and selected transitions
Now your decisions become easier.
Instead of asking “Which of 50 transitions should I use?” at every cut, you’re choosing within a defined system.
This speeds up editing and creates a more coherent viewer experience.
Transition Duration: Short or Long?
There is no universal number that works for every edit.
Duration depends on context.
Shorter transitions often suit:
- fast social videos
- energetic montages
- rapid movement
- faster music
- short clips
Longer transitions may suit:
- slower storytelling
- emotional sequences
- gentle scene changes
- slower music
- deliberate changes in time or place
But those are tendencies, not laws.
The right way to set the duration of CapCut transitions is to watch the actual edit.
If it feels like the video pauses to show the transition, it may be too long.
If the effect happens so quickly that it creates an unpleasant visual jump, it may be too short.
Adjust until the transition belongs to the scene rather than sitting on top of it.
Can You Use the Same Transition Throughout a Video?
Yes, and sometimes that’s better.
Using the same subtle transition at similar types of scene changes can establish consistency.
However, don’t apply it mechanically.
Even if you’ve chosen one main transition style, some cuts may work better without it.
Think of a transition as part of your editing vocabulary.
Writers don’t put the same punctuation after every sentence.
Editors don’t need the same transition after every clip.
Use repetition to create consistency—not predictability.
How to Make Social Videos Feel Fast Without Excessive Transitions
Fast pacing comes from more than effects.
You can create energy through:
- shorter clips
- removing pauses
- cutting on movement
- changing shot size
- using B-roll
- synchronizing with audio
- repositioning visual focus
- using captions effectively
This means you don’t need dozens of CapCut transitions to make a video engaging.
Sometimes improving clip selection and timing produces a bigger improvement.
When a Hard Cut Is Better Than a Transition
Use a hard cut when immediacy is valuable.
Examples include:
- dialogue
- jokes
- reactions
- fast tutorials
- demonstrations
- surprising reveals
- rapid informational content
- action sequences
A hard cut feels direct.
If the audience needs the next piece of information immediately, an elaborate transition can become an obstacle.
Learning to appreciate a clean cut is an important part of mastering transitions.
The two aren’t enemies.
They work together.
A Simple Rule for Professional CapCut Transitions
If you remember only one principle from this guide, use this:
Choose the transition after understanding the cut—not before.
First determine:
- why the scene changes
- where the cut should happen
- what the footage is doing
- what the audio is doing
- where the viewer is looking
Then decide whether CapCut transitions can improve that moment.
This order prevents effects from controlling the edit.
You remain the editor.
Final Thoughts
CapCut transitions can make scene changes smoother, reinforce movement, support music, communicate changes in time or location, and add energy to an edit. But their real value comes from how intentionally you use them.
The transition library is only the starting point.
Strong results depend on the footage before and after the cut, movement direction, pacing, audio, composition, transition duration, and the purpose of the scene change.
Start with a clean edit. Use normal cuts when they work. Add transitions when they solve a genuine visual or storytelling problem. Match movement whenever possible, synchronize important moments with audio, and don’t be afraid to remove an effect that draws too much attention to itself.
As you become more comfortable with CapCut transitions, spend less time asking which preset looks the most impressive and more time asking why the transition belongs at that particular moment.
That’s the shift that makes editing feel intentional.
A viewer doesn’t need to notice every transition.
They need to enjoy moving from one moment to the next.