
A good filter can change the entire feel of a video in seconds. Flat footage can become warmer and more inviting, a travel clip can feel cinematic, and an ordinary portrait can gain a cleaner, more polished mood. But there is a difference between applying a filter and actually making a video look better.
That difference is where many new editors struggle.
CapCut Filters give creators a quick way to change color, tone, contrast, and overall visual mood without building a color grade from scratch. The challenge is choosing a filter that actually suits the footage and then controlling it well enough that the edit still looks natural.
A filter that works beautifully on a sunset may make skin tones look strange. A dramatic movie-style preset may suit a short film but overpower a simple talking-head video. And increasing intensity does not automatically make a filter more effective.
This guide takes a practical approach to CapCut Filters. You’ll learn what filters actually do, how they differ from effects, which types work for different videos, how to apply them, how to choose the right style, and how to avoid the overedited look. We’ll also cover AI filters, common problems, troubleshooting, and techniques that can help your videos look more intentional rather than simply “filtered.”
The goal is simple: by the end, you should be able to look at a piece of footage and understand not only which filter might work, but why.
What Are CapCut Filters?
CapCut Filters are ready-made visual treatments designed to change the overall appearance of a video or image. Instead of manually adjusting every color setting, you can select a preset and immediately preview a different look.
A filter may change several visual characteristics at once. Depending on the preset, these changes can include contrast, color balance, warmth, saturation, brightness, highlights, shadows, or the overall tone of the footage.
Think of a filter as a starting recipe for the visual mood of your video.
If your original clip feels plain, a warm filter might make it feel more welcoming. If you want a dramatic atmosphere, a movie-style preset may deepen contrast or shift the color palette. For a nostalgic edit, a retro look can make modern footage feel older or more stylized.
The advantage is speed. You do not need to understand advanced color theory before experimenting with different looks.
The disadvantage is that a preset cannot fully understand the creative needs of every shot.
That is why the best results usually come from treating CapCut Filters as adjustable starting points rather than one-click solutions.
What Do Filters Change in a Video?
Filters mainly influence how viewers perceive the image rather than changing what physically happens in the scene.
Imagine you recorded a person walking through a city at sunset. The action remains exactly the same after applying a filter, but the emotional impression can change considerably.
A warmer treatment might make the scene feel nostalgic and comfortable. Cooler colors could make it feel quiet or distant. Increased contrast might create a more dramatic appearance, while softer contrast could produce a gentler lifestyle aesthetic.
Depending on the filter and editing controls available in your version of CapCut, the visible result may involve changes to:
- brightness and exposure perception
- contrast
- saturation
- warmth or coolness
- color balance
- highlights and shadows
- skin-tone appearance
- overall visual mood
- perceived depth and atmosphere
This is also why the same preset does not look identical on every clip. A filter is interacting with colors and lighting that already exist in the footage.
Apply the same warm preset to a sunny beach clip and a dim indoor shot, and the results can be dramatically different.
Why Do Creators Use Filters in CapCut?
Speed is one reason, but it is not the only one.
Creators often use CapCut Filters to establish visual consistency. If several clips were recorded in similar conditions, a carefully selected filter can help them feel like parts of the same video rather than unrelated shots.
Filters are also useful when you want to establish a recognizable mood quickly.
A travel creator may prefer clean, vivid landscapes. A food creator might want warm and appetizing colors. A fashion edit could benefit from a restrained, editorial look. A cinematic short may need deeper contrast and a more deliberate color palette.
For beginners, presets can also act as a useful introduction to color styling. By comparing different filters at different intensities, you gradually develop a better understanding of how color influences mood.
The important lesson is that a filter should support the video rather than become the main thing viewers notice.
CapCut Filters vs Effects: What’s the Difference?
Filters and effects are often mentioned together, which can make them confusing for beginners. Both can change how a video looks, but they generally serve different creative purposes.
A filter mainly changes the overall color, tone, or atmosphere of footage.
An effect usually introduces a more obvious visual transformation. Depending on the effect, that could include blur, glow, distortion, shake, light effects, stylized overlays, transitions, or other visual changes.
A useful way to remember the distinction is:
Filters influence how the scene feels. Effects influence how the scene behaves or appears.
There can be overlap, and editing tools continue to evolve, but this distinction is useful when deciding what your video actually needs.
| Editing tool | Main purpose | Typical use |
| Filter | Change overall color and mood | Cinematic, warm, vintage, clean or monochrome styling |
| Effect | Add a visible visual transformation | Glow, distortion, shake, blur, light or stylized movement |
| Manual adjustment | Fine-tune individual image properties | Exposure, contrast, saturation, temperature and color |
| LUT/color grade | Apply or build a controlled color treatment | Consistent or more advanced cinematic styling |
If you want to go beyond color and mood changes, our complete CapCut Effects guide explains how to find, apply, customize, and combine effects without making your videos look overedited.
When Should You Use a Filter?
Use a filter when the composition and movement of your footage already work but the visual mood needs refinement.

For example, you may have a well-exposed travel clip that feels slightly plain. Instead of adding animated effects, a subtle scenery or cinematic treatment might give it more character without distracting from the location.
CapCut Filters are particularly useful when:
- you want a consistent mood across multiple clips;
- the original footage is technically acceptable but visually plain;
- you want to create a warm, cool, retro, cinematic, natural, or monochrome style;
- you need a fast starting point for color styling;
- you want to experiment before making manual adjustments.
A filter should normally complement the footage.
If viewers immediately think, “That filter is extremely strong,” the treatment may be competing with the content rather than helping it.
When Should You Use an Effect?
Use an effect when you want something more visibly transformative.
A glitch effect might work during a transition in an energetic music edit. Motion effects can emphasize movement. A controlled glow may support dreamy footage. Blur can be used creatively to shift attention.
But more effects do not automatically mean a more professional edit.
If the footage already contains fast cuts, animated captions, transitions, stickers, and strong movement, adding several aggressive effects can make the frame difficult to read.
A useful workflow is to establish the overall color and mood first and then decide whether effects are actually necessary.
That way, CapCut Filters and effects work together rather than competing for attention.
What Types of Filters Are Available in CapCut?
CapCut’s filter library is designed around different visual styles and use cases. The exact categories, preset names, availability, and interface can change with updates, platform differences, regions, or versions, so treat category names as a guide rather than a permanent catalog.
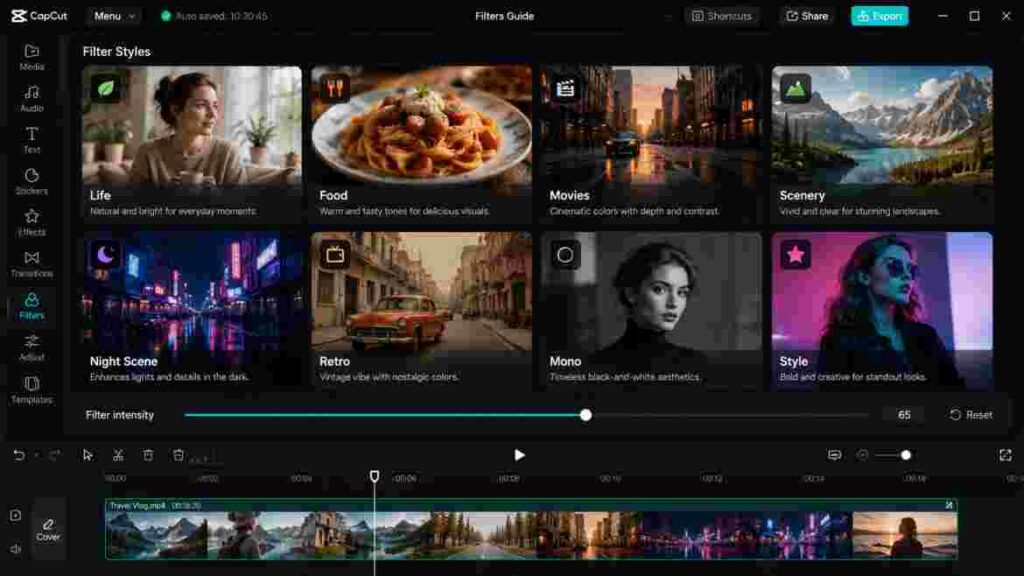
The useful question is not, “Which category has the most filters?”
It is:
Which category is closest to the result I want?
Current CapCut materials reference categories and styles such as Life, Food, Movies, Scenery, Night Scene, Retro, Mono, and other creative options. Each gives you a useful starting point for a particular type of footage.
Life Filters
Life-style filters generally make sense for everyday content where you do not want the color treatment to overpower the subject.
Think:
- daily vlogs
- morning routines
- café clips
- family moments
- lifestyle videos
- casual social posts
- home interiors
- day-in-the-life content
With this kind of footage, natural-looking skin and believable colors are usually more important than dramatic styling.
When testing CapCut Filters for lifestyle footage, look for a treatment that improves the overall image without making whites strongly tinted or faces unnaturally orange, red, or pale.
Subtlety is usually your friend.
Food Filters
Food videos have a specific challenge: the colors need to remain appetizing.
A filter that creates an interesting artistic mood can still be a bad choice if it makes fresh vegetables look dull or gives bread, meat, desserts, or drinks unnatural colors.
For food content, pay particular attention to warmth, saturation, reds, oranges, greens, and highlights.
A slightly warm appearance can sometimes make food feel richer, but too much warmth may turn neutral surfaces yellow and distort the actual appearance of the dish.
The filter should make viewers notice the food, not the editing.
Movie Filters
Movie or cinematic styles are popular because creators often want ordinary phone footage to feel more deliberate.
But “cinematic” does not simply mean dark.
A cinematic look may involve controlled contrast, a cohesive color palette, restrained saturation, deliberate highlight treatment, and consistency between shots.
When exploring movie-style CapCut Filters, watch what happens in both bright and dark areas.
A dramatic preset might look impressive on one frame while hiding important detail elsewhere in the clip. Always play the entire shot instead of judging from a single paused frame.
Scenery Filters
Scenery filters are useful starting points for:
- mountains
- beaches
- forests
- cityscapes
- architecture
- road trips
- sunsets
- outdoor travel footage
Landscape footage often contains several strong color regions at once: blue skies, green vegetation, warm sunlight, neutral buildings, and reflective water.
This makes oversaturation especially easy.
If the sky becomes unnaturally blue or grass starts looking fluorescent, reduce the intensity or try another preset.
A good scenery treatment should strengthen atmosphere while keeping the location believable unless an intentionally surreal style is your goal.
Night Scene Filters
Night footage presents different challenges from daytime footage.
Dark areas, artificial lights, neon signs, street lamps, headlights, and digital noise can all influence how a filter behaves.
A preset that aggressively lifts dark areas may reveal noise. One that adds too much contrast may crush shadow detail. Heavy saturation can make colored lights look harsh.
When using CapCut Filters on night footage, inspect:
- faces
- shadow detail
- bright signs
- lamps and headlights
- noise in dark areas
- color casts from artificial lighting
Night edits often benefit from control rather than maximum intensity.
Retro Filters
Retro styling can make footage feel nostalgic, playful, analog-inspired, or intentionally imperfect.
These treatments may work well for:
- memory montages
- fashion edits
- old-school music videos
- travel diaries
- nostalgic storytelling
- throwback social content
The mistake is assuming that every retro edit needs every retro element.
A vintage-looking filter, heavy grain, VHS distortion, date stamp, frame overlay, light leak, and aggressive transitions all at once can become visually exhausting.
Choose a clear direction and build around it.
Mono Filters
Monochrome styling removes or greatly reduces the role of color, which makes other visual elements more noticeable.
Viewers may pay more attention to:
- lighting
- contrast
- texture
- facial expression
- composition
- shape
- movement
Black-and-white does not automatically make footage artistic, however.
If the original lighting is flat, removing color can make that flatness even more obvious.
When trying mono CapCut Filters, check whether the subject separates clearly from the background and whether important details remain visible.
Style Filters
Style-focused categories are useful when you want a more obvious creative treatment rather than simple correction.
These can suit fashion edits, experimental content, music-driven videos, social-media trends, or projects where the visual identity is intentionally strong.
Just remember that trends move quickly.
A highly recognizable style may attract attention today but make an evergreen video feel dated later. For long-lasting content, a restrained treatment often ages better than an extreme trend.
Best CapCut Filters for Different Video Styles
There is no single best filter for every video.
That is not a convenient answer, but it is the useful one.
The “best” filter depends on your original lighting, colors, subject, platform, storytelling goal, and desired mood.
Instead of choosing solely by preset name, choose by visual behavior.
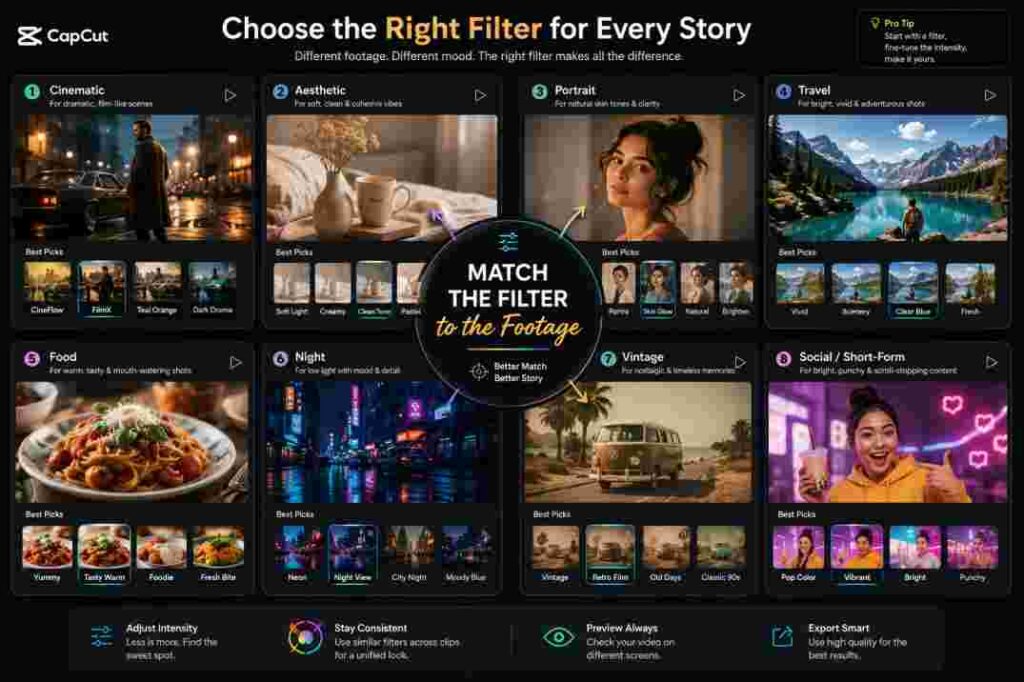
Here is a quick starting guide:
| Video type | Look to prioritize | Watch out for |
| Cinematic | Controlled contrast, cohesive tones | Crushed shadows |
| Aesthetic | Consistent palette, soft styling | Trend overload |
| Portrait | Natural skin, flattering contrast | Orange/red skin |
| Travel | Clear atmosphere, balanced scenery | Oversaturated skies |
| Food | Appetizing warmth and clarity | Unnatural food colors |
| Night | Controlled highlights and shadows | Noise and crushed blacks |
| Vintage | Intentional faded/retro character | Too many retro elements |
| Shorts/Reels/TikTok | Immediate visual clarity | Excessive processing |
Best CapCut Filters for Cinematic Videos
If you want a cinematic result, start by forgetting the idea that “cinematic” equals one particular filter.
Movies do not all look the same.
Some films are warm and nostalgic. Others are cool and restrained. Some have deep contrast; others use soft, muted colors. The common factor is usually intentional visual consistency.
When browsing CapCut Filters for cinematic footage, look for a preset that supports your story.
For a warm memory scene, you might want gentle warmth and softer highlights.
For a tense urban scene, a cooler treatment with restrained saturation may fit better.
For a dramatic landscape, stronger contrast could work—but only if detail remains visible.
A practical cinematic workflow is:
- Correct obvious exposure or white-balance problems first.
- Test a movie-oriented or similarly suitable filter.
- Lower the intensity.
- Play the entire clip.
- Check faces, highlights, and shadows.
- Make small manual adjustments if needed.
- Compare neighboring clips for consistency.
One of the fastest ways to break a cinematic look is to give every shot a completely different color treatment.
Consistency is usually more convincing than intensity.
Best Filters for Aesthetic Edits
“Aesthetic” is a broad term.
A clean lifestyle edit, dreamy pastel video, dark academia montage, bright summer Reel, and minimalist fashion clip can all be described as aesthetic even though their color choices are completely different.
So define the aesthetic first.
Ask yourself:
- Is it warm or cool?
- Bright or dark?
- Saturated or muted?
- Clean or textured?
- Modern or nostalgic?
- Soft or high-contrast?
Then browse CapCut Filters with that target in mind.
This simple decision prevents endless scrolling through presets.
If you want a soft lifestyle aesthetic, for example, prioritize gentle contrast and believable skin tones. For a moody aesthetic, you may want deeper shadows and muted colors. For a bright summer style, lively color can work, but watch for clipped highlights and exaggerated skin.
The strongest aesthetic edits usually repeat a small set of visual rules throughout the project.
Best Filters for Portraits and Selfies
Faces are unforgiving.
Humans are very familiar with what skin should look like, so unusual color casts become noticeable quickly.
When choosing a portrait filter, examine the skin before looking at anything else.
Does the face suddenly look orange?
Too red?
Unnaturally pale?
Gray?
Overly smooth?
If yes, the filter may be too strong or simply wrong for that lighting.
Good portrait CapCut Filters should generally support the face without making it look disconnected from the environment.
Also remember that skin tones vary widely. There is no universal warmth, brightness, or saturation setting that works for everyone.
Judge the actual person in the actual footage.
For talking-head videos, interviews, beauty content, or personal branding, a subtle treatment is often safer because viewers spend a long time looking at the face.
Best Filters for Travel Videos
Travel content benefits from atmosphere.
A mountain scene should feel expansive. A beach should feel inviting. A rainy city might benefit from a moodier palette. A historic street could suit warmer or more nostalgic styling.
But travel footage is also where creators commonly oversaturate.
Blue skies become electric blue.
Green forests become neon.
Sunsets become unnaturally orange.
The solution is not to avoid colorful CapCut Filters entirely. It is to watch individual colors and reduce intensity before the image stops looking believable.
Try to preserve the character of the location.
If viewers have visited the place, they should still recognize it.
Best Filters for Food Videos
Food editing has one primary job: make the food look appealing without making it look fake.
Warmth can help certain dishes, but not everything benefits from an orange cast.
For example, a warm treatment might complement baked goods, coffee, grilled food, or candlelit restaurant footage. But fresh salads, colorful fruit, seafood, and cool beverages may need a cleaner balance.
Check whites as well.
If a white plate becomes heavily yellow, you have a useful warning that the entire image may be too warm.
Food creators should also watch saturation. Increasing it can make ingredients pop, but excessive saturation can make sauces, vegetables, and meat look unnatural.
The best result often comes from applying a suitable preset lightly and then refining individual settings.
Best Filters for Night Videos
Night footage often looks impressive on a phone screen because neon lights and dark backgrounds naturally create contrast.
That does not mean you should push the filter harder.
Night clips can contain limited shadow information, bright highlights, and visible noise. Aggressive processing can exaggerate all three.
When testing CapCut Filters at night:
- Look at the brightest light source.
- Check whether highlight detail disappears.
- Inspect the darkest part of the frame.
- Look for increased noise.
- Check faces under artificial lighting.
- Reduce intensity if colors become too aggressive.
If the footage was recorded in mixed lighting—such as warm street lamps plus blue signs—pay extra attention to skin and neutral objects.
Best Filters for Vintage and Retro Edits
Vintage editing works best when it feels intentional.
Before choosing a filter, decide what kind of “old” look you actually want.
Film-inspired?
Faded family-video look?
VHS-era?
Warm nostalgic memory?
Black-and-white?
These are different aesthetics.
A retro filter can establish the color direction, but you do not need to combine every possible vintage effect.
If you use CapCut Filters alongside grain, frames, light leaks, or other effects, establish a hierarchy.
The viewer should still be able to understand the subject immediately.
Best CapCut Filters for TikTok, Reels, and YouTube Shorts
Short-form video is consumed quickly, often on small screens.
That makes visual clarity especially important.
A filter that looks subtle on a large monitor may feel stronger on a phone, while dark footage can become difficult to read under bright outdoor viewing conditions.
For TikTok, Instagram Reels, and YouTube Shorts, prioritize:
- clear subjects;
- readable captions;
- believable skin tones;
- consistent styling;
- sufficient brightness;
- controlled saturation;
- visual separation between subject and background.
Do not choose CapCut Filters simply because they are currently popular.
A trending preset that fits another creator’s lighting may perform poorly on yours.
Trend awareness can inspire the style, but the footage should make the final decision.
How to Add Filters in CapCut
The exact location and appearance of controls can vary between CapCut mobile, desktop, web versions, and future updates. However, the basic workflow remains straightforward: import your media, locate the filter library, preview a style, apply it, adjust the strength, review the result, and export.
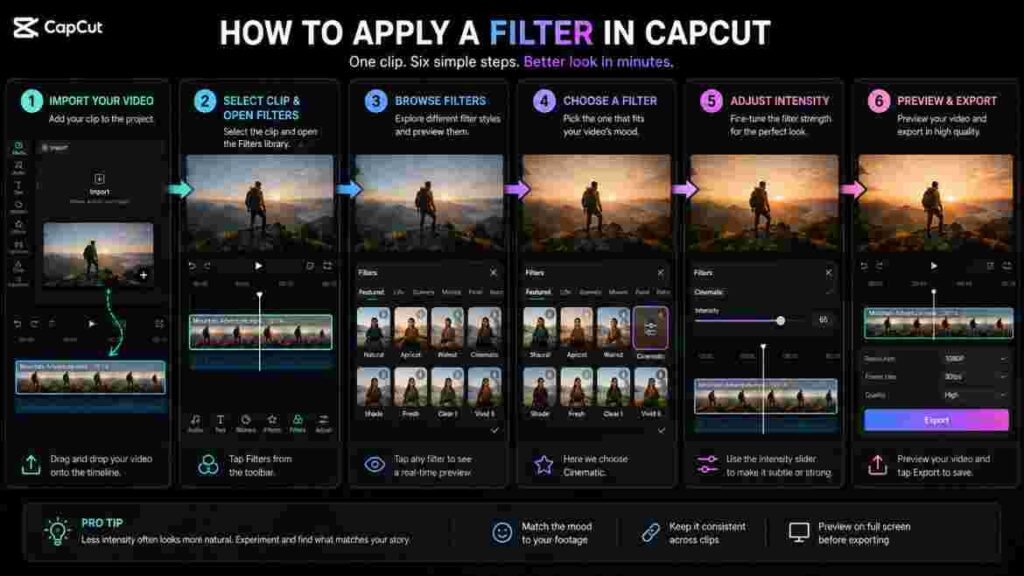
The following process focuses on the logic of the workflow so it remains useful even if interface details move.
Step 1: Import Your Video
Start by creating or opening a project and importing the footage you want to edit.
Before touching CapCut Filters, watch the clip once.
This takes only a few seconds, but it helps you identify what the footage actually needs.
Ask:
- Is it too dark?
- Is the white balance obviously wrong?
- Are colors already strong?
- Is the footage flat?
- Are skin tones natural?
- Is there one dominant color?
- What mood does the scene already have?
This initial check prevents you from using a filter to solve the wrong problem.
Step 2: Open the Filters Library
Select the relevant clip or work area and open the Filters section in the version of CapCut you are using.
Browse by category rather than randomly clicking every preset.
If you are editing a landscape, start with scenery-oriented options. For cinematic content, explore movie-style treatments. For a nostalgic edit, begin with retro looks.
This narrows the choices and speeds up editing.
Step 3: Choose a Filter
Preview several options before committing.
When comparing CapCut Filters, do not only ask which one looks most dramatic.
Ask which one improves:
- the subject;
- the background;
- skin tones;
- important colors;
- visual separation;
- mood;
- consistency with other clips.
Play a few seconds of the video with the filter active.
Movement can reveal problems that are not obvious in a still frame.
Step 4: Adjust the Filter Intensity
This is one of the most important steps.
A preset is not an all-or-nothing decision.
CapCut provides intensity control for filters, allowing you to reduce or increase how strongly the treatment appears.
If the filter feels impressive but slightly artificial, try lowering the intensity before abandoning it.
Often, a restrained version of a strong preset works better than another filter at maximum strength.
There is no universal “correct” percentage.
The correct strength is the one that supports your footage without introducing distracting problems.
Step 5: Preview the Result
Do not immediately export after applying a filter.
Watch the edited section from beginning to end.
Check transitions between clips.
If the first shot is warm and soft but the next is cold and heavily contrasted, the change may feel accidental.
Also inspect:
- skin;
- skies;
- white objects;
- black clothing;
- shadows;
- bright lights;
- captions and graphics.
CapCut Filters influence the footage underneath your text and design choices, so the overall composition matters.
Step 6: Export Your Video
Once the visual treatment looks consistent, move to export.
Choose settings appropriate for your project and destination. Available options can vary, but CapCut’s desktop workflow includes controls such as resolution, format, frame rate, quality-related settings, codec, and bitrate depending on the workflow/version.
The key point is that a beautiful filter cannot compensate for careless export choices.
Preview the exported file before publishing, especially for an important project.
How to Choose the Right CapCut Filter for Your Video
Choosing a filter becomes much easier when you stop starting with the filter library.
Start with the footage.
A simple four-part decision works well:
Footage → Mood → Subject → Intensity
This turns random experimentation into a repeatable editing process.
Start With Your Original Footage
Look at what the camera already captured.
If your footage is beautifully exposed with rich natural colors, it may need very little treatment.
If it has an obvious color cast, fix that problem before adding a strong creative style.
Suppose an indoor clip is already extremely warm because of tungsten lighting. Adding another warm filter may make skin and white objects excessively yellow.
The better workflow is to correct the imbalance first and style second.
This distinction matters because CapCut Filters are primarily creative tools, not replacements for every form of color correction.
Decide What Mood You Want
Color communicates emotion before viewers consciously analyze it.
Warm colors can feel inviting, nostalgic, energetic, or intimate depending on context.
Cooler treatments can feel clean, calm, modern, distant, or dramatic.
Muted colors can suggest seriousness or nostalgia. Bright saturation can create energy.
Instead of thinking, “I want a cool filter,” write the mood in one or two words:
warm memory
clean lifestyle
dark urban
bright summer
quiet cinematic
vintage diary
That description becomes your filter-selection criteria.
Match the Filter to Your Subject
Different subjects respond differently to color changes.
A landscape gives you more freedom with dramatic color than a close-up of a face.
Food needs appetizing color.
Product footage may need accurate brand colors.
Fashion content may prioritize fabric and skin.
Night footage requires careful highlight and shadow handling.
Before finalizing CapCut Filters, identify the most important element in the shot and protect it.
If the background looks fantastic but the product color becomes inaccurate, the filter has failed the purpose of the video.
Test Different Filter Intensities
Do not judge a preset only at its default strength.
A filter that initially feels too aggressive may become excellent after you reduce its intensity.
Try a simple comparison:
- no filter;
- subtle application;
- medium application;
- stronger application.
Then step away from the screen for a moment and compare again.
Editors quickly adapt to exaggerated color. After staring at a highly saturated image for several minutes, it can begin to feel normal.
How to Make CapCut Filters Look Professional
Professional-looking color is rarely about finding a magical preset.
It is about control.
A beginner tends to ask, “Which filter makes this look cinematic?”
A more experienced editor asks, “What does this image need, and how much?”
That difference in thinking is more important than the preset itself.
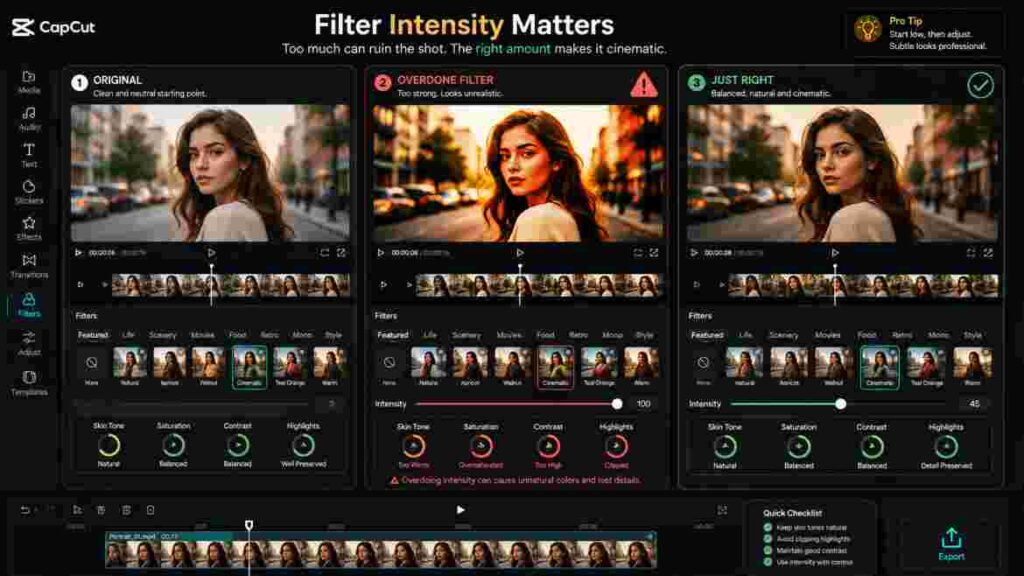
Reduce Filter Intensity When Needed
One of the easiest improvements you can make is simply using less.
Strong CapCut Filters can be useful for exploring a direction because the visual change is obvious. Once you know the direction works, reduce the intensity and reassess.
Ask whether the filter is improving the story or simply announcing its presence.
A viewer should ideally notice the beautiful image before noticing the filter.
Protect Natural Skin Tones
Faces deserve a separate quality check.
After applying your filter:
- Pause on a clear frame of the face.
- Compare it with the original.
- Look at cheeks, forehead, lips, and shadows.
- Check whether warmth or saturation has become excessive.
- Reduce intensity or refine color if needed.
Do not rely on a universal skin-tone formula. Lighting, camera settings, environment, and individual skin tones vary.
The goal is believable, flattering color—not making everyone fit the same preset.
Correct Exposure Before Styling
If footage is badly underexposed or overexposed, a filter is unlikely to be the ideal first fix.
Start with basic corrections.
CapCut provides adjustment tools that can include controls for exposure/brightness, contrast, saturation, temperature, HSL, curves, color wheels, and other color tools depending on the version and workflow.
Once the base image is balanced, CapCut Filters become easier to judge.
Think of it like painting a wall: preparing the surface first usually produces a cleaner finish.
Avoid Excessive Saturation and Contrast
Two settings can quickly make beginner edits look overprocessed: saturation and contrast.
Strong saturation may create impressive thumbnails or individual frames, but it can also:
- make skin too red or orange;
- turn foliage neon;
- make blue skies unrealistic;
- destroy subtle color differences;
- make food look artificial.
Excessive contrast can crush dark detail and make highlights harsh.
When a filter already adds both, avoid automatically increasing them again in manual adjustments.
Keep Filters Consistent Across Clips
Imagine a 20-second travel Reel containing six clips.
Clip one is warm.
Clip two is blue.
Clip three is highly saturated.
Clip four is faded.
Clip five is greenish.
Clip six is extremely contrasty.
Even if every shot looks interesting individually, the sequence may feel disconnected.
Visual consistency helps viewers experience the clips as one story.
This does not mean every shot needs identical settings. Different lighting conditions may require small changes.
The goal is a shared visual language.
Combine Filters With Manual Adjustments Carefully
Filters and manual color controls can work well together.
A practical workflow is:
- Correct obvious problems.
- Choose the creative filter.
- Lower or refine its intensity.
- Adjust exposure and contrast if needed.
- Fine-tune problematic colors.
- Check consistency.
- Export and review.
For greater control, CapCut also offers tools such as HSL, curves, color wheels, color correction, and LUT-related workflows on supported versions.
HSL can help when one color is causing trouble. Curves provide more detailed control over tonal relationships. Color wheels can help refine shadows, midtones, and highlights. LUTs provide another route to preset or custom color treatments.
You do not need to use all of them.
Use the simplest tool that solves the problem.
What Are CapCut AI Filters?
Traditional filters generally apply a predetermined visual treatment to existing footage. AI-based filters or AI transformation tools can go further by using generative or machine-learning processes to reinterpret the appearance of an image or scene.
This distinction matters because users sometimes call every visual transformation a “filter.”
Traditional CapCut Filters are useful when you want to preserve the original scene while changing its overall color and mood.
AI-based transformations may create a more substantial stylistic change.
Depending on the specific tool, template, platform, and current CapCut offering, AI styling may be used for more transformative visual results than ordinary color presets.
Because AI tools evolve quickly, exact names and availability should always be checked in the current version of CapCut rather than assumed from an older tutorial.
AI Filters vs Traditional CapCut Filters
The easiest distinction is the amount of transformation.
Traditional filter: “Keep this footage, but change its look and mood.”
AI transformation: “Reinterpret this visual using a different generated or stylized appearance.”
For a travel vlog where you simply want warmer sunsets, a traditional filter is likely enough.
For an intentionally transformed AI-style visual, an AI feature may be more appropriate.
Do not use AI styling merely because it sounds more advanced.
The best tool is the one that matches the creative goal.
Why Are CapCut Filters Not Showing or Working?
Few things are more frustrating than following a tutorial exactly and discovering that the filter shown on someone else’s screen does not appear on yours.
Before assuming something is broken, remember that CapCut changes over time.
The filter library, preset names, categories, feature availability, and interface can differ between versions and platforms. Online tutorials may also show an older build.
Use the troubleshooting steps below as a practical checklist.

Check Your Internet Connection
Some editing resources may require an internet connection to load or download.
If the filter library appears incomplete or a resource will not load, confirm that your connection is working normally.
Switch networks if appropriate, reopen the relevant library, and allow the app enough time to load available resources.
Do not repeatedly change unrelated settings before ruling out a basic connectivity issue.
Update CapCut
If your version is significantly older than the version used in a tutorial, the interface or available tools may differ.
Check whether an official update is available for your platform.
After updating, reopen the project and look again.
However, an update does not guarantee that a specific old preset will appear. Libraries change, so treat updating as a troubleshooting step rather than a guaranteed recovery method.
Check Whether the Filter Is Still Available
This is particularly important when following old social-media tutorials.
Creators often publish videos around trending CapCut Filters, templates, and effects. Months later, the library may not look identical.
Search within the current filter categories if your version provides search functionality.
If the exact preset is unavailable, focus on recreating its characteristics.
Ask:
- Was it warm?
- Was contrast high or low?
- Were colors muted?
- Did it have a faded look?
- Was it cool and cinematic?
- Was it monochrome?
Finding a visually similar treatment is often more productive than searching indefinitely for one exact name.
Restart CapCut and Reload the Project
If a resource should be available but the editor is behaving unexpectedly, save your work where possible and restart the application.
Then reopen the project and check again.
A restart is a simple troubleshooting step and avoids making unnecessary edits to a project while the application is behaving abnormally.
Check for Platform or Version Differences
A tutorial recorded on desktop may not match the mobile interface.
A web workflow may not match desktop.
Even two users on the same platform may see differences after updates.
When instructions for CapCut Filters do not match your screen, first identify:
- which platform the tutorial uses;
- approximately when it was published;
- which version you are using;
- whether the tutorial refers to a filter, effect, template, or AI tool.
This often explains the mismatch.
Common Mistakes to Avoid When Using CapCut Filters
Learning what not to do can improve your editing faster than memorizing dozens of preset names.
Here are the mistakes that cause the most avoidable problems.
1. Assuming Higher Intensity Means Better Quality
A stronger filter produces a more obvious change, not necessarily a better one.
If you keep increasing intensity simply because the image looks more “edited,” you may lose natural color and detail.
2. Ignoring the Original Footage
A preset interacts with what is already there.
Good daylight footage and dim indoor footage will not respond identically to the same filter.
Evaluate the source first.
3. Using a Filter to Fix Every Technical Problem
CapCut Filters can style footage, but they cannot magically recover every lost highlight, restore every dark detail, remove blur, fix poor focus, or turn low-quality source media into pristine footage.
Use the appropriate editing tool for the actual problem.
4. Making Skin Tones Unnatural
A beautiful background does not compensate for strange-looking faces.
Always check skin separately.
5. Oversaturating Landscapes
Travel creators often want colorful scenery, but there is a point where blue water, skies, and vegetation stop looking believable.
Use saturation deliberately.
6. Mixing Unrelated Styles
If every clip has a different visual personality, the finished video may lack cohesion.
Create consistency across related scenes.
7. Following Trends Blindly
A trending preset became popular because it worked well in certain examples.
That does not mean it suits your footage.
Use trends for inspiration, not as rules.
8. Stacking Too Many Visual Treatments
Filter + strong effect + glow + heavy grain + overlay + aggressive transition + animated captions can overwhelm the viewer.
Decide what deserves attention.
9. Judging Only One Frame
Play the clip.
Changes in lighting, movement, and subject position can reveal problems hidden in a paused preview.
10. Forgetting the Final Viewing Environment
Your audience may watch on a small phone, outdoors, with reduced brightness, or on a completely different display.
Before publishing an important edit, view the final export somewhere other than the screen you edited on.
Are CapCut Filters Good Enough for Professional-Looking Videos?
Yes, CapCut Filters can contribute to professional-looking results—but the preset alone is not what makes the result professional.
Professional appearance comes from a combination of:
- good source footage;
- intentional lighting;
- clear composition;
- appropriate exposure;
- consistent color;
- restrained editing;
- clean audio;
- readable text;
- thoughtful pacing;
- appropriate export settings.
Filters are one part of that system.
For fast social-media production, lifestyle content, short-form video, simple marketing clips, travel edits, and creator workflows, presets can be extremely efficient.
For projects requiring precise color matching, strict brand colors, complex mixed lighting, or a highly controlled cinematic grade, manual color tools may be more appropriate.
CapCut provides a bridge between these workflows because you can start with presets and then use more detailed adjustment tools where needed.
The important distinction is between convenience and control.
A preset gives you speed.
Manual grading gives you greater precision.
Good editors know when each is enough.
A Practical CapCut Filters Workflow for Better Results
Now that we have covered individual techniques, it helps to put everything into one repeatable workflow.
You can use this process for almost any project.
Step 1: Watch the Raw Footage
Do not edit immediately.
Watch it once and identify the strongest and weakest visual qualities.
Step 2: Correct Obvious Problems
Address major exposure or color-balance issues before creative styling where appropriate.
Step 3: Define the Mood
Write down one or two words.
For example:
warm + nostalgic
or:
clean + modern
Step 4: Choose a Relevant Category
Browse CapCut Filters that are likely to support that mood and subject.
Step 5: Compare Several Presets
Do not settle on the first dramatic option.
Compare the subject, background, skin, shadows, and highlights.
Step 6: Reduce the Intensity
Test a more restrained version.
This single step often improves the result.
Step 7: Fine-Tune Manually
Use basic adjustments or more advanced controls only where necessary.
Step 8: Match Other Clips
Check the sequence as a whole.
Step 9: Add Effects Only When They Have a Purpose
Do not use effects simply because the menu exists.
Step 10: Preview the Complete Video
Watch without constantly stopping.
Ask whether anything distracts you.
Step 11: Export Appropriately
Choose settings that suit your intended platform and source material.
Step 12: Review the Export
Watch the final file on another screen if possible.
This workflow may initially take a little longer than selecting a preset and exporting immediately, but it becomes fast with practice.
More importantly, it teaches you to make editing decisions instead of depending on presets.
How CapCut Filters Affect Storytelling
Filters are usually discussed as visual tools, but color is also part of storytelling.
Consider two versions of the same scene.
A person walks alone through an empty street.
In one version, the scene is warm, bright, and softly contrasted.
In another, it is cool, dark, and desaturated.
The physical action is identical.
The emotional interpretation is not.
This is why CapCut Filters should be selected after you understand what the scene is trying to communicate.
A family memory montage may benefit from warmth and softness.
A product demonstration may need clean, accurate color.
A dramatic short film may use cooler shadows or stronger contrast.
A food video may prioritize richness and clarity.
A fashion edit may intentionally push color in a stylized direction.
Color becomes powerful when it reinforces the message.
If the visual style contradicts the story without a reason, the audience may feel that something is wrong even if they cannot explain why.
How to Keep Filters Consistent Across Multiple Clips
Multi-clip videos create a challenge because the source footage may have been recorded under different conditions.
One clip might be outdoors.
The next might be indoors.
Another may be shot at sunset.
Applying exactly the same filter strength to all three does not guarantee they will match.
Start by comparing the unfiltered clips.
Look at:
- brightness;
- white balance;
- skin;
- contrast;
- dominant colors.
Correct major differences first.
Then apply the chosen visual style.
You may need small clip-specific adjustments to maintain a consistent result.
Consistency does not mean identical numerical settings.
It means the clips feel as though they belong together.
This is especially important in travel montages, product videos, interviews, wedding edits, event recaps, and short-form videos assembled from footage recorded throughout the day.
How to Use CapCut Filters Without Making Videos Look Overedited
Overediting usually happens gradually.
You apply a filter.
Then increase saturation.
Then add contrast.
Then add an effect.
Then another effect.
After ten minutes, your eyes have adjusted to the treatment and it no longer feels extreme.
A useful habit is to compare your edit with the original regularly.
Toggle the visual treatment on and off.
If the original suddenly looks completely colorless and your edited version looks almost unreal, you may have pushed the grade too far.
That does not automatically mean it is wrong—stylized projects can intentionally use extreme color—but the choice should be conscious.
For natural-looking videos, aim for enhancement rather than transformation.
Another useful test is the “subject test.”
Ask:
What do I notice first: the subject or the editing?
If the answer is always “the editing,” reduce unnecessary visual competition.
Change block type or style
Move Text (Adv) block from position 516 up to position 515
Move Text (Adv) block from position 516 down to position 517
Displays more block tools
The best CapCut Filters for professional-looking content are often the ones viewers barely think about.
Filters, Color Correction, and Color Grading: Know the Difference
These terms are related but not identical.
Color Correction
Color correction is about making footage look balanced or technically appropriate.
You may correct:
- exposure;
- white balance;
- contrast;
- color casts;
- shot-to-shot inconsistencies.
Color Grading
Color grading is more creative.
Once the footage is balanced, grading establishes a visual style or emotional palette.
Filters
Filters provide preset visual treatments that can help you reach a particular style more quickly.
In practice, workflows can overlap.
You might correct the footage, apply CapCut Filters, reduce their intensity, and then make further adjustments.
Understanding the distinction helps you diagnose problems.
If the footage is too dark, that is not primarily a “find a better filter” problem.
If the footage looks technically fine but lacks atmosphere, that is where a filter or creative grade can help.
When Should You Skip a Filter Completely?
Sometimes the best filter is no filter.
This is especially true when:
- the natural color already looks excellent;
- accurate product color is essential;
- documentary realism is important;
- skin tones become worse with every preset you try;
- the footage already has a strong intentional color treatment;
- the filter does not support the story.
Using CapCut Filters is an option, not an obligation.
A clean, well-shot image with subtle manual correction can look more polished than footage covered with an unnecessary preset.
Knowing when to stop editing is part of editing.
Final Thoughts on CapCut Filters
CapCut Filters make visual styling accessible because they let beginners and experienced creators test different moods without building every color treatment from scratch. Their real value, however, comes from how you use them.
Do not search for one magical filter that makes every video cinematic.
Start with your footage. Understand the subject. Decide the mood. Choose a relevant visual direction, control the intensity, protect important details, and keep the look consistent from one clip to the next.
When a preset gets you close but not quite there, use CapCut’s adjustment tools to refine the result rather than stacking more and more filters.
Most importantly, remember that good editing should support the content.
When CapCut Filters are used with purpose, viewers notice a polished, cohesive video—not a preset sitting on top of one.