A good video effect should improve what viewers see, feel, or understand. It should not make them wonder why an editor added another flashy animation.
That distinction becomes important when working with CapCut effects. CapCut gives creators access to a large collection of visual treatments that can change motion, atmosphere, lighting, texture, distortion, focus, and even how effects respond to people within a frame.
The problem is rarely finding an effect.
The difficult part is choosing the right one.
Open the Effects library and you may immediately find several options that look impressive in preview. Add too many of them, however, and a clean video can quickly become difficult to watch. An effect that works perfectly in a gaming montage may look strange in a product demonstration. A dreamy glow might strengthen a travel video but make small captions harder to read.
This guide is therefore not built around the idea that more effects create better videos.
Instead, you will learn how to find and use CapCut effects, understand the major effect styles, choose them according to the purpose of your footage, control their timing, combine them with other editing tools, and avoid the mistakes that often make an otherwise good video look over-edited.
You will also learn what to check when an effect disappears, fails to apply correctly, or looks different from what you expected.
The goal is simple: use effects as editing tools rather than decorations.
Important: CapCut changes regularly. Available effects, categories, names, controls, pricing, and interface locations can differ according to the mobile, desktop, or web version you are using. Region, account type, app version, device compatibility, licensing, and content-library updates can also affect what appears in your Effects panel.
What Are CapCut Effects?
CapCut effects are visual treatments that change or enhance what appears inside a video frame.
Depending on the selected effect, the change can be subtle or dramatic. Some treatments introduce blur or glow. Others create shaking, digital distortion, trails, light movement, stylization, or visual elements that react to a person.
The important word here is visual.
Effects influence how footage is experienced rather than simply changing where one clip begins or ends.
Imagine you record someone walking through a city at night.
The original video already contains a subject, lighting, movement, and background details. An effect could add a soft glow around the lights, create a digital distortion during a cut, strengthen the feeling of movement, or add a stylized treatment around the person.
None of those options is automatically correct.
The right choice depends on what that particular scene is supposed to communicate.
If the scene is calm and reflective, heavy shake could work against the emotion. If the same footage is part of an energetic music edit, a short motion effect might fit perfectly.
This is why learning effects by name is less useful than understanding what they actually do.
Once you start thinking in terms of purpose, you stop asking, “Which effect looks coolest?”
A better question is:
“What does this moment need?”
That small change in thinking can improve an entire edit.
CapCut Effects vs. Filters vs. Transitions
Effects, filters, and transitions are often grouped together because all three change the visual experience of a video. Their jobs, however, are different.
A filter usually influences the overall visual appearance of footage. It may make the scene warmer, cooler, brighter, darker, more faded, or more stylized.
An effect generally introduces a more noticeable visual behavior or transformation. Blur, glow, digital distortion, shake, light movement, trails, and similar treatments fall into this broader idea.
A transition primarily manages the visual relationship between two clips.
Understanding the difference makes it easier to avoid unnecessary layering.
| Editing Tool | Main Purpose | Example Use |
| Effect | Changes or adds visual behavior | Add blur, glow, shake, distortion, or stylization |
| Filter | Changes the overall visual tone | Give footage a warmer, cooler, or vintage appearance |
| Transition | Connects one clip with another | Fade, slide, or visually blend two scenes |
The categories can overlap creatively.
For example, you might apply a brief distortion exactly where two clips meet. Technically, you are using an effect, but visually it helps the cut behave like a transition.
That is completely fine.
The important thing is understanding why you are using each tool.
If a filter already creates a strong vintage look, adding another heavy vintage effect may be unnecessary. If a transition already contains a lot of motion, layering intense shake over the same moment can make the change difficult to follow.
Good editing is less about how many tools you can combine and more about giving each tool a clear job.
Video Effects and Body Effects
CapCut also distinguishes between effects that influence the broader video and effects designed around people or human movement.
Video-oriented effects can transform large areas of the frame. They are useful when you want to change the atmosphere, energy, or overall presentation of a shot.
Body-oriented effects are more closely connected to a visible person.
Think about a dance clip.
A normal effect might change the entire frame by adding distortion or light. A body-focused treatment may instead create outlines, trails, or stylized visual elements that respond more directly to the dancer.
That difference influences when you should use each type.
If your footage contains a landscape with no visible person, a body-oriented treatment naturally has less relevance. If the whole purpose of the shot is to showcase movement, fashion, dance, fitness, or performance, it may be much more appropriate.
A useful question is:
Is this scene mainly about the environment or about the person?
Your answer can immediately narrow down the most appropriate CapCut effects.
Where to Find CapCut Effects
CapCut is available across different platforms, so the exact interface you see may not be identical to somebody else’s tutorial.
The overall workflow remains similar.
You import footage, place it on the timeline, open the Effects area, browse available treatments, preview one, apply it, and then adjust how it appears in your sequence.
What changes is the location of certain buttons, the size of the library, the available controls, and sometimes the effects themselves.
Finding Effects on CapCut Mobile
Mobile editing is popular because it lets you create an entire short-form video from one device.
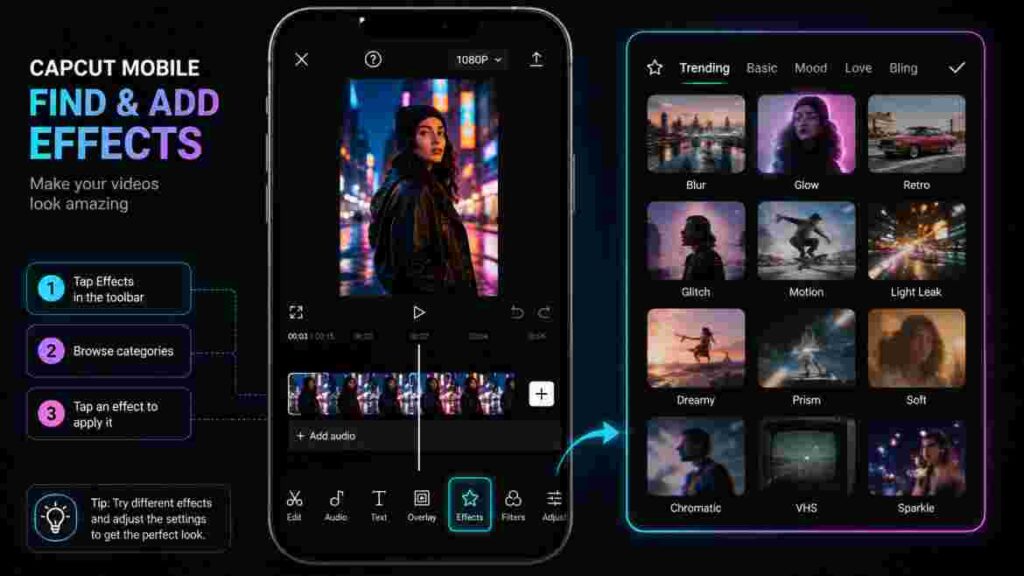
Start by opening an existing project or creating a new one. Add your footage to the timeline and look at the editing options along the bottom of the screen.
Open the Effects area and browse the available effect categories.
Preview an effect before confirming it.
Once applied, look at the timeline to see where it starts and ends. Adjust the duration so the treatment appears only during the part of the video where you actually need it.
This timeline check matters.
Beginners sometimes apply an effect and focus entirely on how it looks while forgetting how long it remains active.
A treatment intended for a one-second reveal may accidentally continue through several following shots. When that happens, the effect stops emphasizing the reveal and becomes a style applied to the whole section.
After changing the duration, play the video rather than judging the result from a paused frame.
Motion changes everything.
Finding Effects on CapCut Desktop
Desktop editing offers more physical screen space, which is particularly useful when your project contains multiple clips, text layers, effects, audio tracks, overlays, and transitions.
Import your footage and drag it onto the timeline.
Open the Effects section from the editing interface and browse the library. You can preview options before applying them to the project.
Once an effect is added, its position and duration can be managed relative to the footage.
This is where the larger timeline becomes useful.
You can see how CapCut effects line up with cuts, music beats, captions, overlays, and other elements without constantly zooming in and out of a small mobile display.
For detailed projects, this visual overview makes precise timing easier.
Finding Effects in CapCut Online
CapCut also provides browser-based editing tools.
The overall approach remains familiar. Open your project, place footage on the timeline, locate the Effects area, choose a visual treatment, and add it to the appropriate section.
Web editing can be convenient when you do not want to depend entirely on a locally installed desktop application.
However, you should not assume that every tool available in another version will appear identically in the browser.
Some controls or effects may differ according to the version and environment you are using.
This explains why screenshots from one tutorial sometimes look slightly different from your own interface.
Rather than assuming the tutorial is wrong or your software is broken, first check whether the creator is using a different CapCut platform or version.
Why You May See Different CapCut Effects Than Another User
This confuses many editors.
You watch a tutorial, see an interesting effect, open CapCut, type its name into the search area, and find nothing.
That does not necessarily mean you are looking in the wrong place.
The effect library can change.
Certain assets may differ according to platform, region, account, app version, technical compatibility, licensing, or current library updates. An effect that was available several months ago may also be renamed, replaced, or removed.
This is why building your entire editing knowledge around exact preset names is risky.
A stronger approach is learning the visual category.
Suppose an old tutorial uses a particular glitch preset that you can no longer find.
Instead of abandoning the idea, identify what attracted you to it.
Was it horizontal digital distortion?
Color separation?
Screen tearing?
Rapid flicker?
Once you know the visual behavior you need, you can browse current distortion or glitch options and look for an alternative.
The same principle applies to light effects, vintage treatments, blur, motion, body effects, and other styles.
Learn the visual language, not only the preset name.
That makes your skills useful even when the library changes.
How to Add Effects in CapCut Step by Step
The technical act of applying CapCut effects is relatively simple.
The creative workflow around that action is more important.
Rather than opening the Effects library as soon as footage enters the timeline, build the foundation of your edit first.
Step 1: Create the Basic Edit Before Adding Effects
Begin with your footage.
Remove obvious mistakes, long pauses, unusable sections, and unnecessary clips. Arrange the remaining material in the correct order.
If you are editing a talking-head video, establish the main dialogue.
If you are creating a montage, determine the sequence of shots.
If you are working with music, establish the basic rhythm.
Effects depend heavily on timing. Applying many of them before your core edit is stable creates unnecessary work later.
For example, you may carefully position a distortion around a specific cut only to shorten the previous clip afterward. Now the effect no longer lands at the correct moment.
Get the structure right first.
Decoration can come later.
Step 2: Identify Why a Moment Needs an Effect
Before browsing the library, describe the purpose in one sentence.
Maybe:
“The opening needs more energy.”
Or:
“I want this moment to feel like a memory.”
Or:
“The product reveal needs a little more impact.”
Or:
“I need viewers to notice the scene change.”
This prevents aimless browsing.
When you know the objective, you can eliminate entire categories that do not fit.
A nostalgic scene may lead you toward softer, retro, or atmospheric styles. A fast gaming edit may point toward motion or digital distortion.
The effect becomes a solution rather than an impulse.
Step 3: Browse the Effects Library
Now open the Effects area.
Do not judge options only from their thumbnails.
Preview promising effects over the actual footage.
The same preset can behave very differently depending on what is underneath it.
A glow treatment may look elegant on night footage but excessive on an already bright outdoor scene. A body effect may look excellent on a clearly separated subject but visually confused when several people overlap.
Give yourself a few alternatives before deciding.
You do not need to test everything.
You only need enough comparison to recognize when one treatment fits better than another.
Step 4: Apply the Effect to the Correct Section
Once you choose an option, apply it to the relevant part of your edit.
Immediately check its beginning and ending points.
Do not assume the default duration matches your intention.
If the effect is meant to emphasize a single action, keep it close to that action.
If it creates atmosphere for an entire scene, a longer duration may make sense.
This distinction is important because duration changes how the viewer interprets the treatment.
A quick burst of distortion feels like impact.
Continuous distortion becomes part of the overall visual style.
Neither is inherently wrong, but they communicate different things.
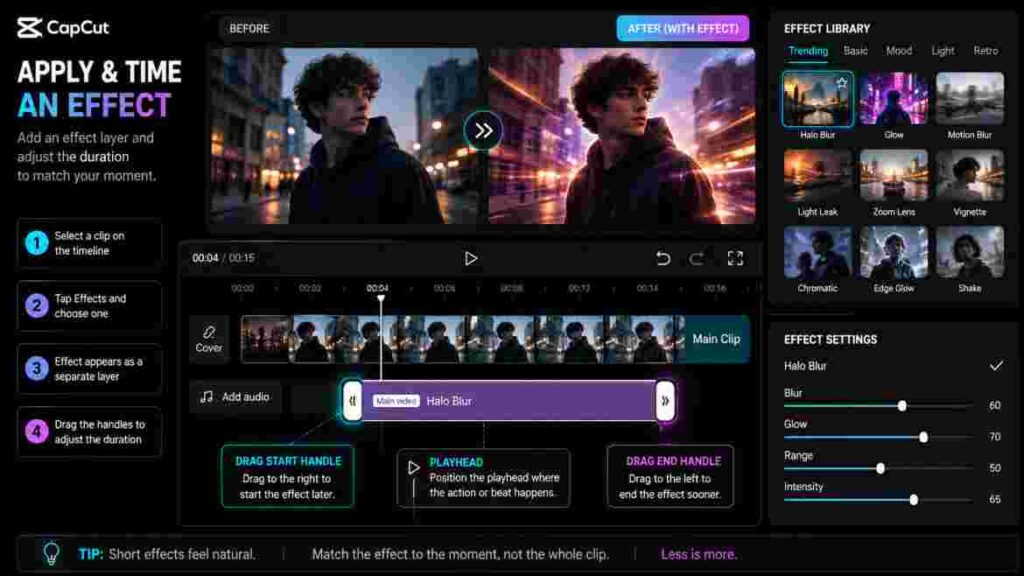
Step 5: Adjust the Duration Carefully
Timing is one of the easiest ways to improve CapCut effects without changing the effect itself.
Imagine a music edit.
A motion effect is supposed to hit at the same moment as a strong beat. If it begins too early, the viewer sees the effect before hearing the reason for it. If it starts too late, it feels like an afterthought.
Small timing adjustments can make a large difference.
Zoom into the timeline when necessary.
Watch the moments immediately before and after the effect rather than repeatedly previewing only the affected frame.
The transition into and out of the effect matters just as much as the effect itself.
Step 6: Adjust Available Settings
Some effects provide additional controls.
The exact parameters depend on the chosen treatment and your version of CapCut.
When adjustments are available, avoid assuming that the default value is automatically best.
Default presets are designed to be immediately noticeable.
Your video may need something more restrained.
If a treatment hides facial detail, text, or the product you are showing, reduce its visual dominance.
If it is so weak that the intended moment has no impact, increase it carefully.
You are not trying to discover the highest setting your device can display.
You are trying to find the setting that serves the scene.
Step 7: Preview the Effect in Context
This step separates deliberate editing from preset testing.
Play several seconds before the effect.
Watch the effect itself.
Continue for several seconds afterward.
Do not stop the playback halfway through.
You need to understand how the treatment changes the rhythm of the surrounding sequence.
An effect can look beautiful when viewed alone but feel completely unnecessary when the whole video is playing.
Context also reveals whether the following clean shot suddenly feels too plain because the previous treatment was excessively intense.
If that happens, you may not need another effect.
You may simply need to reduce the first one.
Step 8: Check the Subject and Text
Now deliberately stop looking at the effect.
Look at your content.
Can you still see the person’s face?
Can you read the captions?
Can you understand the screenshot?
Can you inspect the product?
Does the effect create a bright flash directly behind important words?
Does distortion make a demonstration difficult to follow?
Visual styling should rarely interfere with the reason somebody is watching the video.
When CapCut effects compete with essential information, the information should usually win.
Step 9: Compare the Edited and Original Versions
This is an excellent habit.
Temporarily compare the treated clip with the clean footage.
Ask one question:
Did the video actually improve?
Editors sometimes become attached to a change because they spent time creating it.
Time invested does not make an effect useful.
If the untreated version is clearer, stronger, or more emotionally appropriate, remove the effect.
Good editing includes subtraction.
Step 10: Watch the Entire Video
Once you have finished adding your visual treatments, play the project from beginning to end.
Do not edit while watching.
Experience it.
Look for moments where the visual language changes unexpectedly. Perhaps most of the project uses restrained light and motion, but one section suddenly introduces an aggressive cartoon or glitch aesthetic for no clear reason.
Individual effects can look good while the complete video still feels inconsistent.
The final goal is not to create several impressive moments.
It is to create one coherent video.
Best CapCut Effects by Editing Goal
Searching for “the best effect” sounds useful, but it can lead editors in the wrong direction.
No preset works equally well across every kind of content.
A better approach is selecting effect styles according to what you want the footage to accomplish.
Blur and Focus Effects
Blur is one of the most flexible visual tools because it can communicate several different ideas.
It can soften a scene, direct attention away from detail, support a transition, represent a memory, or create a temporary sense of disorientation.
A short blur between two scenes can make a cut feel softer.
A longer blur may communicate a dream-like state.
A background-focused blur can make the viewer pay more attention to a subject.
But blur is not always appropriate.
Imagine a tutorial where viewers need to read a software menu. Excessive blur damages the exact information they came to see.
The same problem appears in product videos.
If you are demonstrating texture or fine detail, hiding that information for aesthetic reasons makes little sense.
Use blur when softness helps the story.
Avoid it when clarity is the story.
Glitch and Distortion Effects
Glitch treatments are naturally attention-grabbing.
They often introduce visual ideas associated with digital errors, signal interference, fragmented imagery, channel separation, flicker, or abrupt image disruption.
These styles can work particularly well in gaming videos, music edits, technology content, dramatic transitions, or moments where the story intentionally suggests disruption.
Their biggest strength is also their biggest weakness.
They are noticeable.
A very short glitch around a cut can add impact because the visual disruption appears against otherwise clean footage.
Keep that distortion running continuously and the viewer eventually adapts to it.
The effect loses its surprise.
This is why many strong CapCut effects work better as punctuation than as constant decoration.
Use them to mark a moment.
Then give the viewer clean footage again.
Light and Glow Effects
Light-oriented treatments can change mood without necessarily making a clip feel aggressively edited.
They are useful for lifestyle videos, cinematic travel footage, fashion, beauty content, romantic scenes, product imagery, and music edits.
The best results often happen when the added visual light feels connected to the lighting already present in the scene.
For example, footage shot near sunset already has a warm visual direction.
A controlled light treatment can strengthen that atmosphere.
The same effect placed over flat indoor footage may appear more artificial.
Pay particular attention to faces and text.
A bright flare crossing a face during dialogue can become distracting. A glow behind white captions can temporarily reduce readability.
Subtlety helps.
Viewers do not need to consciously notice the added light for it to improve the mood.
Retro and Vintage Effects
Retro styling works when the video benefits from nostalgia, memory, imperfection, or a sense of another era.
Travel diaries, personal montages, fashion edits, music videos, and flashbacks can all support this approach.
The mistake is assuming that vintage styling means combining every old-camera characteristic you can find.
If your footage already has faded color, visible grain, an old date graphic, and a frame treatment, adding another heavy retro effect can make the idea feel forced.
Choose enough visual cues to establish the mood.
Then stop.
Good visual storytelling allows the audience to understand an idea without repeating it in five different ways.
Motion and Shake Effects
Motion treatments increase perceived energy.
They are particularly useful when the footage itself contains action or when the audio gives the visual movement something to respond to.
Sports, dance, gaming, action montages, music videos, and fast-paced social content can all benefit from controlled motion.
The key word is controlled.
A shake effect does not create excitement simply because the image moves more.
It becomes effective when the movement corresponds to something meaningful: an impact, beat, reveal, gesture, or sudden change.
Listen to the video as much as you watch it.
A modest motion effect synchronized perfectly with sound often feels stronger than an extreme shake added randomly.
Body Effects
Videos centered on human movement give body-oriented CapCut effects a clearer purpose.
Dance, fashion, fitness, performance, sports, and creator-focused content are obvious examples.
The effect can make the subject’s movement part of the visual design rather than simply altering the whole frame.
Source footage matters here.
A clearly visible subject provides a better foundation than a person hidden in darkness or overlapping heavily with several other people.
When using subject-aware tools, inspect fast movements, hair, hands, and areas where one body overlaps another.
Automated detection can save time, but it does not remove the need for visual judgment.
If the effect produces distracting edges or tracking behavior, a simpler treatment may actually look more professional.
AI Effects
AI-driven tools can create transformations that would previously have required more complex manual editing.
Depending on the feature available in your version, AI may analyze faces, objects, scenes, or movement and apply stylized visual changes accordingly.
These treatments can be useful for artistic transformations, creator content, experimental visuals, stylized portraits, or moments where the change itself is part of the concept.
However, novelty is not the same as quality.
An AI transformation can look impressive for two seconds and still be the wrong creative choice.
Ask whether the transformation strengthens the story.
Then inspect the result carefully.
Faces, hands, logos, text, objects, and edges deserve particular attention because automated transformations can occasionally create visual inconsistencies.
AI gives you another editing tool.
It does not make editing judgment unnecessary.
Cinematic Effects
“Cinematic” is used so frequently in editing discussions that it sometimes loses its meaning.
There is no single effect that turns ordinary footage into a cinematic video.
Lighting, composition, camera movement, lens choice, pacing, sound, shot selection, color, and storytelling all contribute to the final impression.
Effects are finishing tools within that larger system.
Suppose you have a carefully composed travel shot with good natural lighting and controlled camera movement.
A restrained atmospheric or light treatment may strengthen the mood.
Place the same treatment over poorly framed footage with inconsistent exposure and it cannot solve the underlying problems.
Use CapCut effects to support good footage rather than expecting them to replace it.
Dreamy and Atmospheric Effects
Some videos need energy.
Others need space.
Soft blur, glow, light movement, and related treatments can help footage feel romantic, reflective, peaceful, surreal, or emotional.
These styles often work well in wedding videos, slow travel edits, beauty content, memories, nature footage, and reflective storytelling.
Pacing matters.
A beautiful atmospheric effect has very little room to communicate mood if the video cuts to a completely different frame every half-second.
Slower shots allow viewers to experience texture, light, and movement.
Match the pace of the edit to the emotion you are trying to create.
Choosing an Effect by Purpose
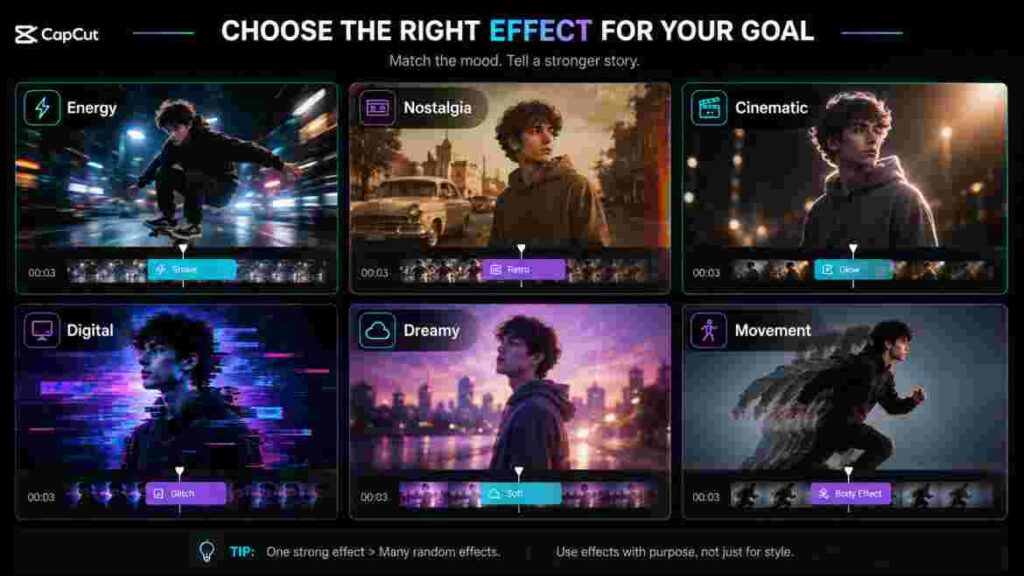
Instead of memorizing preset names, think about what the viewer needs from the scene.
| Editing Goal | Useful Effect Direction | Main Risk |
| Increase energy | Motion, shake, distortion | Visual fatigue |
| Create nostalgia | Retro or vintage styling | Overprocessing |
| Build atmosphere | Light, glow, soft blur | Reduced clarity |
| Emphasize movement | Body or motion effects | Distracting from the subject |
| Create a digital look | Glitch or distortion | Becoming repetitive |
| Create a dream-like scene | Blur, glow, soft visual styling | Looking generic |
| Strengthen a reveal | Short motion or light treatment | Poor timing |
| Showcase a product | Controlled focus or light | Hiding product detail |
This approach remains useful even if individual effects are renamed or removed.
The preset is temporary.
The editing objective is not.
How to Choose the Right CapCut Effects for Your Video
The effect library presents creative possibilities.
Your footage provides the constraints.
Good choices come from understanding both.
Match the Effect to the Emotion
Start with emotion.
What should the audience feel?
Excitement?
Tension?
Curiosity?
Nostalgia?
Calm?
Surprise?
The visual treatment should usually move in the same direction.
For example, strong distortion can communicate tension or technological disruption.
Soft light can support warmth or reflection.
A retro treatment can signal memory.
Motion can increase urgency.
That does not mean you can never use contrast. An intentionally uncomfortable effect during a calm scene can create surprise.
But when visual style and emotion conflict, the conflict should be deliberate.
Match the Effect to the Pace
The faster the edit, the more quickly viewers must process visual information.
Short, energetic treatments often fit naturally in high-speed montages because the viewer is already experiencing rapid change.
A slower video may need more restrained movement.
However, contrast can be useful.
A sudden aggressive effect inside a calm sequence can feel powerful because it breaks the established rhythm.
The important part is understanding that the effect changes the pace even when the actual clip length stays the same.
Visual energy influences perceived speed.
Protect the Main Subject
Every frame needs a visual priority.
For a tutorial, it might be the screen recording.
For a talking-head video, it is usually the speaker.
For a food video, it may be the dish.
For a product video, it is the product.
For travel footage, the environment may be the hero.
CapCut effects should support that priority.
If a decorative flash attracts more attention than the product being demonstrated, the hierarchy is wrong.
If distortion makes a person’s face hard to follow during an important sentence, the effect is working against the content.
View the frame at a small size.
What do you notice first?
The answer tells you a lot.
Use Contrast Instead of Constant Intensity
Effects become powerful because they contrast with what surrounds them.
Clean footage makes a stylized moment more noticeable.
A quiet section makes a sudden burst of movement feel stronger.
A sharp shot followed by temporary blur creates a clear visual change.
This means you do not need an effect on every clip.
In fact, leaving several sections clean can make the few treated moments much more effective.
Contrast creates emphasis.
Constant intensity removes it.
How to Combine CapCut Effects Without Making the Video Messy
Layering is one of the easiest ways to create visual depth.
It is also one of the easiest ways to destroy clarity.
A good rule is to give every editing layer a specific purpose.
If two layers are performing the same function, ask whether you actually need both.
Combining an Effect With a Filter
Effects and filters can work together because they influence different aspects of the image.
A filter might establish the overall color direction of a travel sequence.
A light effect can then emphasize one particular reveal.
The combination works because the filter creates continuity while the effect creates a moment.
Problems begin when both treatments aggressively alter the same visual qualities.
If the footage becomes excessively saturated, dark, hazy, or difficult to read, simplify it.
Combining an Effect With a Transition
A transition handles the relationship between two clips.
An effect can strengthen that relationship.
Imagine two action shots cutting together on a strong beat.
A brief motion or distortion treatment around the cut may make the transition feel more energetic.
You do not need to do this at every cut.
If every transition becomes an event, the viewer stops recognizing which moments actually matter.
Save stronger combinations for important changes.
Combining an Effect With Speed Changes
Speed changes alter rhythm, while effects influence how that rhythm feels.
The combination can work particularly well in music, sports, gaming, and dramatic edits.
Build the speed change first.
Then decide whether the visual treatment adds anything.
A slowdown may pair naturally with softer visual styling.
A sudden acceleration could work with controlled motion or distortion.
Timing matters more than complexity.
When CapCut effects and speed changes peak at slightly different moments, the combination can feel accidental.
Combining an Effect With Text or Captions
Text has a job.
It communicates information.
Effects generally have a supporting role.
That hierarchy becomes especially important in short-form videos where captions may carry much of the message.
You can use an effect to strengthen a title entrance, emphasize a keyword, or visually mark the beginning of a section.
But avoid covering essential captions with flicker, bright flashes, distortion, or excessive movement.
If viewers need to replay the video because they could not read an important sentence, the styling has failed.
If captions are an important part of your editing workflow, learn how to use CapCut Auto Captions to generate, customize, and refine on-screen text before combining it with visual effects.
Combining an Effect With Overlays
Overlays may include screenshots, product images, reaction pictures, logos, arrows, graphics, or supporting visuals.
Each overlay adds information to the frame.
That means the available visual space becomes more limited.
Before adding another effect, make sure the overlays are already organized.
Position them carefully.
Keep the primary subject visible.
Then test the effect.
If the frame becomes difficult to scan, remove or reduce something.
Adding more styling rarely fixes a composition that is already too busy.
A Simple Rule for Layering Multiple Effects
When you want to combine more than one visual treatment, add them one at a time.
After each addition, ask whether it contributes something different.
If the first effect provides motion and the second creates atmosphere, they may complement each other.
If three effects all create different forms of distortion, the result may simply become louder rather than better.
Do not judge complexity by counting layers alone.
Judge it by how much visual information the audience must process.
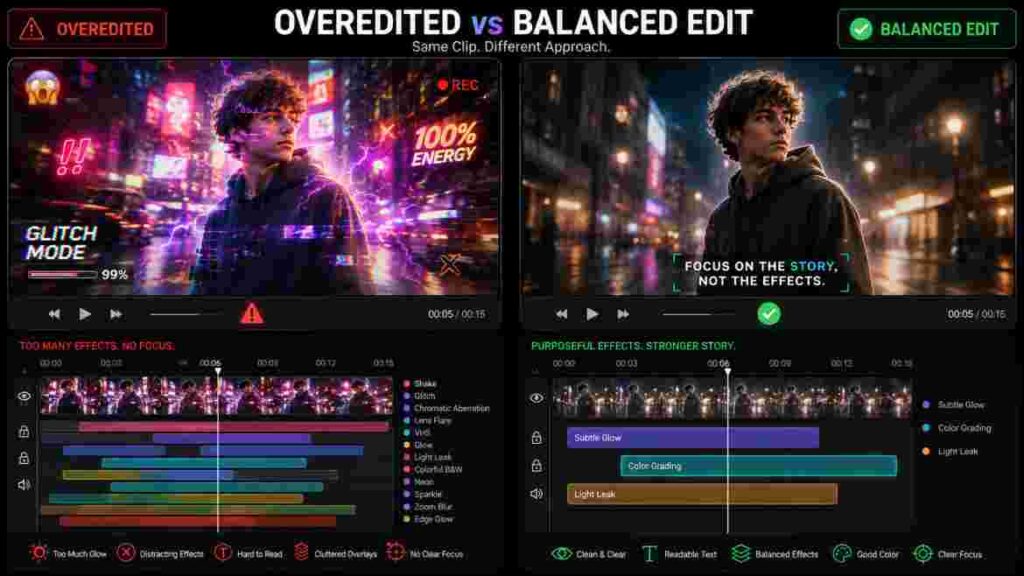
How to Make CapCut Effects Look Professional
Professional-looking effects rarely depend on finding a secret preset.
They depend on restraint, timing, hierarchy, consistency, and context.
Start With Less
When intensity controls are available, start conservatively.
Increase the treatment until its purpose becomes visible.
Then compare it with a slightly weaker version.
This is useful because editors naturally become accustomed to what they are looking at.
After repeatedly previewing an effect, you may keep increasing the intensity simply because the previous setting no longer feels exciting.
The viewer has not seen it twenty times.
You have.
Judge the effect from the audience’s perspective.
Apply Effects to Important Moments
If every second receives the same amount of visual emphasis, nothing feels important.
Use stronger moments strategically.
A reveal deserves attention.
A major statement may benefit from visual emphasis.
A beat drop can support a brief movement change.
A transformation may justify a more noticeable treatment.
Routine footage does not always need the same level of styling.
This difference creates hierarchy.
Time the Effect Precisely
Precise timing can make simple CapCut effects look more polished than complicated effects placed carelessly.
Zoom into the timeline when necessary.
Pay attention to when the effect enters, reaches its strongest point, and disappears.
If a visual impact is tied to a hand movement, musical beat, object drop, or camera movement, align it carefully.
A few frames can change how the moment feels.
Allow Clean Footage to Exist
One of the most common signs of inexperienced editing is fear of empty visual space.
Every moment receives a transition.
Every clip receives an effect.
Every pause receives text.
Every movement receives a sound.
The result becomes exhausting.
Clean footage gives viewers time to understand what they are seeing.
It also makes your stylized moments stand out more strongly.
Restraint is not an absence of creativity.
It is control.
Build a Consistent Visual Language
Imagine one video using soft warm light, restrained transitions, calm music, and slow pacing.
Then, halfway through, an aggressive neon glitch appears without explanation.
The effect may look excellent in isolation.
It still feels wrong.
Visual consistency means individual editing decisions seem to belong to the same creative world.
You do not need to use one effect repeatedly.
You simply need the treatments to support the same direction.
Use Sound as Part of the Decision
Effects do not exist in silence.
Listen to the audio while editing.
Music, dialogue, sound effects, pauses, and environmental sound all create natural opportunities for visual emphasis.
A subtle movement synchronized with a beat can feel intentional.
The same movement placed randomly may feel unnecessary.
You do not have to synchronize every visual change with music.
That can become predictable.
But major effects should have some relationship with the rhythm of the video.
CapCut Effects for TikTok
TikTok encourages fast visual communication, but fast does not mean chaotic.
The first few moments of a video should give viewers a reason to continue.
Effects can help strengthen that hook, but they cannot replace it.
If the underlying opening contains no curiosity, value, personality, surprise, or useful information, adding more visual movement may attract attention only briefly.
For entertainment, dance, transformations, or music edits, energetic treatments can reinforce key moments.
For tutorials and educational videos, the strategy should usually be cleaner.
Use CapCut effects to mark important changes rather than continuously transforming the screen.
For example, a short visual cue can introduce a new step. Another can emphasize a mistake. A final treatment can strengthen the result.
The effect supports the structure.
It does not become the structure.
CapCut Effects for Instagram Reels
Instagram Reels cover a wide range of content, so there is no single ideal visual style.
Lifestyle and travel creators may prefer atmospheric light or restrained retro treatments.
Fashion and fitness creators may benefit from movement-oriented or body-focused effects.
Product creators should protect detail.
Educational creators need to preserve text readability.
Instead of chasing every new visual trend, consider the identity of the account.
A creator who consistently uses controlled, polished edits may weaken that identity by suddenly applying unrelated aggressive styles simply because they are popular.
Trends can inspire your editing.
They do not need to dictate it.
CapCut Effects for YouTube Shorts
YouTube Shorts can support highly edited entertainment as well as information-heavy tutorials, commentary, reviews, and storytelling.
The effect strategy should follow the content.
For an educational Short, clean footage during explanation can make the message easier to follow. A small number of visual treatments can then emphasize the hook, a major point, and the final result.
Montage-based Shorts can support more frequent visual changes.
Even there, consistency matters.
If every cut introduces a completely different visual language, viewers spend more energy processing the editing than following the content.
Using CapCut Effects for Different Types of Videos
Different formats create different visual priorities.
Understanding those priorities makes effect selection easier.
Travel Videos
Good travel footage often contains natural visual interest already.
Architecture, landscapes, food, street scenes, movement, changing light, and local details provide variety without requiring heavy treatment.
Use effects to reinforce atmosphere.
A soft light treatment can strengthen a sunset.
A brief blur may help connect locations.
A restrained vintage look can make a personal travel diary feel nostalgic.
Avoid covering beautiful footage simply because the Effects library is available.
Sometimes the scene is already doing the work.
Gaming Videos
Gaming content can handle more visual intensity because action is already part of the experience.
Short glitch, motion, shake, or digital treatments may work well around victories, eliminations, reactions, failures, transitions, or major gameplay moments.
However, gameplay still needs to remain visible.
If CapCut effects hide the exact moment viewers are supposed to watch, the edit becomes self-defeating.
Apply stronger treatments immediately around the action rather than completely covering it.
Let viewers see what happened.
Then stylize the impact.
Fashion Videos
Fashion relies on color, movement, shape, texture, and personal presentation.
Light effects, body-focused treatments, restrained motion, and retro styling can complement those elements.
But clothing itself often needs to remain visible.
If an effect changes color dramatically or hides fabric detail, the viewer may no longer see the very thing the video is showcasing.
Style the presentation without losing the subject.
Food Videos
Food content depends heavily on texture, detail, color, and movement.
Steam, pouring, cutting, mixing, plating, and close-up details already create visual appeal.
Effects can help during transitions or reveals.
Heavy styling over the finished dish is usually less useful because viewers want to inspect it.
Let the food carry the final shot.
Talking-Head Videos
Talking-head content is usually message-led.
The person and their words are the primary elements.
Instead of constantly styling the speaker, use effects to improve structure.
A subtle treatment can strengthen the hook.
Another can mark a change in topic.
A short emphasis can support an important statement.
Then return to clean footage.
If captions are present, check them every time you add another visual layer.
Educational Videos
Educational videos have one clear priority:
Understanding.
Everything else is secondary.
Effects can still help.
They can distinguish a wrong example from a correct one, introduce a new section, highlight a result, or draw attention to a specific moment.
But when viewers need to read a screen recording, diagram, instruction, or caption, keep that information clear.
A tutorial can look less dramatic and still be far more valuable.
Music and Dance Videos
Music and dance naturally create opportunities for expressive CapCut effects because rhythm and movement provide strong visual anchors.
Motion, light, body effects, distortion, and stylization can all contribute.
The temptation is to add something at every beat.
Resist it.
Choose focal points.
If every beat contains a visual impact, the audience quickly becomes accustomed to the pattern.
Allow choreography, camera movement, and performance to create some of the energy themselves.
Common CapCut Effects Mistakes
Many weak edits do not fail because the editor chose a “bad” preset.
They fail because the effect is used at the wrong time, at the wrong intensity, or for the wrong purpose.
Using an Effect Only Because It Is Trending
Trends can be useful for discovering editing styles.
They should not automatically determine what belongs in your project.
An effect created for a fast transformation video may look completely unnatural in a calm educational clip.
Ask whether the treatment fits the content first.
Popularity comes second.
Applying Effects to Every Clip
If every shot contains a different treatment, the audience loses its visual baseline.
There is no contrast between normal and stylized moments because nothing is normal.
The video starts to look like a demonstration of editing presets.
Leave some footage clean.
The fewer moments you emphasize, the stronger those moments can become.
Using Excessive Intensity
A strong effect is easy to notice.
That does not make it more professional.
High intensity can hide details, distort faces, damage caption readability, and create visual fatigue.
Try a weaker version.
If the visual idea still communicates, the reduction may improve the final edit.
Ignoring Timing
Timing is part of the effect.
A good treatment applied half a second too late can feel wrong.
Pay particular attention to cuts, beats, gestures, movement impacts, reveals, and changes in dialogue.
The effect should feel connected to something.
Random timing makes even expensive-looking visual treatments feel cheap.
Mixing Unrelated Styles
One section feels cinematic.
Another suddenly looks like an old VHS recording.
The next uses neon digital distortion.
Then a cartoon treatment appears.
Each CapCut effects choice may look interesting individually, but the complete sequence has no visual identity.
Choose a small family of styles that support one another.
Consistency makes edits feel intentional.
Covering Important Captions
Captions are especially vulnerable because visual treatments frequently introduce brightness, distortion, movement, or changing contrast.
Watch the actual words while previewing effects.
Do not assume the audience will “probably still be able to read them.”
If a sentence matters, protect it.
Hiding the Subject
The effect should rarely become more important than the subject.
This matters in product videos, fashion, tutorials, talking-head content, food videos, and demonstrations.
Check what you notice first.
If the answer is “the effect,” decide whether that is actually what you intended.
Using CapCut Effects With Keyframes, Masks, and Speed Changes
Effects become more useful when you understand the other editing tools around them.
Sometimes the best solution is not another preset.
It may be controlled movement, selective masking, or a speed change.
Keyframes
Keyframes allow properties such as position or scale to change over time.
This gives you more control over movement.
Suppose you want the frame to slowly push toward a subject.
Instead of searching through dramatic zoom effects, a controlled keyframed movement may produce a cleaner result.
The point is not to replace effects.
It is to recognize that presets are only one way to solve a visual problem.
Masks
Masks allow selective treatment of parts of the frame.
This can create more deliberate compositions because the change does not always need to affect the entire image.
Masking teaches an important visual principle:
Editing can be local.
You can change one area while protecting another.
That approach is particularly useful when the subject must remain clear while the surrounding composition becomes more stylized.
Speed Changes
Speed controls influence rhythm.
Combine them carefully with CapCut effects and the result can become more expressive.
A slowdown may work naturally with softer visual styling.
An acceleration can support motion or distortion.
But speed should not be added simply to make the project more complicated.
Build the movement first.
Watch it.
Then decide whether the effect contributes something that the speed change does not already communicate.
How to Create a Cinematic Look Without Overusing Effects
If your goal is cinematic footage, start before opening the Effects panel.
Look at composition.
Is the subject positioned intentionally?
Look at lighting.
Does the scene have depth?
Look at camera movement.
Is it stable where stability matters and intentionally moving where movement matters?
Listen to the audio.
Does the sound support the atmosphere?
Check your pacing.
Are shots given enough time to communicate?
Once these elements work together, effects can add refinement.
A little atmosphere may strengthen the scene.
A short blur may improve a transition.
A controlled light treatment can reinforce existing lighting.
You do not need several dramatic effects at once.
Cinematic editing is often more convincing because it appears controlled.
Using CapCut Effects for Storytelling
Effects become more meaningful when they communicate information.
A change in visual style can indicate that the story has moved into a memory.
Blur can suggest uncertainty.
Distortion can communicate interruption or technological failure.
Light can reinforce discovery or transformation.
Retro styling can separate the past from the present.
In these situations, the effect is doing narrative work.
The audience may not consciously think about why the scene suddenly looks different.
They simply understand that something has changed.
This is a much stronger use of CapCut effects than adding random visual treatments simply to keep the screen busy.
Using Effects in Before-and-After Videos
Before-and-after content already contains natural contrast.
Use that advantage.
The original state establishes the problem.
The transition builds anticipation.
The final state delivers the payoff.
A strong effect can help with the transition, but avoid covering the final result for too long.
If somebody is watching a room renovation, photo enhancement, hairstyle transformation, product restoration, or design makeover, they want to inspect the “after.”
Let them see it clearly.
The final result should be stronger than the transition used to reveal it.
Using Effects in Tutorials
Tutorials should reduce friction.
The viewer is trying to follow a process.
Use visual treatments to support navigation rather than entertainment for its own sake.
A subtle effect can signal a new step.
Another can draw attention to an error.
A short visual change can introduce the finished result.
But when you are showing a menu, button, screen recording, or configuration, avoid unnecessary movement.
The user is trying to learn.
Respect that.
Using Effects With Captions
Caption-heavy content requires extra care.
Text and CapCut effects often compete for the same part of the frame.
Check how every strong treatment changes the background behind your captions.
A bright light passing behind white words can make them disappear temporarily.
Distortion can bend or visually interrupt text.
Motion can pull attention away from the sentence.
If the effect is optional and the caption contains essential information, protect the caption.
Communication matters more than decoration.
How to Find Trending Effects Without Becoming Dependent on Trends
Trending effects can provide useful creative inspiration.
They show you which styles viewers are currently seeing repeatedly.
But trend awareness is different from trend dependence.
When you find something popular, ask two questions.
First:
Why does this effect work in the original video?
Second:
Does the same reason exist in my footage?
Maybe the treatment works because it aligns with a dance move, a transformation, a specific genre, or a particular song.
Without that context, copying the visual alone may not produce the same result.
Study the principle.
Then adapt it.
Good editing skills survive after the trend disappears.
Are CapCut Effects Free?
CapCut provides visual effects that can be accessed without paying, but you should not assume that every asset or related feature will always be free.
Availability can depend on the current CapCut version, platform, region, account, plan, and content library.
Some assets may require paid access.
Others can change over time.
The safest approach is to check the label displayed in your own current interface.
This becomes especially important when collaborating.
An editor working on another platform, in another region, or under a different account configuration may not see exactly the same library you do.
Avoid building an important project around one specific preset until you know everyone involved can access it.
Why an Effect May Suddenly Disappear
An effect you used previously may later become difficult or impossible to locate.
Several things can cause this.
Content libraries change.
Licensing changes.
Technical requirements evolve.
Older assets may be replaced.
Regional availability can differ.
Some effects may also be optimized differently across devices or platforms.
Rather than depending on one exact name, remember what the preset was doing visually.
If it created glow, find another glow treatment.
If it created digital distortion, search that category.
If it added an analog feel, look for another vintage option.
Your creative concept should not collapse because a single preset disappears.
CapCut Effects Not Working? What to Check
When CapCut effects do not appear correctly, avoid changing everything at once.
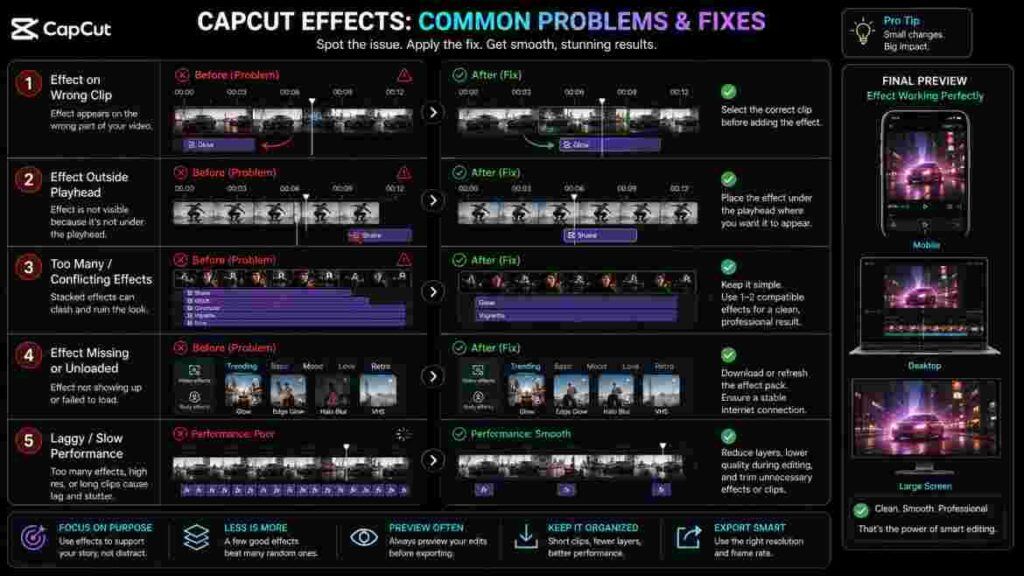
Work through the problem logically.
First, make sure the correct clip or intended footage is active.
Then inspect where the effect sits on the timeline. The playhead may simply be outside its active duration.
If your project contains several layers, check whether the effect has been placed differently from what you expected.
Conflicting filters, effects, adjustments, or overlays can also influence the final appearance. Temporarily simplify the project and test again.
Make sure your version of CapCut is current, especially if you are following a recent tutorial.
Device performance can also matter. A complicated project with multiple visual layers may preview poorly on limited hardware even when the settings themselves are correct.
Cloud-based assets may require a stable connection to load properly.
If a particular named effect is missing completely, consider whether the tutorial you are following is old or uses another platform or region.
Create a simple test project when you are unsure.
Add one short clip and apply the same effect.
If it works there, your original project’s layers or settings deserve closer inspection.
If the problem remains, check CapCut’s current official support information for the platform you are using.
Why Effects May Look Different After Export
Do not assume that the editing preview and exported file will always look identical under every viewing condition.
The final appearance can be influenced by resolution, bitrate, frame rate, compression, playback device, display settings, and any additional compression applied by the social platform where the video is uploaded.
If something looks wrong after publishing, first inspect the exported file locally.
If the local export looks correct but the social media version appears softer, platform processing may be responsible.
If the local export already looks wrong, return to the project and check the relevant effect and export settings.
This simple comparison helps you identify where the problem actually occurred.
A Better Workflow for Using CapCut Effects
A repeatable editing order can prevent visual styling from distracting you before the video itself works.
Start with the story.
Arrange the footage and remove what does not need to be there.
Next, refine the pacing. Adjust clip lengths and any important speed changes.
Add functional elements such as captions, titles, screenshots, and essential overlays.
Establish the broader visual consistency of the footage.
Only then begin applying CapCut effects to moments where they provide a clear benefit.
After that, refine transitions and audio relationships.
Finally, watch the video from beginning to end and inspect the export when necessary.
This sequence is not a strict law.
It is simply a useful way to keep editing priorities in the right order.
A strong video should work before the decorative layer is added.
How Many Effects Should You Use?
There is no correct number.
A ten-second music montage may contain more visual treatments than a sixty-second educational explanation.
Instead of counting effects, think about visual load.
A viewer may already be processing a new clip, animated caption, overlay, transition, camera movement, and sound effect at the same time.
Adding one more treatment could be too much.
In a visually simple section, several subtle layers may feel completely comfortable.
Ask how much new information arrives at once.
That matters more than the number of presets in the timeline.
Should You Use the Same Effect More Than Once?
Yes.
Repetition can create consistency.
If you use the same treatment every time the story enters a flashback, viewers begin to understand that visual cue.
If a particular effect marks each major chapter, it becomes part of the video’s structure.
This is visual grammar.
However, repeated CapCut effects can also become predictable.
If the same dramatic treatment appears every three seconds, its impact quickly decreases.
Repeat visual language when repetition creates recognition.
Do not repeat simply because you found one effect you like.
When You Should Use No Effect at All
Sometimes the best decision is to leave the shot alone.
Clean footage is often preferable when the subject is already visually strong, the viewer needs to inspect detail, the message is serious, the frame already contains several graphics, or styling would make the moment feel less authentic.
This is particularly important for emotional footage.
A meaningful expression, natural reaction, or genuine personal moment may become weaker when covered by unnecessary visual treatment.
Ask what the effect contributes.
If you cannot answer, remove it.
How Beginners Should Practice Effects
Do not learn every effect inside an important project.
Create a short practice timeline.
Use the same clip several times.
Apply different types of treatments and compare how each changes the footage.
Test strong and subtle settings.
Compare short durations with long ones.
Try one effect alone and then combine it with a filter or speed change.
Watch how timing influences the result.
The purpose of the exercise is not to create something publishable.
It is to understand cause and effect.
That knowledge transfers to every future project.
Developing Your Own Editing Style
Your editing identity will not come from one preset.
It develops from patterns in your decisions.
Perhaps you consistently prefer clean typography, restrained motion, warm visuals, and occasional atmospheric light.
Another creator may naturally prefer fast cuts, digital distortion, high-energy sound design, and stronger motion.
Neither approach is inherently superior.
Look at your strongest work.
Which CapCut effects or visual directions appear repeatedly?
How intense are they?
How frequently do you use them?
What type of pacing surrounds them?
Which combinations consistently look good?
Over time, those repeated choices become your style.
You stop chasing random effects because you have a clearer idea of what belongs in your work.
Viewer Comfort Matters
A video can be technically impressive and still be unpleasant to watch.
Rapid flashing, strong shaking, extreme contrast changes, or constant visual movement can become uncomfortable for some viewers.
Creative intensity should therefore be controlled.
You can create energy through cuts, audio, camera movement, pacing, composition, and performance without placing extreme effects over every moment.
This is another reason restraint matters.
Good editing does not simply attract attention.
It manages attention responsibly.
CapCut Effects for Brand Content
Brands usually benefit more from consistency than novelty.
If you are editing repeatedly for the same business, develop a recognizable visual system.
You might establish a preferred transition style, caption treatment, color direction, level of motion, and a small group of acceptable effect families.
Then evaluate new effects against that system.
A popular aggressive glitch may be completely appropriate for a gaming brand.
The same treatment may feel out of place for a premium skincare company using calm, minimal visual communication.
Trend fit is useful.
Brand fit is more important.
CapCut Effects for Product Content
Commercial product videos need to balance attention and accuracy.
Visual styling can make a reveal more exciting, but the product should eventually be shown clearly.
Avoid sustained treatments that significantly distort its color, shape, texture, label, packaging, or visible details.
Use stronger CapCut effects around transitions, movement, or reveals.
Then give the product clean screen time.
The viewer should understand what is being presented.
If visual styling makes the product look materially different from reality, the editing has moved too far.
Can Effects Fix a Boring Video?
Sometimes they improve presentation.
They cannot solve every underlying problem.
A weak video may actually suffer from slow pacing, unclear structure, poor audio, repetitive footage, an uninteresting opening, or unnecessary material.
Before adding another effect, try improving the edit itself.
- Cut the pause.
- Move the strongest clip earlier.
- Add useful B-roll.
- Improve the captions.
- Change the music.
- Remove repetition.
- Clarify the hook.
A stronger foundation often makes fewer effects necessary.
This is one of the most important lessons in editing.
Effects should enhance a good decision.
They should not hide a bad one.
Can Too Many Effects Reduce Video Quality?
Creatively, yes.
Too much styling can reduce clarity, consistency, and viewer comfort.
Technically, final quality also depends on source footage, project complexity, export settings, compression, device performance, and the platform where the video is eventually uploaded.
If your project begins lagging after several CapCut effects are added, distinguish preview performance from final output quality.
A slow preview does not always mean the exported video will look equally poor.
But performance problems should not simply be ignored.
Test a short export when necessary.
Check it on the device where viewers are likely to watch.
Then decide whether the project needs simplification.
How to Decide Whether an Effect Should Stay
When you are uncertain, use a simple test.
Ask whether the treatment supports the purpose of the scene.
Then check whether the subject remains clear.
Consider whether the effect fits the rest of the edit.
Compare the treated and untreated versions.
Finally, ask what the viewer notices first.
Sometimes the effect should be immediately noticeable.
A dramatic transformation may depend on that.
At other times, viewers should barely notice the editing itself.
The important thing is knowing which outcome you intended.
What “Best CapCut Effects” Really Means
There is no universal best preset.
There is only the most appropriate treatment for a particular moment.
A glitch may be perfect for a one-second gaming transition and completely wrong for a calm skincare demonstration.
A soft glow may strengthen a wedding montage and reduce clarity in a software tutorial.
A strong body effect can make a dance clip more expressive while distracting from a simple talking-head explanation.
So when choosing CapCut effects, stop searching for a preset that works everywhere.
Ask a more useful question:
What should the viewer feel, notice, or understand differently after this treatment appears?
If you can answer that clearly, you are no longer selecting effects randomly.
You are editing with intention.
Final Quality Check Before Exporting
Before publishing, watch the complete project rather than inspecting only individual moments.
Check whether the subject remains easy to identify.
Make sure captions and important text stay readable.
Look for effects that begin too early or end too late.
Notice whether one visual treatment suddenly feels unrelated to the rest of the video.
Pay particular attention to sections where effects, overlays, text, transitions, and movement overlap.
Those are the moments most likely to become cluttered.
Then export a test when the project matters enough to justify one.
Watch the exported video at a realistic size.
If the final destination is primarily mobile, do not judge everything from a large computer monitor.
The audience experiences the finished video, not your editing timeline.
Final Thoughts on CapCut Effects
CapCut effects can make footage more energetic, cinematic, nostalgic, atmospheric, playful, or visually distinctive. But access to a large effect library does not automatically create a better video.
The quality comes from the decisions surrounding the effect.
Start with the content.
Understand what the scene needs.
Choose a treatment that supports that purpose.
Control its timing.
Protect faces, products, screenshots, captions, and other important visual information.
Use clean footage when clean footage works better.
When you combine several editing tools, give each one a reason to exist.
Most importantly, be willing to remove an effect.
A simple clip with strong pacing and clear visual hierarchy can look far more professional than footage covered by several impressive presets.
The strongest CapCut effects are therefore not necessarily the loudest or newest options in the library. They are the treatments that become part of the story instead of distracting viewers from it.
Once you begin thinking this way, the Effects panel stops being a collection of presets you need to try.
It becomes a toolkit for controlling attention, atmosphere, rhythm, emotion, and visual storytelling.