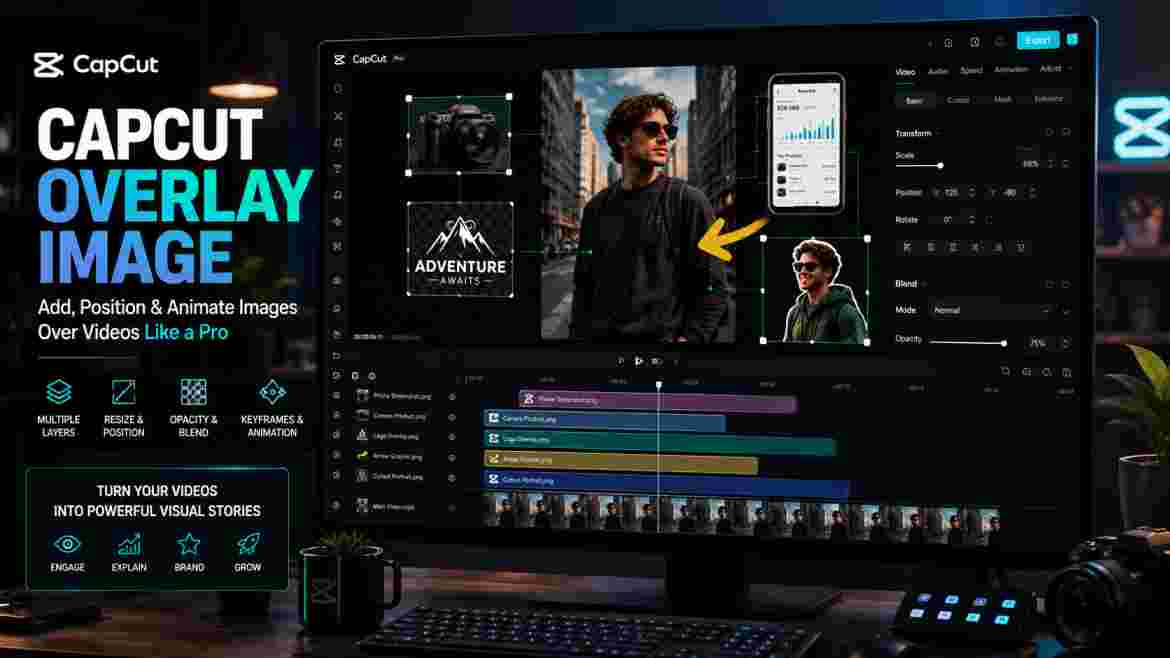
A capcut overlay image can turn a simple video into a much more informative and visually interesting edit. Instead of showing only your main footage, you can place a photo, logo, screenshot, product image, graphic, or transparent PNG over the video while it continues playing underneath.
This technique is useful for tutorials, product videos, social media posts, reaction content, branded clips, educational videos, and many other projects. You can use a capcut overlay image to highlight something that would be difficult to explain with the original footage alone.
The basic process is straightforward. On the mobile app, CapCut provides an Overlay workflow for adding another visual to a project. On desktop, the same idea is generally achieved by placing the picture on a track above the main video. CapCut’s current documentation describes both approaches, although menus and available controls can change as the software is updated.
But adding a picture is only the beginning.
A good capcut overlay image should be positioned carefully, displayed for the right amount of time, sized appropriately, and styled so it does not distract from the main footage. Depending on your project, you may also want to change its opacity, remove its background, blend it with the video, animate it, or move it with keyframes.
This guide covers the complete process on mobile and desktop. You will also learn how to work with PNG files, logos, multiple images, image-on-image compositions, background removal, animations, keyframes, transparency, troubleshooting, and export settings.
By the end, you should understand not only how to add an overlay, but how to make it look like an intentional part of your video.
What Is a CapCut Overlay Image?
A capcut overlay image is a still visual placed above another visual layer in a CapCut project. In most cases, the main video forms the background while the added image appears over it.
Think of your editing project as a stack of transparent sheets.
Your primary footage sits on the bottom. A photograph can sit above it. A logo could sit above both. Because the upper layers do not necessarily cover the entire canvas, several visual elements can appear at the same time.
That is the basic principle behind image overlays.
For example, imagine you are recording a tutorial about a mobile application. Your screen recording can remain visible as the main footage while a screenshot appears in one corner to highlight a particular setting.
The screenshot is the overlay.
A product reviewer could do something similar by keeping the presenter on screen while showing a product photograph beside them. A company could place a transparent logo in the corner of an advertisement.
A creator might use a capcut overlay image for an arrow, icon, meme, reaction picture, decorative frame, call-to-action graphic, or before-and-after example.
The important point is that an overlay does not replace your original footage. It becomes another visual layer within the same composition.
How Image Overlays Work
Three things determine how an image overlay behaves: its layer, its position, and its timing.
The layer determines whether the image appears above or below another visual element.
The position determines where viewers see it on the canvas.
The timing determines when it appears and disappears.
Suppose you have a 40-second video but only want your capcut overlay image to appear from 12 to 17 seconds. The image needs to occupy that part of the timeline.
If its timeline clip starts at the beginning, the image may appear too early. If the image clip ends before the relevant moment, it will disappear before viewers have finished looking at it.
Screen position matters just as much.
A screenshot placed directly over a person’s face may contain useful information but still produce a poor composition. Moving it into available negative space can make both elements easier to see.
Size also affects the result.
An overlay that is too small may be unreadable. One that is too large may hide the footage it is supposed to support.
The goal is therefore not simply to put one visual over another. It is to make both layers work together.
Image Overlay vs. Video Overlay
Image and video overlays use the same basic layering concept, but their content is different.
An image overlay is a still picture. It might be a JPG photograph, PNG graphic, screenshot, logo, illustration, or another static visual.
A video overlay contains motion.
For example, placing a static photograph of a laptop over your main footage is an image overlay. Placing another clip showing someone using that laptop is a video overlay.
Because a capcut overlay image is static, you may decide to create movement through animation or keyframes.
Video overlays already contain their own motion, so they require slightly different editing decisions.
This article focuses on still-image overlays, although concepts such as layer order, timing, scaling, opacity, and positioning can also apply to other visual layers.
Image Overlay vs. Picture-in-Picture
Picture-in-picture, or PIP, is one common type of overlay composition.
A typical PIP layout shows one smaller visual inside a larger one. Reaction videos often use this technique: the main content fills most of the screen while a smaller camera feed appears in a corner.
An image overlay can create a similar layout, but it is a broader concept.
Your overlay might be a transparent logo rather than a rectangular picture. It might be an arrow, a cut-out product, a texture, or a graphic covering only a small part of the frame.
So a capcut overlay image can be used in a picture-in-picture design, but not every overlay needs to look like a traditional PIP window.
Why Use Image Overlays in CapCut?
Image overlays are useful because they allow you to add information without constantly replacing the main footage.
Consider an educational video.
Instead of cutting away from the speaker whenever a chart or screenshot is mentioned, you can show the supporting image beside the speaker. The viewer keeps the original context while seeing the additional information.
This is especially useful for tutorials.
If you are explaining a website, software interface, phone setting, or editing technique, a capcut overlay image can direct attention to a specific menu or example.
Overlays are also useful for branding.
A logo can remain in a corner of the frame without becoming the central subject. A watermark can identify the creator while leaving most of the footage unobstructed.
Product-focused content benefits as well.
A reviewer can mention several products and display the relevant photograph at the exact moment each item is discussed.
Overlays can also make social videos more expressive. Reaction pictures, memes, arrows, icons, screenshots, and graphic elements can support the story when used intentionally.
The keyword here is intentionally.
An overlay should solve a communication or design problem. Adding unnecessary images can make the screen crowded and force viewers to decide where to look.
What You Need Before Adding an Image Overlay
Before creating a capcut overlay image, spend a moment preparing your source material.
The quality of the original image matters.
If you import a tiny, heavily compressed picture and enlarge it until it occupies most of the video frame, it may look soft or pixelated. Editing can change its placement and appearance, but it cannot restore detail that was never present in the source.
Choose the cleanest version of the image you have available.
Also think about its purpose.
A logo has different requirements from a screenshot. A screenshot may need to remain large enough for viewers to read. A logo may only need to occupy a small corner.
A product cutout might require transparency, while a photograph may look better with its original background.
Making these decisions before editing saves time later.
JPG vs. PNG for Image Overlays
JPG works well for ordinary photographs where you want the complete rectangular picture to remain visible.
A travel photo, screenshot, portrait, or product photograph with its background intact can often work perfectly well as a JPG.
PNG is particularly useful when transparency matters.
For example, suppose you have a circular company logo. If the area around the logo is transparent, you can add the logo without showing an unwanted rectangular background.
That makes PNG useful for a capcut overlay image containing logos, icons, arrows, frames, cut-out products, interface graphics, and decorative elements.
However, a PNG file is not automatically transparent.
PNG supports transparency, but a creator can also save a normal image with a solid background as PNG. If you import it and see a white rectangle, the file may simply contain white pixels rather than transparent pixels.
Transparent PNG vs. Reduced Opacity
These concepts are often confused.
A transparent PNG can contain areas that are completely invisible while other parts remain fully visible.
Opacity controls the visibility of the whole selected layer.
Imagine a black logo on a transparent background. The empty space around the logo is invisible, but the logo itself can remain solid black.
If you reduce the opacity of the entire capcut overlay image, the black logo itself also becomes partially transparent.
This distinction matters when creating watermarks, graphics, and blended effects.
Consider the Video Aspect Ratio
Your project’s aspect ratio changes how much usable space you have.
A vertical 9:16 project has a different composition from a horizontal 16:9 project. A wide image that sits comfortably beside a presenter in a landscape video may cover the presenter in a narrow vertical frame.
Do not position an overlay in isolation.
Look at the complete composition and ask what else needs to remain visible.
A capcut overlay image should support the main content rather than compete with it.
How to Add an Image Overlay in CapCut Mobile
The mobile workflow is one of the easiest ways to understand overlays because CapCut provides an Overlay option within the editing interface.
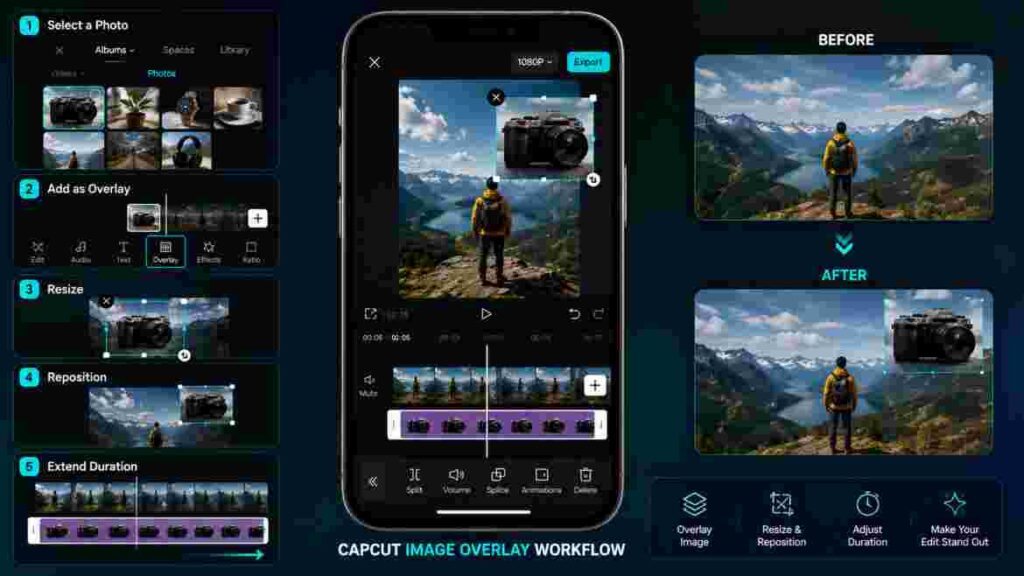
The exact position or naming of controls can change with app updates, operating system, region, and version, so treat the following as a workflow rather than a promise that every button will remain in exactly the same location forever.
Step 1: Create a New Project
Open CapCut on your phone.
Choose the option to start a new project and select the video that will serve as your main footage.
Once imported, the video appears on the editing timeline.
Play through it briefly before adding anything else. Decide where your capcut overlay image needs to appear.
This small step helps you avoid adding the image first and then moving it repeatedly because you have not decided on its timing.
Step 2: Find the Overlay Tool
With your main video in the project, look through the lower editing toolbar for Overlay.
CapCut’s current mobile guidance uses the Overlay workflow for adding secondary visual material.
Open that tool and choose the option to add an overlay.
Your device’s available media should appear so you can select the picture you want to use.
Step 3: Select the Image
Choose the photo or graphic you want to place over your video.
Once added, it should appear as another visual element on the canvas and as a separate item on the timeline.
You have now created the basic capcut overlay image.
Do not worry if it initially appears too large or in the wrong place. That is normal. The next steps are about fitting it into the composition.
Step 4: Resize the Image
Select the image on the preview canvas.
On a touchscreen, you can typically use touch gestures to change its size.
Make the image large enough to communicate its purpose without covering more of the main footage than necessary.
If the overlay is a screenshot containing small text, test its readability.
A viewer watching on a phone has much less screen space than someone looking at your editing preview on a large display.
Step 5: Reposition the Overlay
Drag the picture to the part of the screen where it works best.
Avoid automatically placing every overlay in the center.
The center often contains the main subject, captions, or important action. Corners and areas of negative space may provide a cleaner location.
If your capcut overlay image is a logo, a corner may be appropriate.
If it is a screenshot viewers need to inspect, a larger central position may make more sense for a short period.
Position should follow purpose.
Step 6: Set the Overlay Duration
Now look at the overlay on the timeline.
The image layer has a duration that determines how long it remains visible.
Adjust its beginning and end so the picture appears at the right moment.
For example, if you say, “Here is the setting you need to enable,” the screenshot should appear close to that sentence rather than five seconds later.
Good timing makes a capcut overlay image feel connected to the narration or action.
Poor timing makes the viewer work harder to understand why the picture is there.
Step 7: Preview the Transition
Play the video from a few seconds before the overlay appears until a few seconds after it disappears.
Check whether the appearance feels abrupt.
An instant appearance is not always bad. In a fast tutorial, it may be exactly what you need.
In a polished promotional video, however, a subtle entrance or exit animation may feel smoother.
Do not add animation automatically. Use it only when it improves the visual flow.
Step 8: Make Additional Adjustments
At this stage, you can refine the image depending on the controls available in your version.
You might adjust opacity, color, animation, background removal, or other visual properties.
A simple capcut overlay image often needs very little adjustment. Good source material and thoughtful positioning can be more important than adding many effects.
Step 9: Review the Whole Video
Do not preview only the five seconds containing the overlay.
Watch the entire sequence.
You may discover that the image covers captions, another graphic, or an important visual element that appears later.
You may also notice that the overlay remains on screen longer than necessary.
Correct these problems before export.
Step 10: Export
When the edit is complete, open CapCut’s export controls.
Choose settings appropriate for your project and destination.
Do not assume that selecting the highest possible resolution automatically creates a sharper overlay. If the original picture is low resolution, exporting the project at a larger resolution does not magically restore missing image detail.
Preview the exported file after saving it.
How to Overlay an Image in CapCut on PC/Desktop
Desktop editing uses the same layering principle but presents it differently.
Rather than depending on the same mobile Overlay button workflow, CapCut Desktop allows you to place visual media on tracks in the timeline.
CapCut’s current documentation describes putting the picture on a track above the main video so it becomes the upper visual layer.
For users who understand timelines, this approach makes a capcut overlay image easy to manage.
Step 1: Create or Open a Project
Launch CapCut Desktop and create a project.
Import the video you want to edit.
It is helpful to organize your source files before the timeline becomes crowded, particularly if the project contains several photos, logos, and graphics.
Step 2: Add the Main Video to the Timeline
Place your primary video on the main timeline.
This becomes the base visual layer.
Play through the footage and identify where the additional picture needs to appear.
You can then place the playhead near that section to make timing easier.
Step 3: Import the Image
Import the photograph, screenshot, PNG, or other image into your media area.
You now have both the main video and the image available in the project.
The image is not yet functioning as an overlay simply because it has been imported.
You need to place it correctly on the timeline.
Step 4: Place the Image Above the Video
Drag the picture onto a visual track above the main footage.
Because the image sits above the base video in the layer structure, it can appear over that footage in the preview.
This creates your capcut overlay image on desktop.
If it fills too much of the canvas initially, resize it.
Step 5: Resize the Picture
Select the overlay.
Use the available transform or scale controls to reduce or increase its size.
Desktop editing gives you more physical screen space, which can make precise positioning easier than working on a small phone display.
Still, the same rule applies: size should depend on purpose.
A watermark can be subtle. A screenshot that contains essential information may need to be much larger.
Step 6: Position the Image
Move the overlay to the desired location.
Pay attention to the rest of the frame.
If your video contains subtitles, avoid positioning a large capcut overlay image directly over them.
If the speaker is on one side of the frame, the opposite side may offer useful negative space.
Use the preview as a composition tool, not just a confirmation that the image exists.
Step 7: Adjust the Duration
On the timeline, change the image clip’s length so it remains visible for the required amount of time.
The overlay does not necessarily need to remain for the entire video.
In fact, leaving an informational screenshot on screen after it is no longer relevant can become distracting.
Match duration to viewer need.
Step 8: Refine the Overlay
Now you can consider additional controls.
CapCut’s desktop overlay guidance includes options for scale, position, blending, and other visual adjustments.
You might lower opacity for a texture, adjust color to make a photo fit the scene, or add animation if the image should enter dynamically.
Keep the edit purposeful.
Step 9: Preview at Full Sequence Speed
Watch the section without constantly pausing.
An overlay can look perfect while the video is paused but feel distracting during actual playback.
Check whether the viewer has enough time to understand it.
Also watch the moment the capcut overlay image disappears.
If it vanishes at an awkward point in a sentence or movement, adjust its duration.
Step 10: Export the Finished Video
When everything looks correct, use the export controls.
CapCut currently provides options that can include resolution, frame rate, format, codec, and bitrate depending on platform/version.
Choose settings based on your source footage and destination rather than automatically maximizing every setting.
After export, watch the resulting file outside the editor.
CapCut Overlay Image on Mobile vs. PC
The basic result can be similar on both platforms, but the editing experience is different.
Mobile is convenient when you are creating short social videos and want to edit directly from media stored on your phone.
The dedicated Overlay workflow also makes the concept easy for beginners to understand.
Desktop editing provides a larger workspace and a traditional multi-track timeline. That can be helpful when your project contains several images, video clips, audio tracks, and other visual elements.
Neither platform is automatically the correct choice for everyone.
For a quick TikTok or Reel, mobile may be more convenient.
For a longer project containing many layers, desktop may feel easier to organize.
The best platform for a capcut overlay image is therefore the one that matches your project complexity and editing workflow.
How to Resize an Image Overlay Correctly
Resizing sounds simple, but it has a major effect on visual hierarchy.
When an overlay enters the screen, viewers naturally notice it. If it is extremely large, it may temporarily become more important than the main footage.
That can be useful when the image is the main point.
It can be a problem when the overlay is only supporting information.
Before resizing a capcut overlay image, decide what viewers should look at first.
If the answer is the overlay, give it enough space.
If the main video should remain dominant, keep the image smaller.
Avoid Excessive Enlargement
A small source image may lose visual quality when enlarged.
If you notice softness, jagged details, or unreadable text, shrinking the image may look better than trying to force it to fill the frame.
Whenever possible, begin with a higher-quality source.
This is especially important for screenshots because text and interface elements quickly become difficult to read when the source has been compressed heavily.
Preserve Important Content
Do not judge the overlay by itself.
Look at what it covers.
A perfectly sharp capcut overlay image is still poorly placed if it hides the person’s face, a product demonstration, captions, or an important button in a screen recording.
Visual hierarchy should guide both scale and placement.
How to Crop and Rotate an Image Overlay
Sometimes the image contains more information than you need.
Cropping can remove unnecessary areas and help the important subject occupy more of the overlay.
For example, a full-screen screenshot may contain navigation bars, empty areas, and unrelated controls. If you only need one setting, cropping closer to that area can make it easier for viewers to see.
Rotation can be useful for creative layouts.
However, avoid rotating an image simply to make the edit look more “designed.”
A capcut overlay image should remain easy to interpret.
Slight rotation can work well for scrapbook-style edits, photo collages, or playful social content. It may look inappropriate in a clean software tutorial where clarity is more important than decoration.
How to Change Overlay Opacity and Transparency
Opacity determines how visible a layer is.
At full opacity, the visible pixels in your image appear solid.
As opacity decreases, the footage underneath becomes increasingly visible through the image.
This makes opacity useful when you do not want your capcut overlay image to completely block the video.
Watermarks are a common example.
A fully opaque logo can draw too much attention. Reducing its opacity can keep the branding visible while allowing the footage to remain dominant.
Textures are another example.
A light-leak, grain, or decorative image may work better when blended with the footage rather than sitting on top as a solid rectangle.
When Should You Lower Opacity?
Lower opacity when you deliberately want the two layers to interact visually.
Do not reduce opacity simply because the overlay feels distracting.
First ask whether it is too large, poorly positioned, or unnecessary.
Making a bad overlay transparent does not automatically make it good.
For a capcut overlay image containing a screenshot or text that viewers need to read, lowering opacity too much can actually reduce usability.
Use transparency according to function.
Opacity Is Not Background Removal
Lowering opacity makes the entire image less visible.
Background removal attempts to isolate a subject by removing the surrounding background.
These produce very different results.
If you want a person or product to appear without its original rectangular background, reducing opacity is not the correct solution. You need a transparent asset or a background-removal workflow.
How to Add a Transparent PNG Overlay in CapCut
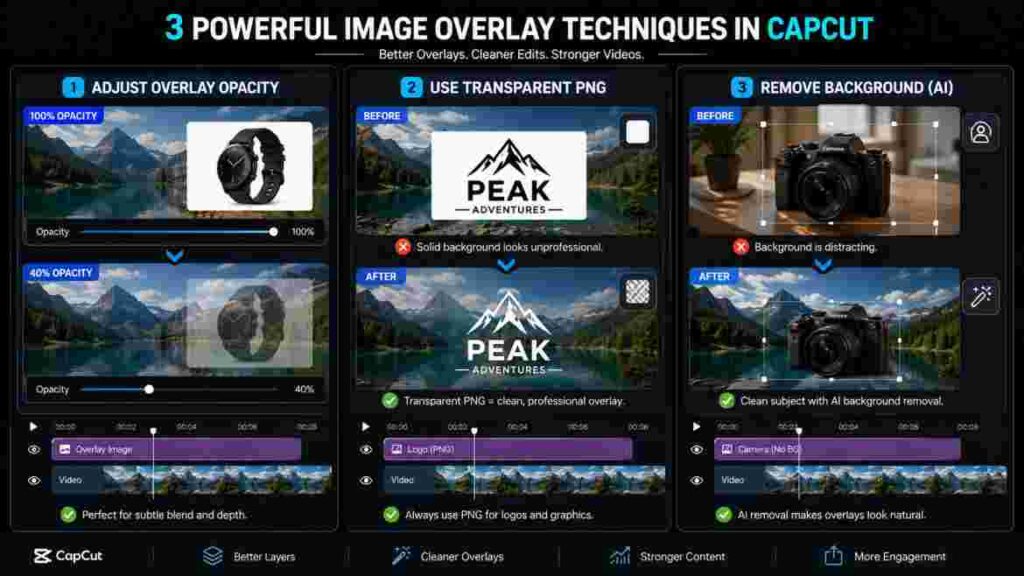
Transparent PNG files are among the most useful assets for overlays.
They allow you to place a graphic over footage without displaying an unnecessary rectangular background.
Start by importing the PNG like any other picture.
On mobile, add it through the relevant overlay workflow.
On desktop, place it on a track above your video.
Resize and position the capcut overlay image according to the composition.
If the file contains genuine transparency, the empty areas should allow the underlying footage to show through.
Good Uses for PNG Overlays
A transparent logo is an obvious example.
You can also use PNG graphics for arrows that point toward interface controls, circles that highlight an object, decorative borders, product cutouts, icons, stickers, and branded elements.
The advantage is flexibility.
Because the background is transparent, the graphic can feel like part of the composition rather than a rectangular photo pasted on top.
Why Does My PNG Have a White Background?
The most common explanation is that the white area is actually part of the file.
A file can use the PNG format while still containing a solid white background.
Open the source image in software that clearly displays transparency before assuming CapCut is responsible.
If the background is embedded in the image, you will need to remove it or obtain a genuinely transparent version.
This can make a major difference to a capcut overlay image used for logos or product cutouts.
How to Remove the Background From an Overlay Image
Background removal is useful when you want only the subject from a photograph.
Imagine you have a picture of a shoe photographed against a plain wall.
If you overlay the original photo, viewers see the shoe and the rectangular wall behind it.
If the background is removed successfully, the shoe can appear directly over the video.
This gives the capcut overlay image a more integrated appearance.
CapCut provides background-removal functionality across parts of its editing ecosystem, but exact tool names, availability, and behavior can vary by platform, plan, region, and software version.
Start With a Suitable Image
Automated background removal generally has an easier job when the foreground subject is visually distinct from its background.
Complex hair, motion blur, transparent objects, shadows, similar foreground/background colors, and fine edges can make separation more challenging.
Do not assume every source will produce a perfect cutout.
Inspect the result.
Remove the Background
Select the overlay and locate the available background-removal or cutout controls in your version.
Apply the tool and allow CapCut to process the image.
Once the background is removed, inspect the edges carefully.
Zooming in can reveal halos, missing details, or rough boundaries that are not obvious at normal preview size.
Position the Cutout
After background removal, the isolated subject often needs to be repositioned.
A product cutout may look good beside a presenter.
A person may work better near the edge of the frame.
Do not automatically center every capcut overlay image after removing its background.
Use the empty areas in your composition intelligently.
Make the Cutout Look Natural
Removing the background does not automatically make two images look like they belong together.
A brightly lit product placed over a dark scene may look disconnected.
Differences in color temperature, contrast, saturation, and scale can also make the overlay appear artificial.
Small adjustments can help the layers feel more consistent.
The goal is not always perfect realism. In a tutorial or promotional graphic, a clearly separated cutout may be intentional.
How to Blend an Image Overlay With Your Video
Blending is about making two layers interact visually rather than simply stacking one solid picture above another.
CapCut’s desktop overlay documentation describes blend controls for certain overlay effects.
These can be useful for textures, light effects, film-style elements, and other creative treatments.
For an ordinary photo, however, you may not need a special blend mode.
Sometimes the best way to integrate a capcut overlay image is simply to choose the right size, position, opacity, and color balance.
Match Brightness and Contrast
If the overlay is dramatically brighter than the surrounding footage, it can attract more attention than intended.
Likewise, an extremely dark image may disappear against a dark background.
Adjusting brightness and contrast can help.
Do not chase a perfect numerical match. Judge the result visually in the context of the complete frame.
Consider Color Temperature
Warm footage combined with a very cool overlay can create an obvious visual separation.
Sometimes that contrast is intentional.
If it is not, modest color adjustments may make the composition more coherent.
Avoid the Pasted-On Look
The “pasted-on” look often comes from several issues working together: incorrect scale, mismatched color, hard rectangular backgrounds, poor placement, and excessive sharpness differences.
Fix the underlying problem rather than applying random effects.
A clean capcut overlay image does not need to be complicated.
How to Animate an Image Overlay in CapCut
A still image does not contain motion of its own, but animation can make its entrance, presence, or exit more dynamic.
This is useful for logos, product photos, screenshots, callouts, and reaction images.
For example, a screenshot might slide into the frame when you mention it and slide out after the explanation ends.
A product image might scale up slightly as you introduce it.
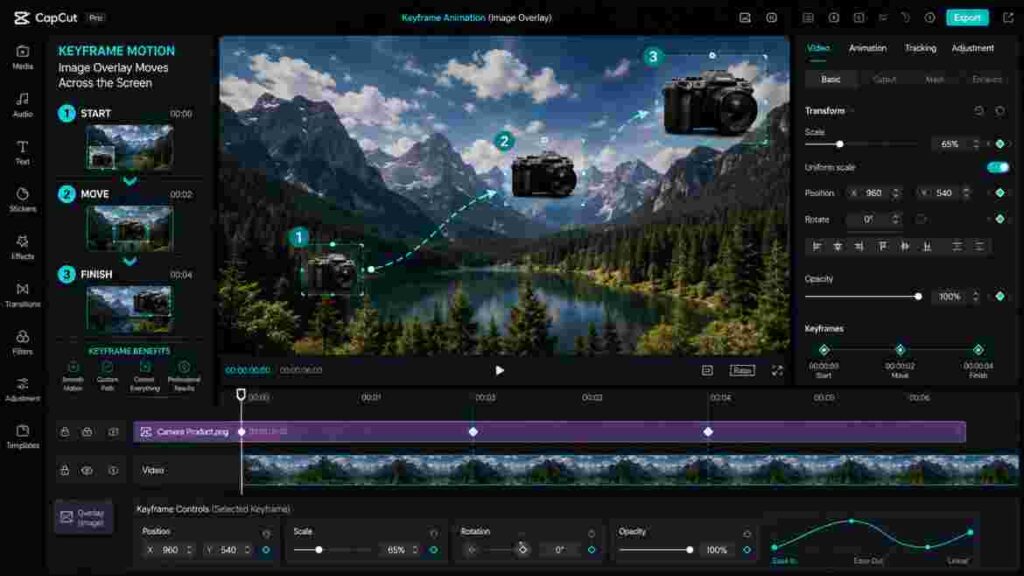
A capcut overlay image can therefore feel connected to the pacing of the video rather than appearing as a completely static element.
Entrance Animation
An entrance animation controls how the overlay first appears.
The right effect depends on the tone of your video.
A subtle fade may work for a professional tutorial.
A faster pop or slide may fit energetic social content.
Avoid choosing an animation simply because it looks impressive in isolation.
The movement should match the edit.
Exit Animation
Exit animations can prevent an overlay from disappearing abruptly.
Again, they are optional.
An immediate cut can be perfectly appropriate in fast-paced editing.
If you do use an exit animation, make sure it finishes before the overlay clip ends.
Loop Animation
Some editing workflows allow continuing motion while an element remains on screen.
This can add energy, but constant movement can also distract viewers from the main footage.
If your capcut overlay image contains information that needs to be read, excessive movement may reduce clarity.
How to Move an Image Overlay With Keyframes
Keyframes give you more precise control over change over time.
Instead of applying only a preset animation, you can define states at different points in the timeline.
For example, you can start an image on the left side of the frame and later move it to the right.
The editor creates the movement between those positions.
Understand the Starting State
Place the overlay where you want the motion to begin.
Set the relevant keyframe using the controls available in your version.
This tells the editor that the capcut overlay image should have a particular position or transform state at that moment.
Move Forward in Time
Move the playhead later in the timeline.
Change the image position.
Depending on the property and workflow, CapCut can interpolate the change between the keyframed states, creating motion.
Combine Position and Scale
Keyframes become more interesting when you change more than location.
You might begin with a small product image in the corner and gradually enlarge it as the narration shifts focus toward that product.
You could also create a controlled zoom toward part of a screenshot.
Keep movement readable.
Fast or complicated motion can make viewers lose track of what the overlay is showing.
Common Keyframe Mistakes
One mistake is creating movement without giving it enough time.
Another is moving the image across important content.
Creators may also add too many keyframes, producing motion that feels nervous or accidental.
A capcut overlay image usually benefits from simple, intentional movement.
Ask what the animation communicates.
If the answer is “nothing,” static placement may be better.
How to Add Multiple Image Overlays in CapCut
You are not limited to a single image.
Multiple overlays can be useful for comparison layouts, collages, product lists, tutorials, and branded compositions.
However, each additional layer increases visual complexity.
Start with your main video and first overlay.
Then add another picture using the same general workflow.
On desktop, additional images can occupy upper visual tracks. On mobile, multiple overlay elements can be managed within the project depending on the current interface.
Each capcut overlay image should have a clear role.
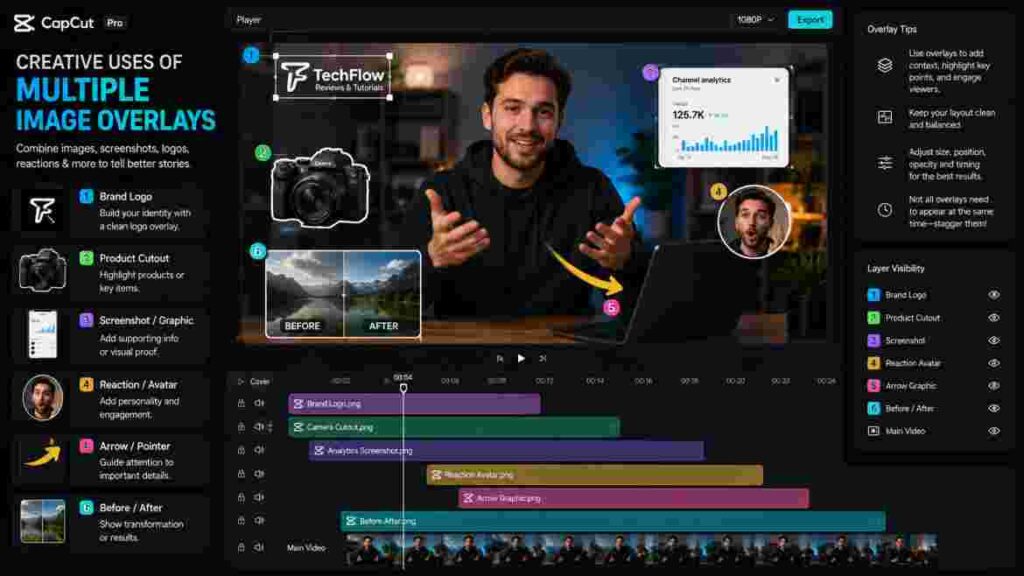
Manage Timing Separately
Multiple images do not need to appear simultaneously.
Suppose you are comparing three products.
You could display the first product when you discuss it, replace it with the second, and then show the third.
This is often cleaner than placing all three on screen for the entire video.
Pay Attention to Layer Order
When images overlap, the upper visual layer can cover the one beneath it.
Layer order therefore matters.
If an arrow is supposed to sit over a screenshot but appears behind it, review the arrangement of the visual elements.
Avoid Visual Clutter
The more overlays you add, the more disciplined your composition needs to become.
Do not fill every empty area.
Negative space helps viewers understand which elements are important.
Three well-positioned overlays can look professional. Three oversized overlays plus captions, stickers, effects, and animated text can quickly become overwhelming.
How to Overlay One Image on Another in CapCut
The phrase image overlay does not always mean picture over video.
Some users want to place one photograph over another.
CapCut’s current image-overlay guidance supports layered image composition, including arranging layers, resizing, positioning, and adjusting opacity.
The principle is almost identical to video overlay.
One image becomes the base, while the second becomes the upper layer.
Choose the Base Image
Start with the picture that should form the background or main canvas.
This might be a landscape photograph, product background, graphic design, or social-media canvas.
Then import the second picture.
Add the Second Image
Place the second visual above the base.
Resize it according to the design.
At this point, you have created a capcut overlay image composition without using a video as the background.
Adjust Position and Scale
Move the upper image into place.
If you are creating a collage, leave enough space for the other elements.
If you are placing a person over a background, consider whether the proportions look intentional.
Adjust Opacity if Needed
Reducing opacity can create double-exposure-like or blended visual effects.
For a normal collage, full opacity may be more appropriate.
Again, opacity is a design choice rather than a requirement.
Remove the Background When Appropriate
If the upper picture contains an unwanted background, isolate the subject first.
This can transform a simple rectangular photo into a more flexible design element.
The resulting capcut overlay image may look more integrated because only the subject remains visible.
How to Add a Logo Overlay in CapCut
Logos are one of the most practical overlay use cases.
Start with a high-quality logo file.
A transparent PNG is often convenient because it allows the underlying footage to remain visible around the logo.
Import it as an overlay and position it in a suitable part of the frame.
Keep the Logo Proportional
Avoid stretching the logo disproportionately.
If the original design is wide, do not force it into a tall shape simply to fit a corner.
Maintain its proportions.
Choose a Suitable Position
Corners are common because they tend to interfere less with the main subject.
But there is no universal “best” corner.
Your footage determines the best location.
If captions occupy the lower portion of the frame, an upper corner may work better.
Control Logo Visibility
A logo does not always need to be fully opaque.
If it competes with the footage, modestly lowering opacity can make the capcut overlay image more subtle.
Do not make it so transparent that it becomes meaningless.
Match the Duration
If the logo should function as branding throughout the video, extend the image layer to cover the relevant duration.
If it is only part of an intro or outro, keep it limited to that sequence.
How to Create a Watermark With an Image Overlay
A watermark is similar to a logo overlay but usually has a more specific purpose: identifying the creator, brand, or ownership of the content.
Choose an image that remains recognizable at a small size.
Place it where it does not obstruct important information.
Then adjust its visibility.
A capcut overlay image used as a watermark should generally be noticeable enough to identify but not so dominant that viewers spend the entire video looking at it.
There is no universal opacity percentage that works for every video.
A white watermark over bright footage behaves differently from the same watermark over a dark background.
Preview several parts of the video before deciding.
Creative Ways to Use Image Overlays
Once you understand the technical workflow, overlays become a storytelling tool rather than just an editing feature.
The following examples show how the same technique can solve different creative problems.
Add Screenshots to Tutorials
Screenshots are especially useful in software and app tutorials.
When you mention a menu or setting, display a cropped screenshot of that exact area.
Enlarge it enough for viewers to understand what they are seeing.
Your capcut overlay image can also include an arrow or circle that directs attention to the relevant control.
Do not leave the screenshot visible after the explanation moves on.
Show Product Images in Reviews
If you are talking about several products, show each one at the moment it becomes relevant.
This helps viewers connect the name with the visual.
Keep the presenter visible if their reaction or explanation remains important.
Create Before-and-After Comparisons
Overlay techniques can help create comparison layouts.
You might show the original photo first and then introduce an edited version beside or over it.
Clear labeling may be useful when the difference is subtle.
Add Reaction Images
Reaction images and memes can add humor or emphasis.
Timing matters more than complexity.
A simple capcut overlay image appearing at exactly the right moment can be more effective than an elaborate animation that lasts too long.
Add Arrows and Callouts
Transparent PNG arrows, circles, and icons are useful for educational videos.
Use them to guide attention.
Do not add several competing callouts at once unless the viewer genuinely needs to compare multiple areas.
Create Promotional Videos
A product can appear beside pricing text, a feature callout, or a presenter.
Use consistent positioning and scale across multiple products so the edit feels deliberate.
Build Photo Collages
Several images can be arranged within one frame.
This works for travel recaps, event videos, portfolios, and memory montages.
Keep spacing consistent.
If every image uses a different size, angle, border, and animation without a design reason, the composition may feel chaotic.
Add Decorative Elements
Frames, light effects, textures, and graphics can create a visual style.
These should support the footage.
If a decorative capcut overlay image makes the main subject harder to see, reconsider its size, opacity, or necessity.
CapCut Overlay Image Not Showing: Common Problems and Fixes
Overlay problems are frustrating because the image may technically exist in the project while remaining invisible or appearing incorrectly.
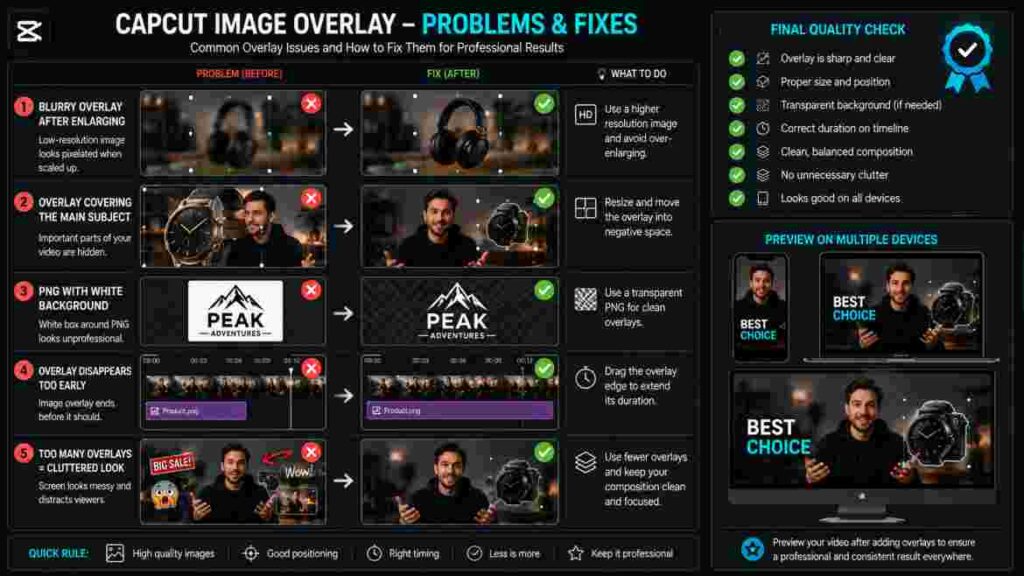
Instead of immediately deleting the project or re-importing everything, check the basic layer, timing, position, and visibility conditions first.
The Overlay Is Outside the Current Timeline Position
An image only appears during its active timeline duration.
If the playhead is positioned before the image begins or after it ends, you will not see it.
Move the playhead into the overlay’s timeline range.
If it appears, the issue is timing rather than the image itself.
The Overlay Ends Too Early
If the picture appears and then disappears before you want it to, extend its duration.
Match the end of the capcut overlay image to the moment when viewers no longer need it.
Do not extend it automatically to the end of the entire project.
The Image Is Too Large
Sometimes an overlay appears to have “replaced” the video because it covers the entire frame.
It may simply be scaled too large.
Reduce its size and reposition it.
The underlying footage should become visible around it.
The Image Is Too Small or Off-Screen
The opposite can also happen.
An overlay may be tiny or positioned beyond the visible canvas.
Select it and review its transform or on-screen position.
Return it to a visible area and resize as necessary.
The Layer Order Is Wrong
If one visual should appear over another but does not, check the layer arrangement.
On desktop, tracks above the main footage are used for upper visual layers in CapCut’s current overlay workflow.
For complex compositions, make sure the element you expect to see has not been hidden behind another full-screen image.
The Overlay Is Too Transparent
If opacity has been reduced dramatically, the picture may become difficult to see.
Increase it temporarily.
If the capcut overlay image becomes visible again, adjust the final opacity to a level that suits the design.
The PNG Still Has a Background
Check the original file.
A white or black background may actually be embedded in the PNG.
If so, obtain a transparent version or remove the background.
Changing the file extension does not create transparency.
The Overlay Looks Blurry
First check the source image.
If it is low resolution and you have enlarged it significantly, softness may be unavoidable.
Use a better-quality source when possible.
Also inspect the exported video before judging only from the editing preview.
If your source picture is already blurry or too small, improving it before using it as an overlay can produce a cleaner result. You can check our CapCut Image Upscaler guide to learn whether CapCut’s 4K AI upscaling can improve a low-quality photo before you add it over your video.
Background Removal Looks Rough
Complex edges can challenge automated cutout tools.
Try a cleaner source image if possible.
High contrast between subject and background can make separation easier.
Inspect hair, fingers, transparent materials, and fine edges carefully.
The Overlay Option Looks Different
CapCut changes over time.
The interface can also differ between mobile, desktop, web, operating systems, account types, regions, and software versions.
If a tutorial screenshot does not match your screen exactly, focus on the workflow rather than assuming the feature has disappeared.
Look for related media, layer, overlay, transform, or editing controls in your current version.
Multiple Overlays Make Editing Difficult
Complex projects require organization.
Keep overlay timing tidy and avoid adding unnecessary duplicate layers.
On desktop, a larger timeline view can make complicated edits easier to understand.
If performance becomes poor, remember that project complexity, source media, effects, device resources, and software version can all influence editing performance. Avoid assuming one specific cause without testing.
Common Image Overlay Mistakes to Avoid
Knowing how to add an image does not automatically produce a good edit.
Several common mistakes can make otherwise useful overlays feel amateurish.
Using Low-Quality Source Images
Start with the best source you can reasonably obtain.
A low-quality capcut overlay image may become especially obvious when displayed beside sharp video footage.
Avoid unnecessary enlargement.
Covering the Main Subject
An overlay should not hide the most important part of the video unless that is the intended effect.
Watch for faces, products, subtitles, interface buttons, and demonstrations.
Leaving the Overlay on Screen Too Long
Once viewers have received the information, the picture may no longer need to remain.
Removing it can restore visual simplicity.
Showing the Overlay Too Briefly
The opposite is equally problematic.
If the image contains text or detailed information, give viewers enough time to understand it.
Do not measure timing only by how quickly you can read it as the editor who already knows what it says.
Using Too Many Animations
Movement attracts attention.
If every capcut overlay image spins, bounces, zooms, and slides, the video can become exhausting.
Reserve strong movement for moments that deserve emphasis.
Ignoring Visual Consistency
If one overlay uses a thin border, another uses a heavy shadow, another is rotated, and another has completely different colors, the project may lack visual unity.
A consistent treatment can make even simple overlays feel professional.
Forgetting Mobile Viewing
Many viewers may watch your video on a small screen.
A screenshot that seems readable on a large monitor can become tiny on a phone.
Preview accordingly.
Best Practices for Professional-Looking Image Overlays
Professional-looking overlays usually come from restraint rather than from using every available feature.
Start with a clear reason for adding the image.
If you cannot explain what the overlay contributes, consider removing it.
Maintain Visual Hierarchy
Decide what should be noticed first.
If the presenter is the main focus, the capcut overlay image should support them.
If the overlay contains the critical information, it can temporarily become more prominent.
Use Negative Space
Empty space is useful.
It gives overlays somewhere to sit without blocking the subject.
When filming your own content, you can even compose the shot with future graphics in mind.
A presenter standing slightly to one side may leave room for product images or screenshots.
Match the Visual Style
Use consistent borders, corner treatments, shadows, and animation styles where appropriate.
Consistency makes separate visual elements feel like parts of the same project.
Keep Branding Subtle
A logo should not compete with every scene.
If branding is the purpose, make it recognizable but considerate of the content.
Check Readability
If your image contains text, preview it at realistic display sizes.
Do not assume viewers can pause and zoom.
Use Motion With Purpose
Animate a capcut overlay image when movement improves communication or pacing.
For example, an arrow can move toward the object it highlights. A product image can enter when the product is introduced.
Avoid motion that exists only to demonstrate that animation is available.
Review Against Different Backgrounds
An overlay may look perfect over one frame and disappear over another.
This matters particularly for logos, text-like graphics, and transparent elements.
Watch the complete duration of the overlay.
Preview Before Export
Check timing, position, scale, transparency, edge quality, and animation.
Fixing a small mistake before export is much easier than noticing it after uploading the video.
How to Export a Video With Image Overlays
Export is not merely the final button press.
It is your last opportunity to make sure the project translates correctly into a finished file.
Before exporting, watch the video from beginning to end.
Pay particular attention to every capcut overlay image.
Check whether it appears at the correct time, remains visible long enough, stays sharp, and does not cover something important.
Choose Resolution Based on the Project
CapCut currently offers multiple export resolutions depending on platform and version, with some workflows supporting options up to 4K.
Higher is not automatically better.
If your source footage is 1080p and your images are designed for that project, exporting at an unnecessarily higher resolution may increase file size without creating new source detail.
Choose settings that fit your original footage and intended platform.
Consider Frame Rate
For most image overlays, frame rate affects the surrounding video and animated movement rather than the sharpness of the still image itself.
If you use keyframe motion or animation, preview it carefully.
Where appropriate, keeping export frame rate consistent with your source/project can avoid unnecessary changes in motion character.
Check the Final File
After export, open the actual video.
Do not rely only on the editor preview.
Look for unexpected cropping, soft overlays, timing mistakes, animation problems, and incorrect positioning.
If the video will be posted vertically, watch it vertically.
If it will be viewed on desktop, check it there too when practical.
A Complete CapCut Image Overlay Workflow
A reliable workflow starts before you touch the Overlay button.
First, decide what the additional picture contributes.
Choose a clean source image and determine whether you need its original background or a transparent version.
Import your main footage.
Then add the capcut overlay image using the appropriate mobile or desktop workflow.
Resize the image.
Position it in a part of the frame that supports the composition.
Set its timeline duration so it appears at the right moment.
Remove the background if the rectangular source does not fit your design.
Adjust opacity or blending only when those changes serve a clear purpose.
Animate the image if movement improves the sequence.
Use keyframes when you need precise control rather than relying only on presets.
Preview the entire section.
Finally, export at settings appropriate for your footage and destination, then watch the finished file.
That workflow is simple enough for beginners but flexible enough for more advanced edits.
Advanced Composition Tips for Image Overlays
Once you are comfortable with the basic process, start thinking like a designer rather than someone simply placing pictures on a timeline.
The frame has limited visual attention.
Every new element asks the viewer to look somewhere.
A capcut overlay image should therefore have a clear relationship with the main subject.
If you place a screenshot beside a speaker, consider where the speaker is looking. If they naturally face toward the screenshot, the composition may feel more connected.
If they face away from it, the frame can feel visually divided.
Think About Eye Direction
Portraits and product images often have directional energy.
A person looking toward the center of the frame usually feels more contained than a person looking outward toward the edge.
You can use this when positioning cut-out portraits.
Use Consistent Margins
If several overlays appear in the same corner at different moments, keep their distance from the edges reasonably consistent.
Small alignment decisions create polish.
Avoid Unnecessary Full-Screen Images
Sometimes a screenshot needs to fill most of the frame.
Other times, enlarging it that much simply hides useful footage.
Crop to the important information and use only as much space as needed.
Give Important Overlays More Time
A decorative icon can appear briefly.
A detailed chart requires more viewing time.
Duration should depend on information density.
This is one of the easiest ways to improve a capcut overlay image without adding any effects.
Using Overlays for YouTube Videos
YouTube content often benefits from overlays because longer videos have more opportunities to reference supporting material.
A talking-head creator can show screenshots, photos, charts, product images, or examples without cutting away completely from the presenter.
For tutorials, overlays can reinforce instructions.
For reviews, they can show close-up product photographs.
For commentary, they can provide visual context.
In a horizontal 16:9 composition, you often have enough width to place the presenter on one side and supporting imagery on the other.
But do not assume every YouTube viewer uses a large screen. Many still watch on phones.
Keep detailed images readable.
Using Overlays for TikTok, Reels, and Shorts
Vertical video creates different challenges.
The frame is narrow, and captions often occupy significant screen space.
A large capcut overlay image can easily cover the speaker, subtitles, or interface-safe areas.
Use space carefully.
Vertical content also tends to move quickly, but speed should not make supporting visuals unreadable.
If you show a screenshot containing several lines of text for less than a second, many viewers will miss the point.
Crop tightly and focus on the relevant information.
You can also sequence several overlays rather than displaying them all at once.
This keeps the frame cleaner
Using Image Overlays in Educational Content
Educational overlays should prioritize clarity.
Avoid decorative effects that make diagrams, screenshots, or labels harder to interpret.
If a capcut overlay image contains a diagram, keep it large enough to read.
If you are explaining one part of the diagram, consider using an arrow or highlight rather than shrinking the entire diagram into a corner.
Timing is critical.
Keep the visual on screen while the explanation refers to it.
Remove or replace it when the lesson moves to another concept.
This creates a strong relationship between narration and visuals.
Using Image Overlays in Product Videos
Product overlays can show features that are not visible in the main footage.
A presenter could mention a color option and display a photograph of that version.
A promotional video could show a cut-out product beside a short feature callout.
Consistency matters when several products appear.
Use similar scale, placement, and animation so each capcut overlay image feels like part of the same design system.
If one product flies in from the left, another spins from the top, and a third suddenly fills the screen, the inconsistent motion may distract from the comparison.
How Many Image Overlays Should You Use?
There is no ideal number.
A 20-second tutorial might need three screenshots.
A five-minute talking-head video might use dozens of supporting images.
Another video may need none.
The correct number depends on information and pacing.
Do not add a capcut overlay image simply to keep the screen busy.
Visual changes can support retention, but unnecessary elements can also create cognitive overload.
Use an overlay when it clarifies, demonstrates, identifies, compares, brands, or intentionally enhances the visual style.
Should Every Overlay Be Animated?
No.
Static overlays are often more effective.
A screenshot viewers need to study benefits from stability.
A watermark should usually avoid demanding constant attention.
A decorative graphic may work perfectly well without movement.
Animation is most useful when it helps introduce an element, direct attention, communicate a change, or match the energy of the edit.
Treat animation as a tool, not a requirement.
How to Make Overlays Feel Less Distracting
If your overlay feels distracting, do not immediately lower its opacity.
First diagnose why.
It may be too large.
It may cover the subject.
Its colors may be much brighter than the footage.
Its animation may be too aggressive.
It may simply stay visible too long.
Once you identify the reason, make the smallest useful adjustment.
This usually produces a better result than adding more effects to compensate.
Final Quality-Control Checklist
Before publishing, review the project one last time.
Check that every overlay appears when intended.
Confirm that important images are readable on a small display.
Look for accidental stretching or distortion.
Inspect transparent edges around cut-out subjects.
Make sure logos do not cover captions.
Watch keyframe movement at normal playback speed.
Confirm that your capcut overlay image does not disappear before the related narration finishes.
Then inspect the exported file.
A clean quality-control pass can catch problems that are easy to miss while you are focused on editing individual sections.
Final Thoughts on CapCut Overlay Images
Learning how overlays work gives you much more control over visual storytelling.
The basic process is easy: import your main footage, add an image above it, resize it, position it, and control its duration.
The difference between a basic edit and a polished one comes from the decisions you make after that.
A well-designed capcut overlay image appears at the right moment, occupies the right amount of space, and helps the viewer understand the video.
Transparency can make branding less intrusive. Background removal can turn ordinary photographs into flexible cutouts. Animation can make static graphics feel more dynamic. Keyframes can create controlled movement. Multiple layers can build comparisons and more sophisticated compositions.
None of these techniques needs to be used in every project.
The best overlay is often the simplest one that communicates its purpose clearly.
Whether you are making a tutorial, product review, YouTube video, Reel, TikTok, Short, advertisement, or educational clip, treat each image as part of the complete frame rather than as a separate decoration.
Once you start thinking about timing, visual hierarchy, negative space, scale, and consistency, a capcut overlay image becomes much more than a picture placed over a video. It becomes a practical storytelling tool.