
Creating an original image used to mean taking a photograph, drawing an illustration, or spending time learning graphic-design software. Generative AI has changed that workflow. A written description can now become a portrait, product concept, cinematic scene, social media graphic, or illustration within minutes.
CapCut is best known as a video editor, but its growing collection of AI tools extends well beyond trimming clips and adding effects. The CapCut AI Image Generator brings text-to-image and reference-based image creation into the same ecosystem many creators already use for videos, social posts, advertisements, and short-form content.
That integration is arguably its biggest attraction.
Instead of generating an image in one service, downloading it, opening another editor, adjusting it, and finally importing it into a video project, creators can keep more of that workflow inside CapCut.
Convenience, however, does not automatically mean quality.
An AI image generator still has to understand prompts, create convincing details, follow composition instructions, produce the right dimensions, and give users enough control to correct imperfect results. It also needs to be practical enough that generating the image is faster than finding or manually creating an alternative.
So, how useful is CapCut’s AI image generation in practice?
This guide explains what the tool does, how to use it, how text-to-image and reference-image workflows differ, how to write stronger prompts, which settings matter, and how to improve weak generations. We will also look at practical uses for thumbnails, social media, product concepts, blog graphics, advertisements, and creative projects.
More importantly, this guide covers the limitations you should understand before relying on AI-generated images for professional work.
By the end, you should know not only how to generate an image in CapCut but also how to decide whether AI generation is the right approach for a particular project.
What Is the CapCut AI Image Generator?
The CapCut AI Image Generator is an AI-powered creation tool that converts written instructions, and in supported workflows visual references, into newly generated images.
The basic idea is simple.
You describe what you want to see. The AI interprets that description and produces visual results based on the information in your prompt.
For example, instead of searching through stock-photo libraries for an image of a coffee shop at night, you could describe a cozy café with warm lighting, rain outside the windows, wooden tables, and cinematic photography.
The generator then attempts to create that scene.
The process is different from conventional photo editing.
Traditional editing starts with an existing image. You crop it, change colors, remove elements, add text, replace a background, or make other adjustments.
Generative AI can start with an idea.
That distinction opens up possibilities for creators who need visuals that are difficult to photograph or find in stock libraries.
A blogger can generate a conceptual featured image. A YouTube creator can create a dramatic thumbnail background. A small business can explore product-presentation ideas. A filmmaker can visualize a scene before shooting it. A social media manager can develop visual concepts for a campaign.
CapCut also combines generation with editing. Once a result exists, it can move into a broader creative workflow rather than remaining an isolated AI output.
How Does CapCut Turn Text Into an Image?
The CapCut AI Image Generator uses a text-to-image AI model to interpret written prompts as visual instructions and turn them into AI-generated images.
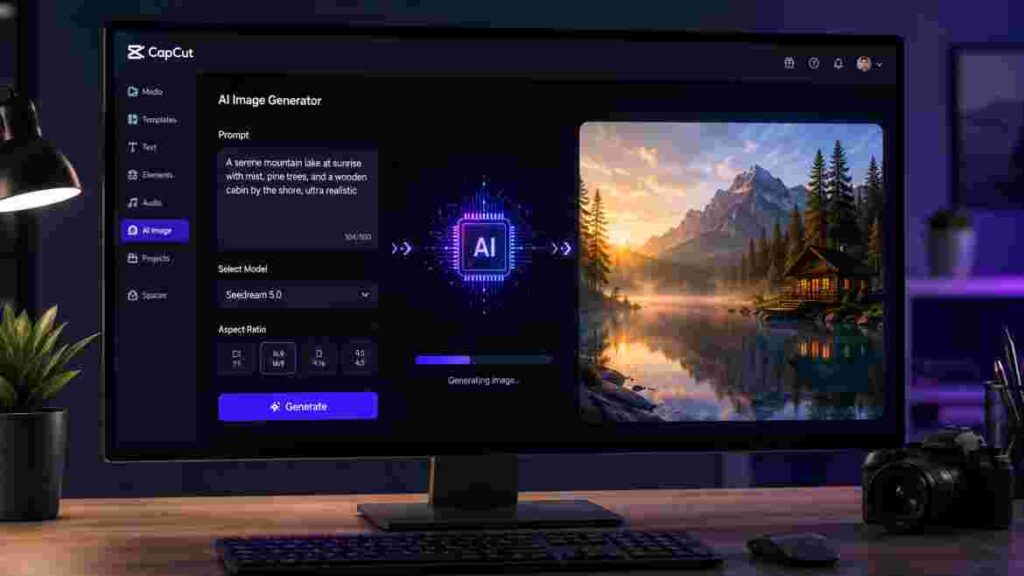
Consider this basic prompt:
“A sports car on a road.”
The generator understands the main subject and setting, but almost everything else remains open to interpretation.
What color is the car?
Is it daytime or nighttime?
Is the road in a city, desert, forest, or mountain range?
Is the camera beside the vehicle or above it?
Should the image look like a photograph, digital illustration, advertisement, or movie frame?
The AI has to make those decisions itself when you do not provide them.
Now consider a more descriptive version:
“A glossy black sports car driving along a winding mountain road at sunset, low front three-quarter camera angle, warm golden light reflecting across the bodywork, distant mountains covered in mist, realistic automotive photography, sharp vehicle details, subtle motion blur in the background.”
The creative direction is much clearer.
This is why prompt writing has such a large effect on AI image quality. Better instructions do not guarantee a perfect result, but they reduce the number of important decisions you leave entirely to the model.
Text-to-Image vs. Image-to-Image
Text-to-image generation starts primarily from your written description.
Image-to-image generation starts with visual information as well.
You might upload a photograph, sketch, layout, product reference, or another source image and then tell the AI how you want it transformed.
The second approach can be useful when words alone cannot adequately describe your intended composition.
Suppose you have a simple sketch showing a person on the left, a product in the center, and empty space on the right for text.
Explaining that arrangement in a prompt is possible, but supplying a visual reference may give the generator a stronger starting point.
Reference-based generation can also be useful for style exploration, background changes, concept development, and transformations.
It does not mean the AI will reproduce every detail perfectly. Generative models can still alter objects, faces, proportions, colors, and composition. Important visual details should always be checked after generation.
What Can You Do With CapCut AI Image Generator?
The most obvious use is creating an image from a text prompt, but that is only one part of the workflow.
CapCut can be useful when you need a new visual idea quickly and do not have a suitable photograph or graphic available.
You could generate a landscape that does not exist, visualize an imaginary product environment, create a stylized character, produce a background for a vertical video, or develop a visual concept before creating the final asset manually.
Another practical use is experimentation.
Designing several concepts manually can take considerable time. AI generation allows you to explore different directions quickly.
For example, imagine you need a hero image for a coffee brand.
You could test a dark luxury aesthetic, bright lifestyle photography, rustic café imagery, minimalist product photography, and a colorful social-media style before deciding which direction deserves more refinement.
The images created with the CapCut AI Image Generator don’t always need to be final assets; they can also serve as visual inspiration for exploring concepts, styles, and creative directions.
Generate Images From Text
Text-to-image is the simplest workflow.
You enter a description of the desired image, choose the available settings, and generate results.
The effectiveness of this workflow depends heavily on the prompt.
Clear subjects, visual details, composition, lighting, and style usually provide the AI with more useful direction than vague descriptions.
Transform an Existing Image
Where reference or image-to-image generation is available, an existing visual can guide the result.
You might use it to explore a new style, alter an environment, create a different visual interpretation, or preserve more of an existing composition.
This can be especially useful when your project already has a defined visual direction.
Create Different Visual Styles
AI generation is not limited to photorealism.
Depending on the model and available controls, prompts can request aesthetics such as cinematic photography, watercolor, digital illustration, anime-inspired artwork, 3D rendering, fantasy concept art, editorial photography, pencil drawing, or minimalist design.
Style instructions should serve the project rather than simply making the prompt longer.
The CapCut AI Image Generator requires different prompt styles and visual details for realistic product advertisements and creative children’s illustrations.
Generate Images for Different Platforms
A good image can still become inconvenient if its dimensions do not match its destination.
A square social post, vertical Story, Pinterest image, and YouTube thumbnail require different compositions.
CapCut currently promotes common aspect ratios including 1:1, 4:5, 16:9, and 9:16 in its creator-oriented AI image workflow.
Choosing the destination before generating is usually better than creating one composition and aggressively cropping it later.
Continue Editing After Generation
Generation should rarely be considered the final quality-control stage.
Colors may need adjustment. The crop might need refinement. A distracting detail may need removal. The image may require sharpening, background work, or additional design elements.
CapCut’s advantage is that generated visuals can remain inside a broader editing environment.
That makes the generator particularly relevant to people who already create content in CapCut.
How to Use CapCut AI Image Generator: Step-by-Step
The exact interface can change as CapCut updates its applications and AI tools. Feature availability may also differ by region, account, device, subscription, and version.
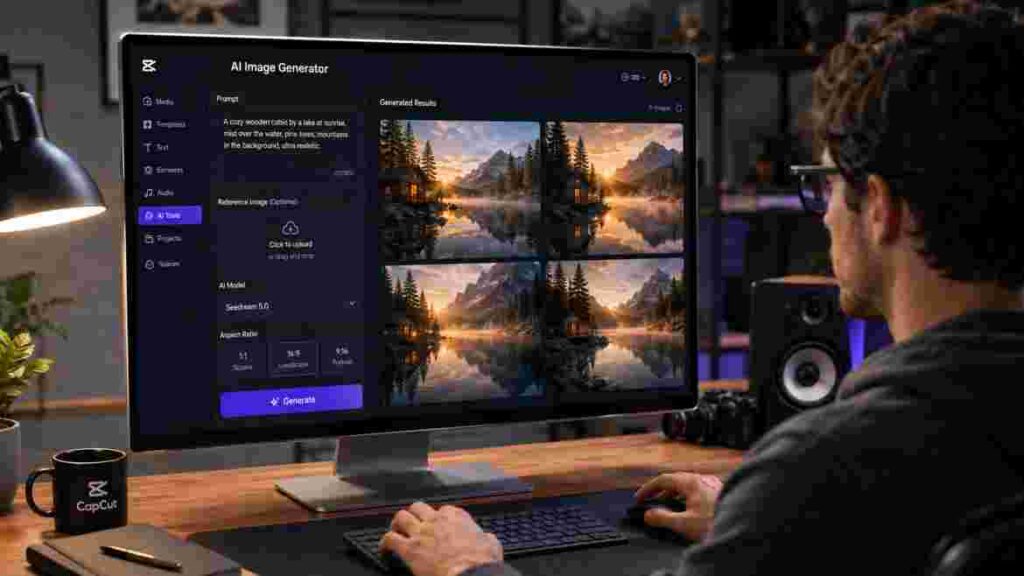
The general workflow, however, remains straightforward.
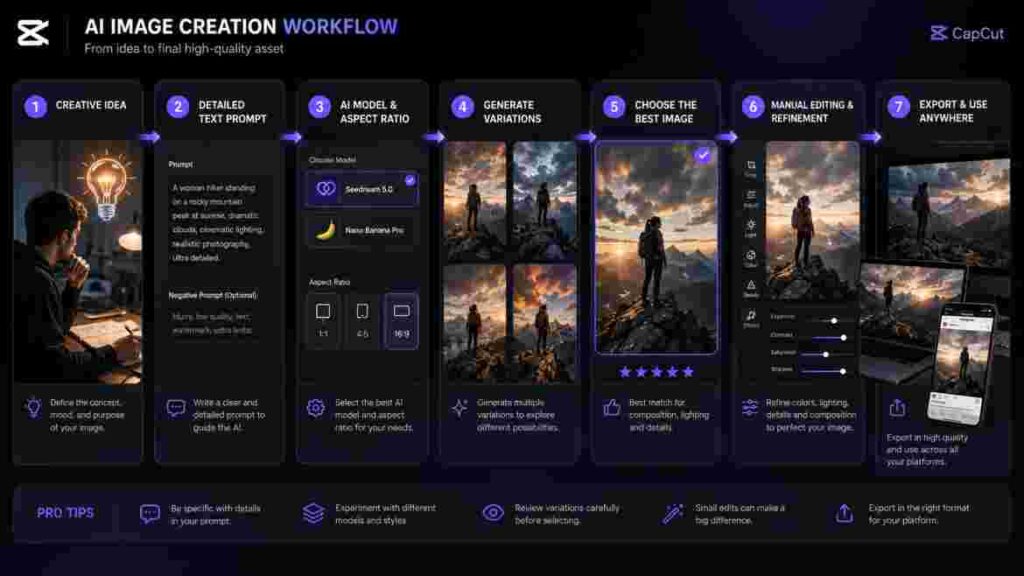
Step 1: Open the AI Image Tool
On CapCut Desktop, open the application and enter the editing workspace.
CapCut’s current official instructions place AI image generation under the AI media area of the desktop interface.
If your version looks different, search the available AI tools rather than assuming the feature has been removed. CapCut regularly reorganizes AI functionality as products are updated.
On the web version, sign in to your CapCut account and locate the AI image or AI design workflow.
If the feature does not appear, check your account, application version, region, and available AI access.
Step 2: Decide What You Actually Need
Do not start by typing the first sentence that comes to mind.
First define the job of the image.
Is it:
A YouTube thumbnail background?
A realistic portrait?
A blog featured image?
A product concept?
A vertical background for a Reel?
An Instagram post?
A fantasy illustration?
A storyboard frame?
The answer affects your aspect ratio, composition, level of realism, and prompt.
A thumbnail background should usually leave usable space for additional elements. A portrait may require careful facial detail. A product image needs accurate geometry. A Story needs a vertical composition.
Knowing the final platform and image purpose before using the CapCut AI Image Generator helps you choose the right aspect ratio, composition, and prompt while avoiding unnecessary regeneration.
Step 3: Write Your Prompt
Enter a description of the image.
Begin with the subject.
Then describe the action or pose, setting, composition, lighting, mood, and style.
Instead of:
“Man working.”
Try:
“Young freelance designer working on a laptop at a modern wooden desk beside a large window, morning sunlight, indoor plants in the background, natural candid pose, realistic lifestyle photography, clean composition, soft shadows.”
The second version gives the model much more visual information.
Avoid turning your prompt into a long story.
AI image prompts work best when the details help describe what should actually appear in the frame.
Step 4: Add a Reference Image When Appropriate
If the workflow supports reference images and you have a visual that can guide the generation, upload it.
References are particularly useful when composition, subject appearance, product shape, or style direction matters.
Still, never assume that an AI-generated version will preserve a reference perfectly.
Check important features carefully.
For branded or commercial content, compare logos, packaging, labels, colors, product proportions, and other identity-critical details with the original.
Step 5: Choose an Available AI Model
The CapCut AI Image Generator currently supports advanced AI models such as Seedream 5.0 and Nano Banana Pro for creating high-quality AI-generated images.
This is a rapidly changing part of the platform. Model names, versions, and availability can change.
Rather than assuming one model will always be best, test the available choices using the same prompt when image quality matters.
Compare how each model handles:
Prompt adherence.
Faces.
Small details.
Text.
Composition.
Reference images.
Lighting.
Realism.
Style.
The best model depends partly on what you are creating.
Step 6: Choose the Aspect Ratio
Select the ratio based on where the image will ultimately appear.
For example, 16:9 is commonly appropriate for widescreen visuals such as YouTube thumbnail backgrounds, while 9:16 suits vertical content.
A square 1:1 format works for many social graphics, while 4:5 can provide more vertical space in feed-based posts.
Do not treat aspect ratio as an export decision only.
The ratio influences composition during generation.
A person centered in a square image may need to be positioned differently in a 16:9 image if you also need room for a headline.
Step 7: Generate the Image
Once your prompt and settings are ready, start generation.
CapCut’s current desktop instructions state that the tool can return multiple generated results for comparison.
Do not automatically choose the first image that looks attractive.
Compare all available results.
Look at the subject first, then inspect the background, edges, small objects, anatomy, text, shadows, reflections, and other details.
AI images can look impressive at thumbnail size while containing obvious errors at full resolution.
Step 8: Refine the Prompt Instead of Starting Over
If a generation is close to what you want, identify exactly what is wrong.
Suppose the subject looks good, but the composition is too centered.
Instead of rewriting everything, strengthen the composition instruction:
“Place the subject on the left third of the frame and leave clean negative space on the right.”
If the lighting is too dramatic:
“Use soft natural window light with gentle shadows and realistic exposure.”
If the background is too busy:
“Minimal uncluttered background with only a desk and one plant.”
Controlled iteration helps you learn which instruction changed the result.
Step 9: Edit the Best Generation
Once you have selected the strongest result, move to refinement.
CapCut currently lists tools such as color correction, sharpening, upscaling, and background replacement among the options that can support generated-image workflows.
Use editing to improve an already strong generation.
Do not expect enhancement tools to rescue a fundamentally bad image.
If the face is wrong, the product shape is inaccurate, or the composition fails the purpose of the image, regenerating may be more effective than applying heavy enhancement.
Step 10: Inspect the Image at Full Size
Zoom in before export.
Check facial features, eyes, fingers, jewelry, object edges, logos, writing, reflections, repeated patterns, background people, and small architectural details.
These are common places where generative images can reveal inconsistencies.
For professional work, this inspection is not optional.
Step 11: Export the Final Image
When you are satisfied, choose the appropriate format, resolution, and quality.
CapCut’s current AI image page advertises export resolutions up to 8K in its desktop workflow, although available export options can depend on the tool, plan, platform, and current product version.
Do not automatically choose the largest possible resolution.
Match the export to the final use.
A web image benefits from reasonable file size. A large display or print workflow may need more resolution. A social post may be compressed by the platform regardless of how enormous the source file is.
How to Use CapCut AI Image Generator Online
The online workflow is useful when you do not want to install desktop software or when you are working from a computer that does not have your usual editing setup.
Start by opening CapCut’s web platform and signing in.
Locate the AI image or AI design functionality available to your account.
Enter your prompt and choose the available generation options.
If reference input is supported in the workflow you are using, upload the image you want the AI to consider.
Select the appropriate aspect ratio before generation.
Generate the image and compare the results.
Once you have a promising output, refine it through additional instructions or editing tools.
The web version is particularly convenient for quick experimentation.
However, AI generation is cloud-based, so internet quality matters. Slow or unstable connections can affect the experience.
CapCut also notes that AI functionality can be restricted by region or credits.
If the tool is missing despite being signed in, do not assume your account is broken. Check whether the feature is supported in your region, whether sufficient credits are available, and whether the same tool appears in another supported CapCut platform.
How to Use CapCut AI Image Generator on PC
Desktop is a logical choice for serious image-generation projects because a larger display makes comparison and quality inspection easier.
CapCut’s current official workflow instructs desktop users to open the editing interface and navigate to AI media and then AI image.
Once there, type the prompt describing the intended visual.
Choose the available model and aspect ratio.
Generate your results.
The larger workspace is useful when comparing similar generations. Two images may appear almost identical at first, but one can have cleaner facial features, more convincing shadows, better object geometry, or a composition that leaves more useful negative space.
After choosing a result, refine it.
If you are creating an image for a video, you can then incorporate the visual into the rest of the project.
This is one of the areas where CapCut makes more sense than a standalone generator.
Generation becomes part of the editing workflow instead of a separate activity.
Can You Use CapCut AI Image Generator on Android and iPhone?
Mobile availability requires some caution.
CapCut’s public-facing AI image page currently describes an Android and iOS generation workflow. However, CapCut’s Help Center has also published guidance stating that user-accessible AI image generation was not available in the mobile app at the time of that particular documentation.
Because these official sources are not completely aligned, mobile users should check the current version of the app and their own account rather than relying on a fixed universal instruction.
Feature availability can change according to version, region, account rollout, device, and product updates.
If the CapCut AI Image Generator is available in your app, follow the on-screen steps, choose the right platform format, write a detailed AI image prompt, select the correct aspect ratio, compare generated results, and carefully review the final image before exporting.
If it does not appear, use CapCut Web or Desktop rather than installing unofficial software or relying on questionable workarounds.
CapCut AI Image Generator Features Explained
Understanding individual features helps you use the tool deliberately rather than clicking options without knowing what they change.
Text-to-Image Generation
Text-to-image generation converts written descriptions into visual outputs.
It is most useful when you have an idea but no starting image.
The challenge is translating that idea into visible characteristics.
“Beautiful city” is subjective.
“A narrow European street after rain, warm café lights reflecting on wet cobblestones, evening blue hour, pedestrians in the distance, realistic travel photography” is visual.
The second prompt tells the model what beauty means in that particular scene.
Image-to-Image Generation
Image-to-image uses an existing visual as part of the generation process.
CapCut has a dedicated image-to-image workflow that promotes transformations such as converting photographs into different styles, changing backgrounds, developing portraits, and creating product mockups.
This workflow can offer more direction than text alone.
It is useful for creators who already know roughly how the image should look.
Model Selection
Different AI models can interpret the same prompt differently.
One might create more realistic skin. Another might follow layout instructions more closely. Another may perform better when text is included.
Model performance also changes as new versions are released.
The practical solution is testing.
If a project matters, run a representative prompt through the models available in your account and compare them.
Aspect Ratio Control
Aspect ratio determines the shape of the canvas.
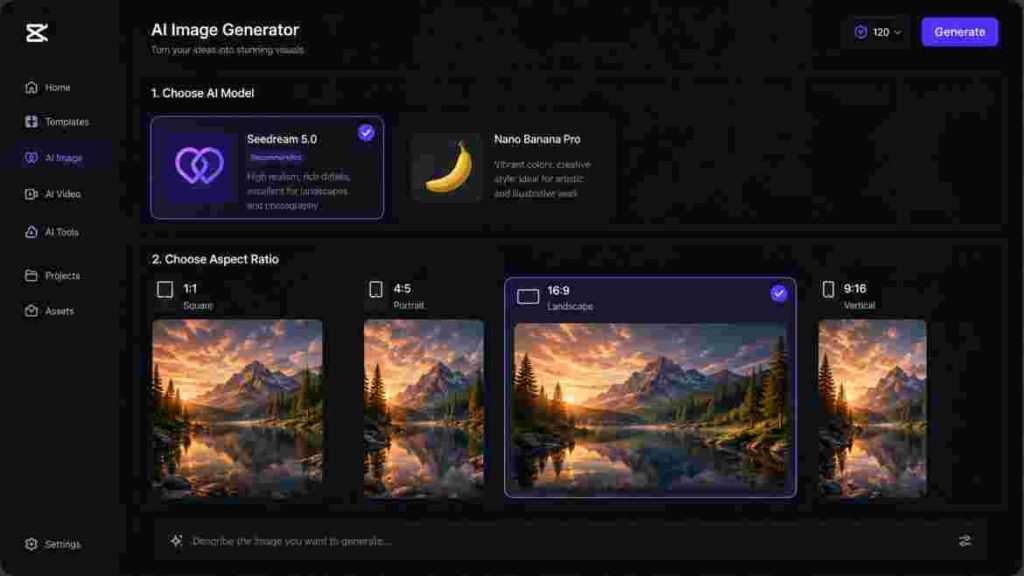
It also affects how the AI organizes the scene.
A vertical image naturally encourages different framing than a landscape image.
Choose the ratio based on the destination whenever possible.
If you know the image will become a 9:16 Story background, generate vertically from the beginning.
Prompt-Based Refinement
Prompt refinement lets you communicate changes using words rather than manually rebuilding the image.
The key is specificity.
“Make it better” provides almost no useful direction.
“Reduce the background clutter, keep the subject unchanged, use softer daylight, and leave more empty space above the subject” is actionable.
AI Upscaling
The CapCut AI Image Generator’s upscaling feature can increase image resolution while preserving or reconstructing details for sharper, higher-quality AI-generated images.
It can be useful when a selected generation is visually strong but needs a higher-resolution output.
Upscaling does not fix every generation problem.
A higher-resolution incorrect hand is still an incorrect hand.
Select the best underlying image first.
Background Editing
Background replacement or modification can help when the subject works but the environment does not.
This is particularly useful for marketing concepts and social content.
Carefully inspect subject edges afterward, especially around hair, transparent objects, fine fabric, and reflective surfaces.
Color Adjustment
Capcut AI image generator can produce attractive colors that are nevertheless unsuitable for the project.
A brand may require a particular palette. A set of images may need consistent warmth. A thumbnail may need more separation between subject and background.
Color correction gives you another layer of control after generation.
How to Write Better CapCut AI Image Prompts
Writing detailed CapCut AI Image Generator prompts can make a significant difference in image quality, accuracy, composition, and overall visual results.
You do not need to become a technical prompt engineer, but you do need to communicate visually.
Start With a Clear Subject
Identify the main subject immediately.
Instead of:
“A cool futuristic scene.”
Use:
“A female astronaut standing beside a small exploration vehicle on Mars.”
The second prompt gives the composition a clear center.
Describe the Subject
Add characteristics that matter.
For a person, this could include age range, hairstyle, clothing, pose, expression, and position.
For a product, it could include material, shape, color, finish, orientation, and surface.
For a building, it could include architectural style, scale, materials, and environment.
Only add details that actually affect the visual.
Explain the Action
A subject doing something usually creates a more specific image than a subject merely existing.
Compare:
“A chef in a kitchen.”
With:
“A chef carefully plating pasta at a stainless-steel counter in a modern restaurant kitchen.”
The second prompt gives the model more information about pose and scene.
Define the Environment
The background changes the entire meaning of an image.
A running shoe photographed on a white studio surface communicates something different from the same shoe on a wet mountain trail.
Describe where the scene happens.
Control Composition
Composition is frequently overlooked.
Useful instructions include:
“Centered composition.”
“Subject on the left third.”
“Close-up portrait.”
“Wide establishing shot.”
“Top-down view.”
“Low camera angle.”
“Large negative space on the right.”
“Product filling approximately half the frame.”
These instructions are particularly valuable when you plan to add text later.
Specify Lighting
Lighting is one of the strongest visual cues for realism and mood.
Try phrases such as:
“Soft window light.”
“Overcast daylight.”
“Golden-hour sunlight.”
“Studio softbox lighting.”
“Warm practical lighting.”
“Strong side lighting.”
“Diffused morning light.”
Do not add every lighting term at once.
Choose one coherent direction.
Define the Mood
Mood can help unify visual choices.
Examples include calm, energetic, luxurious, mysterious, playful, dramatic, peaceful, nostalgic, or futuristic.
Mood works best when the rest of the prompt supports it.
A “calm” image could use soft natural light, muted colors, uncluttered composition, and a relaxed pose.
Describe Color Intentionally
If color matters, say so.
You might request:
“Muted earth tones.”
“Warm orange and brown palette.”
“Neutral whites and soft gray.”
“Pastel blue and pink.”
“Deep green with subtle gold accents.”
For branded work, AI-generated colors should still be checked against actual brand values.
Use Camera Language When It Helps
Photography terminology can sometimes guide the aesthetic.
Words such as close-up, wide shot, shallow depth of field, macro photography, telephoto look, or documentary photography can communicate useful visual direction.
Do not assume adding expensive camera names automatically creates realism.
The scene, lighting, anatomy, texture, and composition matter more than stuffing technical terms into the prompt.
Describe Texture
Texture can make an image feel more tangible.
Examples include brushed metal, weathered wood, soft cotton, matte ceramic, rough concrete, glossy plastic, wet asphalt, or natural skin texture.
Specific materials often produce more useful results than generic requests for “high detail.”
Choose One Clear Style Direction
A prompt can request realism, illustration, 3D rendering, watercolor, editorial photography, concept art, or another visual direction.
Avoid combining too many contradictory aesthetics.
“Photorealistic watercolor 3D anime oil painting” gives the model competing instructions.
Choose the style that supports your goal.
Avoid Conflicting Instructions
AI models struggle when a prompt asks for incompatible things.
“Bright midnight sunlight” is contradictory.
“Minimalist crowded room” can also be confusing unless you explain exactly what you mean.
Read your prompt as a visual brief.
If a human designer would need clarification, the AI may also interpret it unpredictably.
A Simple Prompt Formula
A reusable formula makes prompting easier:
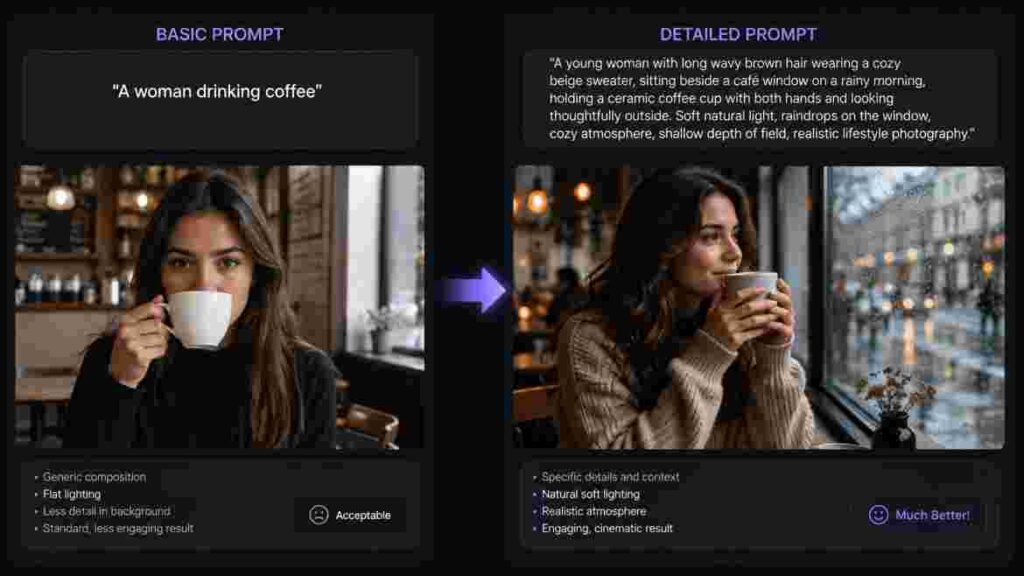
Subject + action + environment + composition + lighting + style + mood + important details.
You do not need every category for every image.
The formula simply reminds you which types of visual information may be missing.
Basic Prompt
“A woman drinking coffee.”
The concept is clear, but the AI has enormous freedom.
Improved Prompt
“A young woman drinking coffee beside a café window on a rainy morning, relaxed expression, medium shot, soft natural window light, realistic lifestyle photography.”
Now the subject, action, setting, framing, lighting, and style are clearer.
More Controlled Prompt
“A young woman with shoulder-length dark hair wearing a beige sweater, sitting beside a large café window and holding a ceramic coffee cup, rainy city street visible outside, medium shot from slightly below eye level, subject positioned on the left third, soft diffused morning light, warm interior tones, natural skin texture, realistic editorial lifestyle photography, calm mood, clean background, negative space on the right.”
This does not guarantee perfection.
It does, however, give the generator a much stronger creative brief.
25 CapCut AI Image Generator Prompts You Can Try
The following prompts are starting points. Modify them according to your subject, brand, platform, and desired style.
1. Realistic Portrait
“Professional portrait of a confident young entrepreneur standing beside a large office window, dark casual blazer, relaxed expression, soft natural daylight, shallow depth of field, realistic skin texture, modern city background gently blurred, editorial business photography.”
2. Cinematic Portrait
“Close-up cinematic portrait of a traveler standing at a train station at night, warm overhead lights, light rain, subtle reflections, thoughtful expression, realistic skin, shallow depth of field, atmospheric movie still.”
3. Outdoor Lifestyle Portrait
“Young man hiking on a mountain trail at sunrise, backpack and outdoor jacket, candid expression, warm sunlight along the mountain ridge, realistic landscape photography, natural colors, wide environmental portrait.”
4. Luxury Product Shot
“Premium black wristwatch standing upright on a dark stone pedestal, subtle gold reflections, controlled studio lighting, dark gradient background, luxury advertising photography, crisp edges, realistic metal and glass textures, clean composition.”
5. Skincare Product Concept
“Minimal white skincare bottle on a pale stone surface beside small water droplets and green leaves, soft diffused daylight, bright clean background, premium cosmetic advertising photography, realistic reflections, elegant composition.”
6. Coffee Product Advertisement
“Matte black coffee package standing on a rustic wooden table beside roasted coffee beans, soft morning sunlight entering from the side, subtle steam from a ceramic cup in the background, warm brown palette, realistic commercial product photography.”
7. YouTube Technology Background
“Futuristic home technology studio with a large monitor, subtle blue ambient lighting, modern desk, clean wall panels, realistic cinematic photography, dramatic depth, empty space on the left for a presenter, 16:9 composition.”
8. YouTube Finance Background
“Modern financial workspace overlooking a city skyline at night, laptop and subtle market charts on monitors, professional dark atmosphere, cinematic lighting, realistic photography, clean negative space on the right for thumbnail text.”
9. YouTube Travel Background
“Dramatic mountain valley at sunrise with winding road leading toward distant snow-covered peaks, warm sunlight breaking through clouds, high-detail travel photography, strong visual depth, clear space in upper-left area for headline text, widescreen composition.”
10. Instagram Fashion Image
“Stylish young woman wearing a minimalist neutral outfit walking beside a modern concrete building, soft overcast daylight, editorial fashion photography, natural pose, muted colors, clean urban composition.”
11. Instagram Food Image
“Fresh handmade pasta in a white ceramic bowl on a rustic restaurant table, grated cheese and basil, warm side lighting, realistic food photography, shallow depth of field, inviting natural colors, elegant composition.”
12. Vertical Reel Background
“Modern neon-lit city alley after rain, glowing signs reflected on wet pavement, deep perspective, cinematic atmosphere, no people in foreground, vertical 9:16 composition with clear central area for video subject.”
13. Pinterest Interior Design
“Bright Scandinavian living room with light wood furniture, cream sofa, indoor plants, textured rug, large windows, soft morning daylight, realistic interior photography, calm neutral palette, vertical composition.”
14. Minimal Blog Featured Image
“Open laptop on a clean wooden desk beside a notebook and coffee cup, soft daylight from the left, minimalist home office, realistic photography, uncluttered composition, generous negative space for website headline.”
15. Artificial Intelligence Concept
“Abstract visualization of artificial intelligence represented by interconnected glowing nodes forming a subtle human brain shape, dark modern background, elegant blue-white light, sophisticated technology editorial illustration, clean composition.”
16. Cyberpunk Street
“Busy futuristic street at night, neon storefronts, light rain, pedestrians carrying transparent umbrellas, reflections across wet pavement, cinematic cyberpunk atmosphere, deep perspective, highly detailed digital art.”
17. Fantasy Landscape
“Ancient stone castle built into a dramatic mountain above a mist-covered valley, waterfalls falling from cliffs, sunrise behind distant peaks, epic fantasy concept art, atmospheric depth, detailed environment, wide composition.”
18. Anime-Inspired Scene
“Young traveler standing beside a quiet countryside railway crossing at sunset, backpack, warm sky, wildflowers moving in the breeze, expressive illustrated aesthetic, peaceful nostalgic mood, detailed background.”
19. Watercolor Landscape
“Quiet lakeside village surrounded by green mountains in early morning mist, small wooden boats near shore, soft watercolor painting, gentle washes, subtle paper texture, peaceful natural palette.”
20. 3D Character Concept
“Friendly small robot assistant standing in a bright modern creative studio, rounded design, expressive digital eyes, polished white material with subtle metallic details, high-quality 3D render, soft studio lighting.”
21. Restaurant Advertisement
“Elegant restaurant table prepared for dinner, white plates, polished glassware, warm candlelight, modern dark interior softly blurred behind, realistic hospitality photography, sophisticated atmosphere.”
22. Fitness Advertisement
“Athlete tying running shoes on outdoor stadium steps just before sunrise, energetic posture, dramatic side light, realistic sports photography, strong contrast, motivational commercial aesthetic.”
23. E-Commerce Lifestyle Scene
“Minimal wireless headphones resting beside a laptop and notebook on a modern home-office desk, soft window light, realistic product lifestyle photography, clean neutral palette, uncluttered background.”
24. Storyboard Frame
“Wide cinematic frame of a lone traveler entering an abandoned roadside motel at dusk, old car parked outside, cloudy sky, realistic movie storyboard concept, strong leading lines, mysterious atmosphere.”
25. Poster Background
“Abstract flowing glass shapes suspended against a dark gradient background, subtle reflections, elegant modern lighting, premium 3D design, centered visual movement, clean areas around edges for typography.”
These prompts should be treated as frameworks rather than magic commands.
Change one important variable at a time and compare results.
That teaches you far more than repeatedly generating random variations.
How Good Is CapCut AI Image Generator?
There is no single answer because image quality depends on the model, prompt, subject, reference material, and standards of the project.
A fantasy landscape can appear successful even if a small background object is imperfect.
A product advertisement has much less tolerance for mistakes.
Instead of asking whether CapCut AI Image Generator is simply “good” or “bad,” evaluate it across several categories.
Prompt Accuracy
Does the generated image actually contain the requested subject, environment, composition, and mood?
A beautiful image that ignores half of your instructions is not necessarily a successful generation.
Start with the most important requirements.
If you requested one red chair in an empty white room and received several chairs in a decorated living room, the model failed the core brief even if the result looks attractive.
Photorealism
Realism depends on more than sharpness.
Look at lighting direction, shadows, materials, depth, skin texture, reflections, proportions, and environmental consistency.
An image can be extremely detailed and still look artificial.
Faces
Faces attract immediate attention, so small problems become noticeable.
Inspect the eyes, teeth, ears, hairline, glasses, earrings, facial symmetry, and connection between the head and neck.
A face that looks convincing at small size may reveal artifacts when enlarged.
Hands and Anatomy
Generative models have improved significantly, but complex anatomy still deserves inspection.
Check fingers, wrists, arms, feet, and interactions between people and objects.
A hand holding a cup or phone is more difficult than a hand resting naturally out of view.
Text Inside Images
AI-generated typography should never be trusted without inspection.
Even when a model is capable of rendering readable text, spelling, punctuation, letter shapes, spacing, and brand accuracy can still fail.
For critical headlines, prices, labels, disclaimers, and calls to action, adding text manually is often safer.
Lighting
Look for consistency.
If a strong light source appears on the left, highlights and shadows should make sense relative to it.
Product imagery deserves particular attention because unrealistic reflections can make an object look synthetic.
Composition
A technically impressive image can still be unusable because the subject occupies the wrong part of the frame.
Evaluate the result according to its final destination.
If it is a thumbnail background, is there room for a face and headline?
If it is a product ad, does the product dominate the visual hierarchy?
Consistency
Generating the same character or product repeatedly can introduce variation.
CapCut itself acknowledges that generative AI can change people, objects, colors, poses, and scene elements between generations because randomness is part of the process.
Reference-based workflows and precise prompts can reduce unwanted variation, but perfect repeatability should not be assumed.
Best Uses for CapCut AI Image Generator
Capcut AI generator is strongest when speed, ideation, flexibility, or imaginative visuals matter more than exact documentary accuracy.
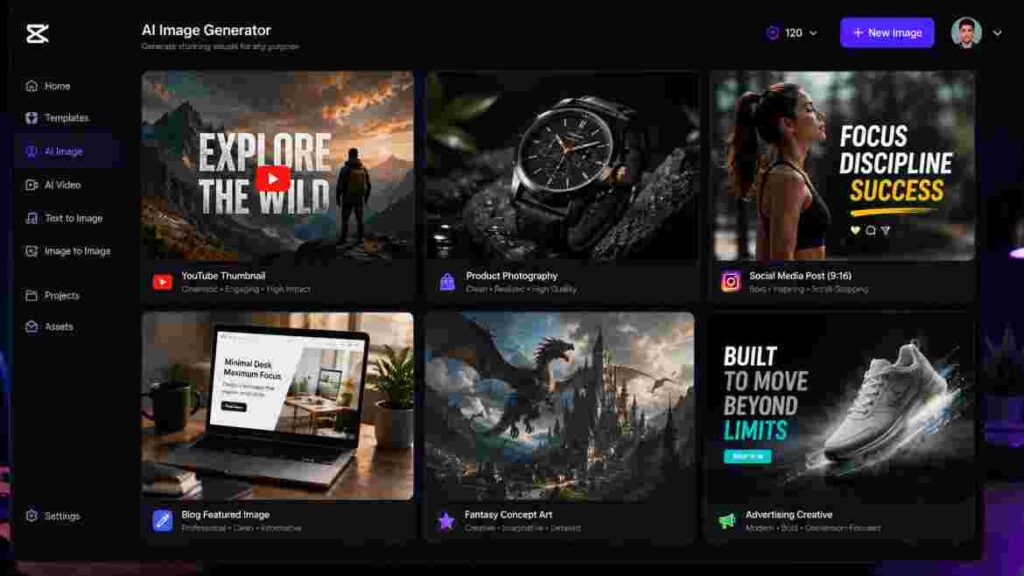
YouTube Thumbnails
Creators frequently need dramatic visual concepts that would be expensive or impossible to photograph.
AI can generate backgrounds, environments, props, lighting concepts, and illustrative scenes.
The safest workflow is often generating the visual foundation and adding important text, logos, and identity-critical elements manually.
Social Media Content
Social teams constantly need new visuals.
AI can help create backgrounds, campaign concepts, seasonal imagery, quote-card backgrounds, visual hooks, and experimental creative directions.
The ability to choose platform-friendly ratios makes this workflow more practical.
Blog Featured Images
Creating an original featured image for abstract topics can be challenging, but the CapCut AI Image Generator can turn detailed text prompts into unique, relevant visuals.
Topics such as cybersecurity, AI, productivity, remote work, digital marketing, or future technology do not always have obvious photographs.
A custom-generated concept can make an article visually distinct.
Storyboards
AI is useful for communicating an idea before production.
A director or content creator can generate rough scenes to explore camera angle, lighting, environment, wardrobe, or mood.
The generated frame does not need to be perfect.
Its job is to communicate creative intent.
Mood Boards
Instead of searching for dozens of reference images, you can generate concepts that represent a particular atmosphere.
This can help teams discuss whether a campaign should feel bright, luxurious, youthful, futuristic, natural, or cinematic.
Advertising Concepts
AI can accelerate early creative exploration.
A marketer can test several environments around a product concept before committing to a final direction.
Final commercial assets still require careful review for accuracy, rights, brand standards, and disclosure requirements where applicable.
Faceless Content
Faceless channels often need a large volume of supporting visuals.
Generated scenes can supplement video narration when suitable stock imagery is unavailable.
Avoid using AI merely to fill every second of a video.
The image should still support what the viewer is hearing.
CapCut AI Image Generator for YouTube Thumbnails
YouTube thumbnails have a specific job: communicate the video idea quickly enough to earn attention.
That means image generation should begin with composition rather than decoration.
If you plan to place a person on the left and headline text on the right, tell the AI to preserve the relevant space.
A useful prompt might say:
“Dramatic futuristic editing studio, large monitor displaying abstract video timeline, cinematic lighting, subject area left open for presenter, clean dark negative space on right for bold headline, realistic photography, widescreen 16:9.”
The generator now understands that the empty area is intentional.
Avoid asking AI to create the entire finished thumbnail when important typography is involved.
Generate the difficult visual elements first.
Then add text manually in an editor where you can control spelling, font, hierarchy, spacing, and readability.
Also remember that thumbnails are viewed small.
An image filled with tiny details may look impressive on a monitor but become visual noise in a feed.
For better CapCut AI Image Generator results, prioritize a clear focal point, strong subject-background separation, and a simple, balanced composition.
CapCut AI Image Generator for Social Media
Social media content is one of the most natural applications because formats change constantly.
A vertical Story and square feed graphic should not be treated as the same design.
Generate with the final placement in mind.
For Instagram feed posts, square and portrait formats can both be useful depending on the content.
For Stories, Reels, TikTok, and other vertical placements, 9:16 is generally the natural starting point.
Pinterest frequently benefits from taller imagery.
When creating a visual that will contain text later, ask for negative space.
For example:
“Minimal summer travel scene with turquoise sea and white coastal architecture concentrated in lower half, clean bright sky in upper half for headline text, vertical composition, realistic travel photography.”
This CapCut AI Image Generator prompting approach creates clean negative space for design elements instead of forcing typography over a busy AI-generated background.
CapCut AI Image Generator for Product Images
Product imagery is both promising and risky.
AI can create environments that would be expensive to build physically.
A simple product can appear on marble, in a luxury bathroom, beside a mountain trail, in a futuristic studio, or within a seasonal scene.
This makes AI useful for ideation and mockups.
Accuracy, however, matters enormously.
If you supply a real product as a reference, inspect the generated version against the original.
Check dimensions, logos, text, buttons, ports, seams, packaging, colors, and distinctive features.
An image can look polished while representing a product incorrectly.
That is especially problematic for e-commerce, where customers may rely on visuals to understand what they are purchasing.
For that reason, AI-generated product imagery should not automatically replace accurate photography.
It can supplement creative workflows, generate backgrounds, develop concepts, and help visualize campaigns.
Use original product assets whenever precise representation is essential.
How to Make CapCut AI Images Look More Realistic
Creating photorealistic results with the CapCut AI Image Generator requires detailed prompts, natural lighting, believable textures, and accurate composition—not simply repeating the word “realistic.”
The scene has to make visual sense.
If your generated image looks good but still lacks crisp detail, improving the resolution can help prepare it for larger displays or high-resolution exports. Our CapCut Image Upscaler guide explains how CapCut’s AI upscaling works and where its limits begin.
Use Plausible Lighting
Real-world lighting follows physical relationships.
Soft daylight from a window creates a different result from direct noon sunlight or a studio spotlight.
Choose one primary lighting direction.
Avoid Excessive Perfection
For photorealistic CapCut AI Image Generator results, include subtle natural imperfections and realistic textures that make AI-generated images look more like real photographs.
Natural texture, believable depth of field, realistic fabric, slight environmental variation, and sensible shadows can help an image feel less synthetic.
Prompts demanding everything be “perfect, ultra-smooth, flawless, glossy, hyper-detailed” can sometimes push results toward an artificial aesthetic.
Give the Subject Context
A realistic person should appear to belong in the environment.
A chef should interact naturally with the kitchen.
A runner should connect convincingly with the ground.
A product should cast appropriate shadows on the surface.
Control the Background
Busy backgrounds create more opportunities for errors.
If the background is not important, simplify it.
This also strengthens visual hierarchy.
Inspect Anatomy
For portraits and lifestyle images, zoom in.
Pay particular attention to hands interacting with objects.
If an image fails here, regenerating with a simpler pose may be easier than attempting to hide the problem.
Fix Problems Before Upscaling
Do not upscale CapCut AI-generated images immediately; first choose the best result, fix visible flaws, and refine important details before increasing the image resolution.
First decide whether the underlying image is worth keeping.
Choose the best composition and cleanest details.
Then refine and enhance.
If your generated visual is good but lacks crisp detail at the size you need, an upscaling workflow may help prepare the selected image for a larger output. A dedicated CapCut Image Upscaler guide can be used here to explain when AI upscaling improves an image and when it simply enlarges existing problems.
Common CapCut AI Image Generator Problems and How to Fix Them
Generative AI is probabilistic, so imperfect results are normal.
The key to improving CapCut AI Image Generator results is identifying why an AI-generated image failed and refining the prompt or settings accordingly.
The Image Doesn’t Match My Prompt
The prompt may be too vague, overloaded, or contradictory.
Identify the three most important requirements and make them explicit.
If composition matters, state where the subject should appear.
If a particular object is essential, describe it clearly.
Remove decorative language that does not contribute to the image.
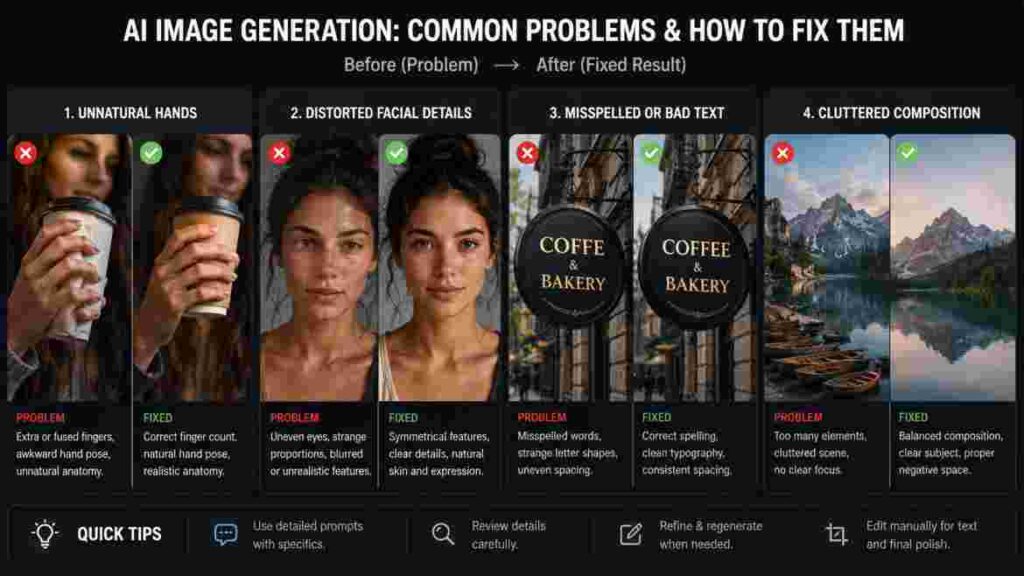
The Face Looks Artificial
Simplify the scene and improve the portrait instructions.
Use natural lighting, realistic skin texture, and a clear camera distance.
Complex scenes containing many people increase the difficulty.
If only one face matters, make that subject visually dominant.
Hands Look Wrong
Try a simpler pose.
Hands interacting with small objects can create additional complexity.
If the hand is not important to the concept, frame the image so it does not dominate.
Text Is Misspelled
Do not rely on generation for mission-critical typography.
Generate the image without the headline and add the words manually afterward.
This gives you complete control over spelling, typography, alignment, and brand font.
The Image Looks Too Artificial
Remove excessive style terms.
Replace generic phrases such as “ultra perfect masterpiece 16K hyper realistic” with specific photographic information.
Describe believable light, materials, environment, camera position, and natural texture.
The Composition Is Wrong
Tell the model where the subject belongs.
Use phrases such as:
“Subject positioned on left third.”
“Large negative space on right.”
“Centered symmetrical composition.”
“Wide shot.”
“Top-down composition.”
“Close crop from shoulders upward.”
Composition instructions should appear prominently in the prompt.
The Reference Image Changes Too Much
Generative systems do not necessarily copy a reference pixel for pixel.
Use a more precise prompt describing which characteristics must remain consistent.
If exact identity or product representation is mandatory, consider whether generative transformation is appropriate at all.
The Image Is Blurry
First determine whether the blur is intentional.
Depth of field may blur the background while keeping the subject sharp.
If the main subject lacks detail, regenerate or refine before reaching for an upscaler.
Upscaling is most useful when the underlying structure is already good.
The AI Image Feature Is Missing
Several issues can cause the CapCut AI Image Generator to stop working or disappear, including app version, account, region, credits, or temporary technical problems.
CapCut states that AI functionality can vary by region, credits, platform, application version, and account.
Update CapCut.
Check your internet connection.
Confirm that you are signed in.
Check whether AI tools appear on the web or desktop version.
Review your available credits.
If the feature is region-restricted, do not assume an application reinstall will solve the problem.
Generation Is Stuck on “Thinking”
CapCut’s Help Center associates prolonged AI processing with factors such as internet problems, server load, input complexity, or temporary service issues.
Check your connection first.
If you are using the web version, refresh the session or try a supported desktop browser.
If the problem persists across multiple simple prompts, it may be temporary rather than prompt-specific.
CapCut AI Image Generator Pros and Cons
The CapCut AI Image Generator may be a powerful creative tool, but no AI image generator is ideal for every user, workflow, or content-creation need.
CapCut’s biggest strengths come from accessibility and integration.
Advantages
The workflow is relatively approachable for people who do not have professional illustration or 3D-rendering skills.
Text-to-image generation can turn ideas into visual concepts quickly.
Reference-based workflows provide additional creative direction when text alone is insufficient.
Different aspect ratios make the tool practical for creator-focused formats.
Generated images can move into CapCut’s wider editing environment.
This is particularly useful for video creators who already spend much of their workflow inside CapCut.
AI can also accelerate ideation.
Instead of manually producing five completely different visual concepts, you can generate rough directions, identify what works, and refine the strongest idea.
Limitations
CapCut AI Image Generator results are not always completely predictable, as AI-generated images can vary in details, composition, style, and prompt accuracy between generations.
Repeated generations can change people, objects, colors, poses, and details.
Faces and anatomy still require inspection.
Typography should be checked carefully.
Reference images do not guarantee exact preservation.
AI features can vary across platforms and regions.
Generation may consume credits depending on the feature and account.
Models and interfaces change quickly, which means tutorials can become outdated.
Commercial users also need to consider accuracy, brand standards, intellectual-property concerns, platform rules, and any disclosure requirements relevant to their use case.
The generator is therefore best treated as a creative tool rather than an unquestionable source of finished assets.
Is CapCut AI Image Generator Free?
The word “free” needs context when discussing modern AI tools.
CapCut markets AI image-generation experiences as free in some of its public-facing material, but CapCut also operates a credit system for AI-powered functionality.
Its Help Center states that credits are used for AI features including AI image generation and that credits can be deducted when a qualifying AI action is performed.
This means you should not assume unlimited generation simply because you can access the tool without paying initially.
The exact experience can depend on your account, plan, promotional allowances, region, and current CapCut policies.
Before starting a large batch of images, check whether the interface displays a credit cost.
CapCut says qualifying actions can show the required credits before execution.
This is particularly important for professional workflows.
Using the CapCut AI Image Generator for a single experimental image requires far fewer AI credits and resources than producing hundreds of image variations for a large marketing campaign.
Pricing, credit allowances, subscription benefits, and promotional access can change. Check the current information shown inside your account before calculating production costs.
CapCut Credits and AI Image Generation
Credits function separately from a normal editing subscription.
CapCut describes them as a virtual currency for certain AI-powered operations.
When a qualifying action uses credits, the system deducts them from the available balance.
This distinction matters because having CapCut Pro does not necessarily mean every AI operation is unlimited.
Conversely, credit availability and purchase options can differ by platform.
Before using AI generation at scale, estimate how many iterations you may need.
A single finished image might require several generations.
That means your real production cost is not simply the cost of the final output. It includes the failed and experimental generations needed to reach it.
This is another reason to improve prompts before repeatedly clicking Generate.
Better planning can reduce unnecessary iterations.
CapCut AI Image Generator vs. Traditional Image Editing
The CapCut AI Image Generator and traditional image editing solve different creative problems, with AI generation focusing on creating new visuals and manual editing offering precise control over existing images.
Traditional editing is strongest when you already have the correct source material and need precise control.
Generative AI is strongest when the required visual does not yet exist.
Suppose you have an accurate photograph of a product and simply need to remove the background.
Traditional editing is usually the more controlled approach.
Now suppose you need to imagine that product in a futuristic retail store that has never been built.
Generation becomes much more useful.
Traditional editing also offers predictable control over typography, layout, masks, layers, and brand assets.
AI is more interpretive.
You request a result rather than manually specifying every pixel.
The best workflow is often hybrid.
Generate what would be difficult to create manually.
Then use conventional editing tools for precise finishing.
This approach combines AI speed with human control.
CapCut AI Image Generator vs. Stock Photography
Stock photography provides real, predictable visuals, while the CapCut AI Image Generator offers greater creative flexibility for producing custom images from detailed prompts.
AI generation offers customization.
If you need a generic photograph of a laptop on a desk, stock photography may be faster.
If you need a laptop on a specific futuristic desk with a particular lighting direction and empty space for a headline, generation may provide more flexibility.
Stock also avoids some generative inconsistencies.
A photographed keyboard has real keys. A photographed watch has physically coherent components.
AI-generated objects require more inspection.
The decision therefore depends on specificity.
Use the simplest method capable of producing the required result.
Tips for Getting Better Results With CapCut AI Image Generator
The strongest improvements usually come from process rather than secret prompt phrases.
First, define the image’s purpose.
A visual without a clear destination is harder to direct.
Second, establish the main subject.
Do not make the model guess what viewers should notice first.
Third, specify composition when layout matters.
This is especially important when the image will later contain text or another subject.
Fourth, select the final aspect ratio before generation.
Cropping afterward can destroy carefully generated composition.
Fifth, use references when visual continuity matters and the feature is available.
Sixth, generate alternatives.
AI generation contains randomness, so one attempt is rarely enough to judge an idea.
Seventh, change one important variable at a time.
If you simultaneously change the subject, style, lighting, camera angle, and background, you will not know which change improved the result.
Eighth, inspect the image at full size.
Tiny errors become obvious after publishing on a large screen.
Ninth, add important typography manually.
This improves accuracy and gives you control over branding.
Tenth, upscale after selection, not before.
There is little value in enhancing a generation you will eventually discard.
Finally, maintain human quality control.
AI can create the pixels.
It cannot determine whether every image is accurate, appropriate, on-brand, legally suitable, and effective for your particular audience.
Mistakes to Avoid When Using CapCut AI Image Generator
The first common mistake is writing an extremely vague prompt.
“Create a good YouTube image” is not enough.
The generator does not know your video topic, desired composition, visual hierarchy, or brand.
The second mistake is adding too many conflicting instructions.
More words do not automatically mean more control.
A shorter coherent prompt is better than a long collection of incompatible styles.
The third mistake is ignoring the final aspect ratio.
Generating square and cropping into vertical can remove essential elements.
The fourth mistake is accepting the first result.
Generation is exploratory by nature.
Compare alternatives before committing.
The fifth mistake is assuming visual polish equals accuracy.
An AI image can look professional while containing incorrect text, impossible geometry, or inaccurate product details.
The sixth mistake is publishing without zooming in.
Quality-control problems often hide in small details.
The seventh mistake is asking AI to render critical text when manual typography would be safer.
The eighth mistake is trying to repair a fundamentally bad image with upscaling.
Enhancement should improve a good foundation, not justify keeping a failed generation.
The ninth mistake is assuming features are identical for every user.
CapCut changes quickly, and availability can vary.
The tenth mistake is treating AI output as automatically ready for commercial use.
Professional publication requires additional checks for accuracy, rights, branding, and platform requirements.
How to Build a Better AI Image Workflow in CapCut
A repeatable workflow saves more time than random prompting.
Start with a creative brief.
Write one sentence explaining what the image must achieve.
For example:
“Create a realistic 16:9 background for a YouTube thumbnail about AI video editing, with the main visual interest on the right and enough dark space on the left for a presenter and headline.”
Now convert that objective into visual instructions.
Define the environment.
Choose the lighting.
Choose the visual style.
Set the ratio.
Generate several options.
Select the image with the best underlying composition rather than the image with the most impressive small details.
Refine the prompt if necessary.
Once the composition works, correct visual issues.
Then add precise design elements such as typography, logos, icons, arrows, or brand colors manually.
Finally, inspect the finished asset at both full resolution and the approximate size at which the audience will see it.
This last step matters.
A social graphic should work on a phone.
A thumbnail should work when small.
A blog hero should remain clear when cropped responsively.
Quality is contextual.
Using AI Images for Blog Content
Bloggers have a particular challenge.
They need visuals that improve understanding or presentation without distracting from the article.
A generic decorative AI image does not automatically add value.
Use generated images where they clarify a concept, establish context, or create a meaningful visual break.
For a tutorial about AI image generation, useful visuals might include a prompt-development example, a comparison between vague and detailed prompts, different aspect ratios, or an example of quality-control mistakes.
These are more valuable than inserting random futuristic robots between every section.
Featured images are another good use.
A unique visual can help differentiate an article in social shares and content feeds.
Still, keep the composition simple enough to support a title overlay if your website uses one.
Using CapCut AI Images for Marketing
Marketing imagery has to do more than look attractive.
It must communicate a message.
Start with the audience and objective.
An image for a luxury product should not simply include “luxury” in the prompt.
Think about what visually communicates that positioning: controlled lighting, restrained composition, premium materials, negative space, subtle reflections, and a limited palette.
A youth-focused campaign may require a completely different energy.
AI can rapidly explore those directions.
However, the final selection should still be made according to marketing goals rather than personal taste.
Ask whether the image makes the product clear.
Does it support the message?
Does it leave room for copy?
Does it fit the brand?
Does it remain understandable on mobile?
Does anything in the image make a claim the actual product cannot support?
Those questions turn AI generation into a marketing workflow rather than an art experiment.
Using Reference Images More Effectively
A reference image gives the model visual information that would be difficult to communicate entirely through words.
Choose a clean reference whenever possible.
If the image contains many unrelated objects, the model may have more visual information to interpret.
Then explain what should change and what should remain.
For example:
“Keep the general product shape and front-facing camera angle. Replace the plain background with a dark premium studio environment. Add a subtle reflective surface beneath the product. Use soft side lighting. Do not add additional products.”
This is more useful than:
“Make this look better.”
References are guidance, not guarantees.
For identity-critical work, compare the output directly against the original.
How to Choose the Right Aspect Ratio
Aspect ratio should be part of creative planning.
Use 16:9 when you need a conventional widescreen composition.
This is useful for many video backgrounds, presentation visuals, and YouTube-oriented assets.
Use 9:16 when creating vertical-first content.
This gives the AI room to compose the subject for a phone screen instead of forcing a landscape scene into a narrow crop.
Use 1:1 when a square composition makes sense.
Use 4:5 when you want a taller feed image without going fully vertical.
The exact platform specifications can change, so always check current publishing requirements for the destination.
The larger lesson is simple:
Use the CapCut AI Image Generator to create images in the exact canvas size and aspect ratio required for your target platform.
How to Create Better Thumbnail Backgrounds
Thumbnail generation deserves a slightly different prompting strategy.
Do not ask only for an attractive scene.
Ask for a usable layout.
Imagine your finished thumbnail before generation.
Where will the face go?
Where will the text go?
Which element should create visual tension?
Which part should remain simple?
Then describe those zones.
For example:
“Dark modern editing studio, glowing monitor with abstract image-editing interface on right side, dramatic rim lighting, left side mostly dark and uncluttered for presenter cutout, upper-left area clear for short headline, realistic cinematic photography, 16:9.”
Notice that the prompt is not simply describing objects.
It is describing design space.
That distinction can make generated backgrounds far easier to use.
How to Create Better Product Backgrounds
When you already have an accurate product photograph, generating a complete replacement product may be unnecessary.
Instead, consider using AI to develop the environment.
Create a background or conceptual scene that matches the product’s intended positioning.
Then combine the accurate product asset with the generated environment through editing.
This reduces the risk of AI changing packaging, logos, buttons, labels, or physical dimensions.
It also gives you more control over the final advertisement.
For many e-commerce workflows, this hybrid method is safer than asking AI to recreate the entire product.
How to Keep AI Images Consistent
Consistency is difficult because generation includes randomness.
Start by preserving your successful prompts.
Do not rely on memory.
Record the wording, ratio, model, reference image, and any other important settings.
If one result is close to the desired direction, refine that prompt instead of creating an entirely new one.
Describe identity-defining features consistently.
Use reference images when available.
Avoid changing several major characteristics between generations.
Even with these practices, expect some variation.
If a project requires the exact same character, object, or product across many images, you may need additional manual editing or specialized consistency workflows.
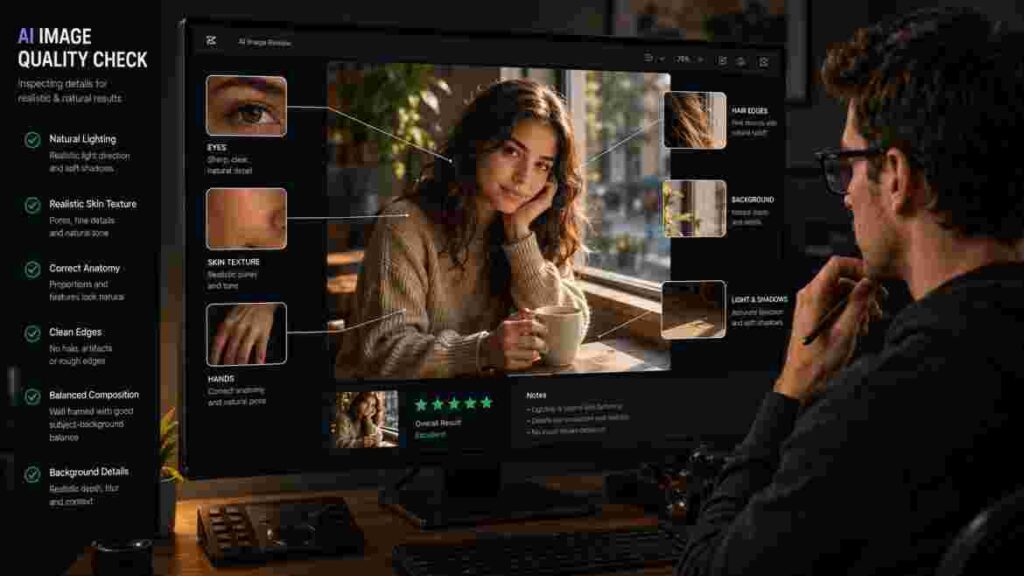
How to Quality-Check an AI-Generated Image
Quality control should happen before publication.
Start with the overall image.
Does it communicate the intended idea immediately?
Then check composition.
Is the subject positioned correctly?
Is there enough space for additional design elements?
Next, zoom in.
Inspect faces, hands, object edges, text, logos, reflections, shadows, patterns, and background details.
Check whether objects connect physically.
Does a hand actually grip the cup?
Does a chair leg connect to the chair?
Do reflections correspond to nearby objects?
Then check color.
If the image belongs to a brand, compare important colors against the actual palette.
Finally, test the destination.
View the thumbnail small.
View the social graphic on a phone.
Preview the blog image in the page layout.
An image is not finished merely because it looks good at 100% zoom.
It has to work where people will actually see it.
Is CapCut AI Image Generator Safe for Professional Work?
The tool can be useful in professional workflows, but “professional” does not mean publishing generations without review.
Professionals need higher quality-control standards.
If the image depicts a real product, verify accuracy.
If it contains text, verify every word.
If it represents a person, consider consent and context.
If it is used commercially, review the applicable CapCut terms, platform policies, intellectual-property considerations, and laws relevant to your location and use case.
CapCut’s Trust Center states that users retain rights to content they create on the platform, subject to the permissions and terms associated with using CapCut services.
That does not eliminate every legal consideration surrounding AI-generated material.
Rights involving uploaded references, third-party trademarks, copyrighted characters, recognizable people, and commercial claims can involve separate issues.
When a project carries significant legal or commercial risk, obtain appropriate professional advice rather than relying on a general software tutorial.
Who Should Use CapCut AI Image Generator?
The tool makes particular sense for existing CapCut users.
Video creators can generate supporting visuals without completely changing workflows.
Social media managers can experiment with campaign concepts.
Bloggers can create custom conceptual imagery.
YouTubers can develop backgrounds and thumbnail components.
Small businesses can explore promotional concepts.
Designers can use generation during ideation.
Marketers can test multiple visual directions before committing resources.
Beginners can create images without mastering advanced illustration tools first.
It is less suitable when absolute visual accuracy is mandatory and the generated subject cannot be allowed to change.
A catalog photograph of a real product, a technical diagram, a legally sensitive image, or an identity-critical portrait may require a more controlled workflow.
Is CapCut AI Image Generator Worth Using?
For the right user, yes.
Its strongest argument is not that it eliminates photographers, designers, illustrators, or specialized AI tools.
Its strongest argument is workflow convenience.
If you already create content in CapCut, generating an image and immediately continuing into editing can save friction.
The tool is particularly useful for concepts, backgrounds, social visuals, storyboards, thumbnail elements, imaginative scenes, and quick creative experimentation.
Prompt quality matters considerably.
Users who enter one vague sentence and expect a perfect finished advertisement may be disappointed.
Users who treat generation as an iterative creative process are more likely to get useful results.
Its limitations should also shape your expectations.
AI can alter details.
Consistency is not guaranteed.
Typography needs checking.
Product accuracy requires attention.
Availability and credit requirements can change.
Professional work requires human review.
The best way to think about CapCut AI Image Generator is as a fast creative collaborator.
Give it a clear brief.
Generate alternatives.
Select critically.
Refine deliberately.
Finish the work yourself.
That approach takes advantage of AI speed without surrendering creative judgment.
Conclusion: CapCut AI Image Generator
The CapCut AI Image Generator expands CapCut from a conventional editing environment into a broader visual-creation workspace.
It can turn written prompts into original images, use visual references in supported workflows, create content for different aspect ratios, and feed generated assets into a larger editing process.
Its greatest value comes from speed and accessibility.
A creator can move from an idea to several visual directions without organizing a photoshoot or building every concept manually.
But AI generation is not a one-click replacement for creative decision-making.
The quality of your prompt affects the quality of your direction. The quality of your review determines whether hidden mistakes reach the audience.
Start with a clear purpose.
Describe the subject, environment, composition, lighting, and style in visual terms.
Choose the correct aspect ratio before generating.
Compare multiple results.
Refine the strongest one.
Inspect details at full size.
Add critical text and branding manually when accuracy matters.
And remember that a technically impressive AI image is only successful when it actually serves the content.
Used that way, CapCut’s image-generation tools can become a practical part of a creator’s workflow rather than simply another AI feature to experiment with.