A photo can look perfectly acceptable on a phone screen and still fall apart the moment you try to use it somewhere larger. You add it to a website banner, open it on a desktop monitor, crop it for a product listing, or prepare it for a presentation, and suddenly the weaknesses become obvious. Edges look soft. Hair loses definition. Small text becomes difficult to read. Fine textures turn into blocks, and what once seemed like a usable photo now looks blurry or pixelated.
That problem is especially common with old digital photographs, images downloaded from social media, screenshots, heavily compressed JPEGs, cropped product photos, and AI-generated images created at relatively small dimensions. The original may contain enough visual information to look good at its native size, but not enough pixels to remain convincing after enlargement.
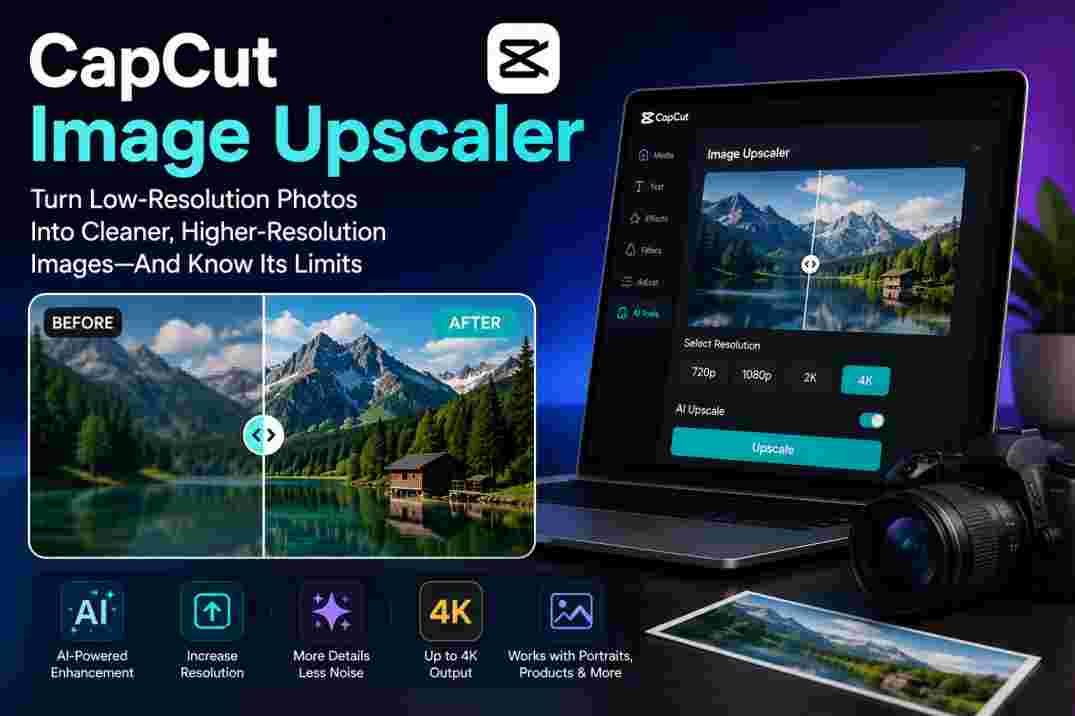
The CapCut Image Upscaler is designed for situations like these. Rather than enlarging a picture through ordinary interpolation alone, CapCut uses AI-assisted processing to analyze visual patterns, edges, textures, and image structure before generating a higher-resolution result. CapCut’s current dedicated upscaler promotes high-resolution enhancement, including 4K output, while other official CapCut workflows describe resolution or scale choices such as 720p, 1080p, 2K, 4K, and 2× or 4× enlargement depending on the tool being used.
That sounds straightforward, but increasing resolution and improving an image are not always the same thing.
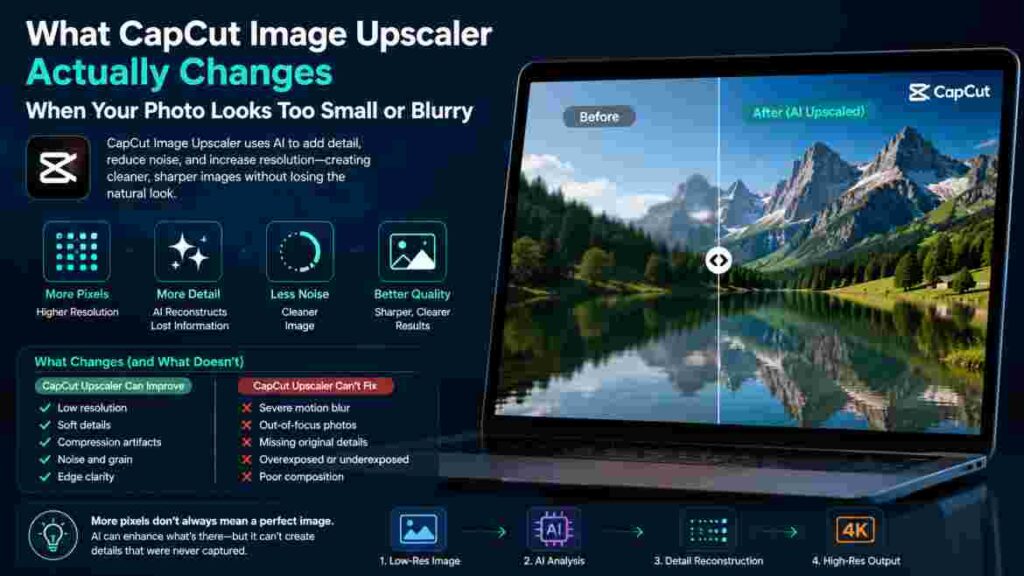
An AI tool can create more pixels, smooth rough edges, suppress visible noise, and reconstruct plausible texture. What it cannot do is travel back in time and recover visual information the camera never captured. A severely blurred face does not secretly contain a perfect high-resolution portrait waiting to be unlocked. When source information is missing, AI has to estimate what could reasonably be there.
That difference explains why one image can improve dramatically while another becomes artificial.
This guide takes a practical approach to the CapCut Image Upscaler. Instead of simply telling you where to click, it explains which images are worth upscaling, how the process differs from ordinary resizing, what 720p, 1080p, 2K and 4K actually mean in practice, how to inspect an AI-enhanced image for mistakes, and when another editing method may be more appropriate.
The goal is not simply to create a larger file.
It is to create an image that remains useful, believable, and appropriate for the place where you intend to use it.
What CapCut Image Upscaler Actually Changes When Your Photo Looks Too Blurry
When people describe an image as “low quality,” they can be referring to several different problems at once. The picture may have low resolution, poor focus, digital noise, compression artifacts, weak lighting, motion blur, inaccurate colors, or a combination of those issues.
That matters because the CapCut Image Upscaler is most useful when you understand what is actually wrong with the source.
Upscaling primarily addresses insufficient pixel dimensions. AI-assisted enhancement may also make edges, textures, and certain details appear clearer, but it should not be treated as a universal repair process for every visual defect.
Resolution is only one part of perceived image quality
Resolution is commonly described by the number of pixels contained in an image.
A photograph measuring 600 × 400 pixels contains 240,000 pixels. A 2400 × 1600 version contains 3.84 million. The second file gives the image much more room to describe small edges, textures, patterns, and tonal transitions.
That does not automatically make it a better photograph.
A high-resolution image can still be badly focused. It can still contain motion blur, excessive noise, clipped highlights, poor composition, or inaccurate colors. Likewise, a relatively small image can look sharp and attractive as long as it is displayed at an appropriate size.
The problem becomes noticeable when you ask a small image to occupy more visual space than its source information can comfortably support.
Imagine a 500-pixel-wide product photo displayed at approximately the same width on a website. It may look reasonably clean. Now imagine trying to use that same file as a large hero image across a desktop screen. The browser or editing software has to create a much larger display from a relatively small amount of original information.
That is when pixelation and softness become easier to see.
Perceived image quality also depends on viewing distance. A large image viewed from across a room can tolerate imperfections that would be obvious when examined closely on a monitor.
This is why resolution should always be evaluated in context.
When deciding whether to use the CapCut Image Upscaler, ask three questions:
- How large is the original image?
- How large will it ultimately be displayed?
- What details actually need to remain convincing?
A social-media background does not require the same precision as a product photograph that customers can zoom into.
What AI upscaling does differently from ordinary enlargement
Traditional image enlargement generally uses interpolation.
Interpolation calculates new pixel values based on the pixels already present in the source. Different algorithms handle this differently, but the basic idea is similar: the software estimates what should go between existing pixels as the dimensions increase.
This can produce a smoother enlarged image, but it cannot intelligently understand that one area represents hair while another represents lettering, fabric, skin, grass, or a building edge.
AI upscaling introduces a different approach.
Instead of treating every pixel relationship as a purely mathematical resizing problem, an AI model can analyze patterns in the image and predict what a higher-resolution version of those patterns could look like.
A fuzzy boundary may become cleaner.
Hair may receive more strand-like definition.
Fabric may gain more recognizable texture.
A rough diagonal edge may look smoother.
Compression artifacts may become less distracting.
CapCut describes its current AI Image Upscaler as using AI to denoise photographs, reduce imperfections, and add detail while generating larger outputs. Its dedicated tool currently promotes 2×–8× upscaling and high-resolution results, including 4K, although exact options can vary across CapCut workflows.
This gives AI upscaling an important advantage over simple resizing: the result can look as though it contains more visual information rather than merely more pixels.
But there is a tradeoff.
Ordinary interpolation is comparatively predictable because it does not try to understand the subject creatively. AI can produce a more impressive image, but some of the apparent new detail may be reconstructed rather than recovered.
That distinction becomes important when accuracy matters.
Why adding pixels cannot always recover genuinely missing detail
Suppose an old photograph contains a person’s face that is only 20 or 30 pixels wide.
The image may tell you where the eyes, nose, mouth, and hair are located. It probably does not contain enough original information to accurately describe individual eyelashes, subtle skin texture, tiny wrinkles, or precise reflections in the eyes.
If an AI upscaler produces those details, it has not discovered hidden information.
It has generated a plausible interpretation.
For casual creative use, that can be extremely useful. The enhanced face may look much more natural when the photograph is enlarged.
For historical documentation, forensic work, identification, product accuracy, medical images, or other evidence-sensitive situations, plausible reconstruction needs to be treated differently from original captured detail.
The same problem appears with tiny text.
If a distant sign contains only a few blurred shapes, AI may produce letter-like forms. That does not mean the software has recovered the actual wording.
This is why the CapCut Image Upscaler should be viewed as an intelligent enhancement tool rather than a guaranteed information-recovery system.
A strong source gives AI more reliable evidence.
A weak source forces it to make more assumptions.
The best upscaling results usually happen when the original image is fundamentally good but too small—not when the original contains almost no usable visual information.
The Images Most Likely to Improve—and the Ones That Can Still Give AI Trouble
Not every low-resolution image responds to AI enhancement in the same way.
Two files can have identical pixel dimensions and still produce very different results because resolution is only one input. Focus, compression, lighting, subject complexity, noise, and the amount of recognizable structure in the source all influence what an AI model has to work with.
Before using the CapCut Image Upscaler, it helps to estimate how much reliable information already exists in your photograph.
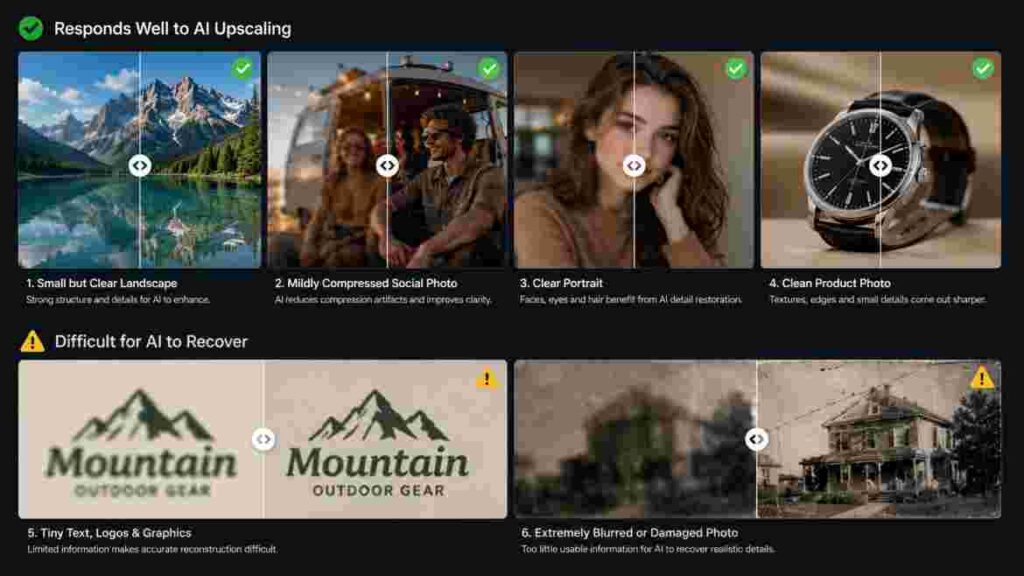
Small but reasonably clear photographs
These are among the best candidates for upscaling.
Imagine an old photograph that is only 900 pixels wide but still shows reasonably clean facial features, object boundaries, and textures. The image may be too small for a modern high-resolution layout, yet there is enough visual structure for AI to interpret.
In this situation, upscaling can add dimensions while making the photograph feel cleaner at larger viewing sizes.
The important characteristic is not simply that the file is small.
It is that the file is small but informative.
If you can already distinguish important edges and features in the original, the model has a stronger basis for reconstructing them at higher resolution.
Compressed social-media images
Images downloaded from social networks and messaging apps are common candidates for the CapCut Image Upscaler, but they come with an extra challenge: compression.
Platforms often reduce file size to speed up uploads, downloads, and delivery. That process can remove fine detail and introduce artifacts.
You may see:
- blocky textures;
- halos around high-contrast edges;
- smeared hair;
- muddy foliage;
- loss of subtle gradients;
- rough text;
- unnatural patches in shadows.
AI enhancement can sometimes reduce the visual impact of those defects, but the better solution is to locate the original file whenever possible.
If you uploaded the image yourself, check your camera roll, cloud storage, computer, media library, or original project folder before working with a downloaded social-media copy.
Every extra generation of compression gives the AI less trustworthy information.
Portraits and faces
Portraits can respond very well to AI upscaling because human faces contain structures that modern AI models are good at recognizing.
They are also one of the easiest categories to get wrong.
Human viewers are exceptionally sensitive to facial identity. Even subtle changes to the eyes, mouth, teeth, eyebrow shape, hairline, or skin texture can make a person look different.
When using the CapCut Image Upscaler on a portrait, inspect the result carefully rather than judging only the overall sharpness.
Look at:
- pupils and catchlights;
- eyelids and eyelashes;
- teeth;
- lip boundaries;
- eyebrows;
- hairlines;
- ears;
- glasses;
- facial hair;
- skin texture.
A strong portrait upscale should make the image easier to view without changing who the person appears to be.
Product photography
Product images are strong candidates when the source is reasonably clean.
CapCut specifically promotes super-resolution workflows for ecommerce product imagery, describing the ability to produce higher-resolution assets for marketplace listings, zoomable galleries, product-detail pages, and advertising creatives.
That makes practical sense.
Customers often expect to inspect texture, stitching, surface finish, packaging, controls, labels, or other small details before purchasing something.
However, product accuracy matters more than visual drama.
If AI makes leather look smoother than it is, alters stitching, changes small text on a label, reshapes a product edge, or modifies a pattern, the image may become less trustworthy even if it looks more polished.
Use the CapCut Image Upscaler to improve presentation, not to change what the product appears to be.
Text, logos and graphics
Text-heavy images deserve particular caution.
AI can recognize visual structures, but tiny or severely compressed lettering is difficult because a small error can change an entire character.
A distorted “B” is not simply an imperfect texture. It may become a different letter.
The same applies to logos.
If you have access to an original vector logo—such as an SVG, EPS, or suitable PDF—use that rather than upscaling a tiny raster copy.
Vector graphics can scale cleanly because their shapes are mathematically defined rather than locked to a fixed pixel grid.
The CapCut Image Upscaler is most useful for a logo or graphic when a better master asset does not exist.
Extremely blurred, damaged or tiny source files
These are the hardest cases.
Severe motion blur removes clean edge information.
Heavy defocus prevents the camera from recording precise details.
Physical photograph damage can remove entire portions of the image.
Extreme compression destroys subtle texture.
Tiny source files simply contain too little information.
AI can still create a visually attractive result, but the further the source falls from a clean photograph, the more the process shifts from enhancement toward reconstruction.
That does not make the output useless.
It means you should judge it according to the purpose.
A reconstructed family photograph intended for personal display may be completely acceptable.
A reconstructed image intended to prove exactly what was written on a sign is a different matter.
Using CapCut Image Upscaler From Upload to Final Export
The mechanics of using the CapCut Image Upscaler are relatively simple. The more important decisions happen around those mechanics: choosing the source, selecting the right output, reviewing the enhancement, and deciding whether further editing helps or hurts.
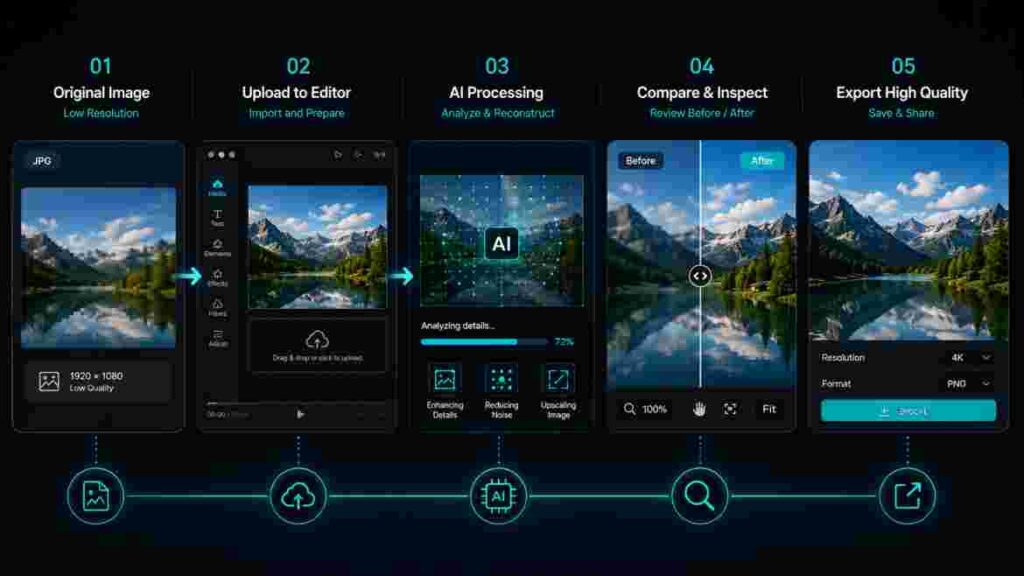
CapCut’s current official instructions describe a workflow in which users open an image project, upload a photo, select the image, access AI tools, choose the upscale function, allow the tool to process the image, and then export the result in formats such as JPEG, PNG, or PDF. Interface wording can change as CapCut updates its products.
Use the following process as a quality-first workflow rather than simply a sequence of clicks.
Step 1 — Start with the best source file you still have
This is the most important step, and it happens before CapCut does anything.
Do not automatically upload the first copy of the image you find.
Search for the strongest version.
If you have multiple copies, compare their pixel dimensions and visual quality. Look for the file that contains the most original information and the least previous processing.
Prefer:
- the original camera file over a screenshot;
- the original download over a social-media re-download;
- the uncropped photograph over a tiny crop;
- the highest-quality export over a compressed copy;
- the version with natural sharpness rather than aggressive editing.
Suppose someone sent you a photograph through a messaging app. The downloaded copy may have been compressed before it reached you. If the sender still has the original, asking for that file can improve your final result more than any additional AI setting.
The CapCut Image Upscaler can only work with the information you provide.
Better input usually gives it a better starting point.
Step 2 — Upload the image and inspect its existing quality
Open the relevant CapCut image workflow and import your photograph.
Before running the AI tool, examine the source at 100% zoom.
Do not immediately start enhancing it.
Identify what is wrong.
Is the image simply too small?
Is it blurred?
Does it contain JPEG artifacts?
Is there significant digital noise?
Are the colors poor?
Is the main subject tiny because the photograph needs cropping?
Does it contain important text?
Are facial details already difficult to distinguish?
This diagnosis affects everything that follows.
If the image already looks reasonably sharp but lacks dimensions, the CapCut Image Upscaler is addressing the right problem.
If the photograph has severe motion blur, upscaling alone may not solve it.
If the source contains heavy noise, you may need to consider how noise reduction interacts with the upscale.
If the image is damaged, restoration may be a separate task.
The purpose of inspection is not to complicate the process. It is to stop you from expecting one tool to fix the wrong defect.
Step 3 — Choose an output resolution that matches the actual use case
CapCut’s official resources currently describe several forms of resolution selection depending on the workflow. Some CapCut guides list 720p, 1080p, 2K, and 4K choices, while the current dedicated AI upscaler emphasizes scale-based enlargement and 4K-capable results.
Use the options available in your interface, but choose them according to your final need.
Do not automatically select the largest output.
Ask:
- Is the image for a blog?
- Will customers zoom into it?
- Is it intended for a social post?
- Will it be shown on a large television?
- Is it going into a presentation?
- Is it being printed?
- Will you crop the image again later?
A 4K result may provide useful headroom, but producing an enormous image only to display it at 600 pixels wide is inefficient.
Likewise, choosing too small an output can leave you with the same problem once the image reaches its final destination.
The correct output is not the largest number.
It is the one that gives you enough resolution for the intended use without creating unnecessary processing, storage, or file-size overhead.
Step 4 — Run the AI upscale and inspect important details
Once you have chosen the appropriate setting, run the CapCut Image Upscaler.
The processing may seem automatic, but your job is not finished when the result appears.
Start with a side-by-side comparison if your workflow provides one.
Then zoom into areas where reconstruction errors are most likely.
For portraits, look at the eyes, teeth, hair, skin, glasses, and ears.
For ecommerce images, inspect labels, logos, seams, patterns, and reflective surfaces.
For buildings, look at railings, windows, bricks, roof lines, and repeating structures.
For screenshots, examine every piece of text.
For artwork, inspect thin lines and intentional textures.
You are looking for two things:
Did the image become more useful?
and
Did the AI change anything that should have remained accurate?
A stronger-looking result is not automatically a more faithful result.
Step 5 — Make additional corrections only where they improve the image
CapCut offers a broader image-editing environment beyond upscaling. Its current official upscaler workflow notes that users can continue editing with tools such as filters, effects, background removal, cropping, and other adjustments after enhancement.
That flexibility is useful, but additional editing should be purposeful.
Avoid the temptation to improve everything simply because controls are available.
If the image already has natural color, it may not need a strong filter.
If skin texture looks believable, extra smoothing may make it worse.
If the AI already increased edge definition, aggressive sharpening may create halos.
If noise is not distracting at the final display size, heavy denoising may erase texture unnecessarily.
Each additional edit should solve a visible problem.
This approach usually produces a more natural result than stacking enhancement on top of enhancement.
Step 6 — Export and check the finished file at full size
When the image looks good in the editor, export it.
CapCut’s current dedicated upscaler page describes export choices including JPEG, PNG, and PDF, along with size and quality controls in the download workflow.
Choose the format according to the destination.
JPEG is widely useful for photographs and can produce manageable file sizes.
PNG is appropriate where lossless raster output, transparency, or graphic elements are important.
PDF may be relevant to particular document or print workflows.
After export, open the actual file outside CapCut.
Check it at 100%.
Then view it at approximately the size your audience will actually see.
This second view is important.
Pixel-level inspection can reveal artifacts, but an image does not need to look flawless at extreme magnification if it will ultimately be displayed as a relatively small web graphic.
At the same time, a product image intended for zooming or a photograph intended for large print deserves stricter inspection.
The final destination determines the quality standard.
720p, 1080p, 2K or 4K? Choose the Output for Where the Image Will Actually Be Used
Resolution terminology can encourage a simple assumption: bigger is better.
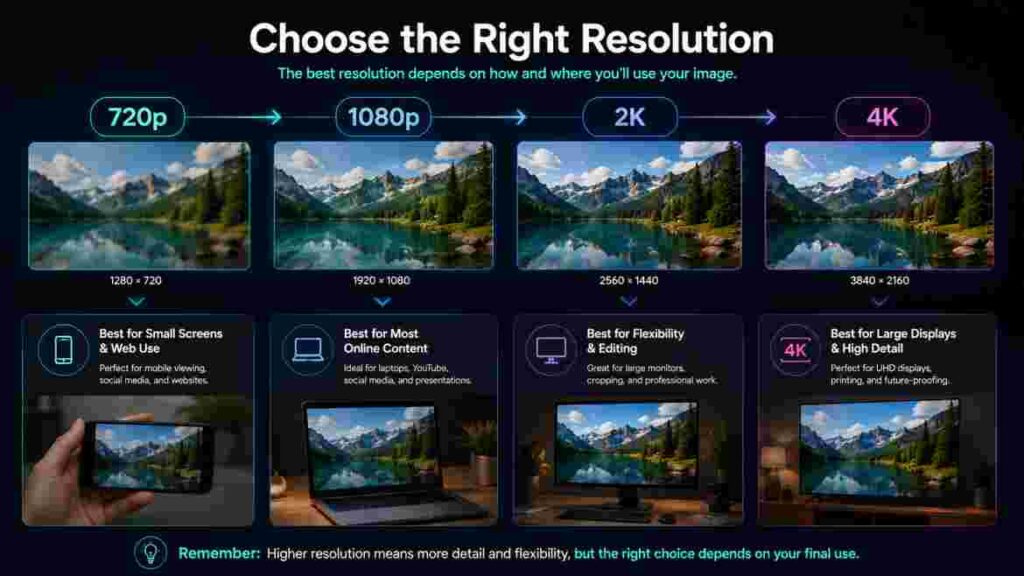
If 1080p is good, then 2K must be better. If 2K is better, 4K must be the correct choice.
Real image workflows are not that simple.
Official CapCut resources describe 720p, 1080p, 2K, and 4K options in relevant upscaling workflows, while other current CapCut tools present enlargement through scale factors rather than the same resolution menu.
Whichever interface you see, choose the CapCut Image Upscaler output according to the image’s destination.
When 720p may be enough
Lower-resolution output can still be perfectly useful when an image will occupy limited screen space.
Think about:
- small presentation inserts;
- mobile-first graphics;
- email imagery;
- small web cards;
- temporary previews;
- lightweight internal documents.
If the image will never be displayed large, generating a massive file may provide no visible benefit.
This is especially relevant for websites.
Serving a much larger image than necessary can increase page weight and bandwidth usage. Modern sites often create multiple responsive image sizes, but it is still good practice to start with sensible assets.
Do not interpret 720p as “bad.”
Interpret it as a level of resolution that may or may not fit your destination.
Why 1080p remains practical for many digital uses
1080-class imagery remains highly practical because many everyday digital applications do not require extremely large files.
Social graphics, online presentations, standard website visuals, content thumbnails, digital advertisements, and screen-based designs can often look very good at moderate high-resolution dimensions.
The exact pixel dimensions you need depend on the orientation and layout, so “1080p” should not be treated as a universal still-image specification.
A vertical graphic has different dimensions from a landscape one.
The larger principle is what matters: your output should provide sufficient pixels for the final display while avoiding unnecessary excess.
For many users, a 1080-class result from the CapCut Image Upscaler can provide a useful balance between sharpness and manageable file size.
Where 2K provides useful extra headroom
2K output becomes attractive when you need flexibility after enhancement.
Perhaps you are preparing one photograph for several destinations.
You may need:
- a landscape website banner;
- a square social graphic;
- a vertical story image;
- a presentation slide;
- a cropped product advertisement.
A larger master gives you more room to crop and reposition without immediately running out of pixels.
This is one of the strongest reasons to upscale beyond the exact display size.
You are not necessarily creating a larger file because the audience will see every pixel.
You are creating editing headroom.
The key is to remember that AI-generated resolution is still based on reconstructed information. More output pixels do not turn a weak source into a genuinely high-detail camera original.
When choosing 4K makes sense
4K can be useful when the image will genuinely benefit from a large output.
Examples include:
- high-resolution displays;
- large presentation backgrounds;
- detailed ecommerce imagery;
- larger digital advertising layouts;
- some print applications;
- designs that require substantial cropping;
- creative assets reused across multiple formats.
CapCut currently promotes 4K enhancement through its AI Image Upscaler, and its ecommerce-focused super-resolution material also emphasizes higher-resolution product imagery.
If the source contains enough clean structure, a 4K upscale can produce a noticeably more useful asset than basic enlargement.
But the source still sets the ceiling on authenticity.
Why the highest resolution setting isn’t automatically the best result
Imagine taking a severely blurred 200-pixel image and creating a huge output.
The resulting file may contain millions of pixels.
Those pixels do not automatically contain millions of pixels worth of original information.
The model has to reconstruct more and more detail as the enlargement becomes increasingly aggressive.
This can create:
- artificial skin;
- strange hair;
- distorted text;
- repetitive textures;
- overdefined edges;
- unnatural patterns;
- details that look convincing but were never truly visible.
In such cases, a smaller upscale can sometimes look more natural because it asks less of the model.
The best CapCut Image Upscaler result is therefore not necessarily the largest.
It is the output that provides enough resolution while preserving believable visual structure.
A Better Upscale Starts Before You Click the Upscale Button
AI upscaling can feel like a finishing process, but source preparation often has more influence on the result than users expect.
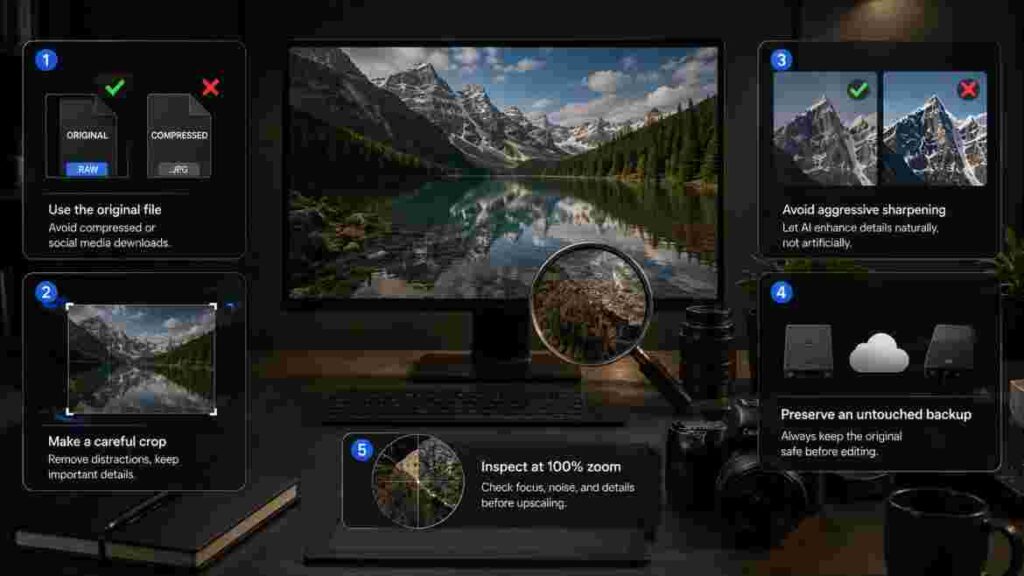
A clean input gives the AI clearer evidence.
A heavily processed, repeatedly compressed, oversharpened source gives it a mixture of real detail and editing artifacts that can be harder to interpret.
If you want the CapCut Image Upscaler to perform well, improve the input before worrying about the output.
Avoid repeatedly downloading compressed copies
Repeated compression can gradually damage an image.
A common chain might look like this:
Original camera file → social-media upload → social download → messaging app → download → editing app → JPEG export → another upload.
Each stage may introduce rescaling or compression.
By the time the file reaches the CapCut Image Upscaler, fine information may already have been removed several times.
Whenever possible, go back to the earliest available version.
For your own website images, check your original media folder.
For shared photographs, ask the sender for the original file.
For client projects, request high-resolution assets before beginning.
AI enhancement should ideally start with the strongest surviving source rather than compensate for an avoidable chain of degradation.
Crop carefully before enhancement
Cropping changes how many source pixels remain available.
Suppose a person’s face occupies only a small portion of a large image.
Cropping around the subject may make sense because you do not need the surroundings.
However, once you crop tightly, the remaining image may contain relatively few pixels.
That means the AI will have to perform more reconstruction when you enlarge it.
Preserve the original uncropped file.
Create a working copy.
Then decide whether cropping before or after upscaling gives the best combination of subject focus and source information.
There is no universal rule because different images behave differently.
Don’t oversharpen an already damaged photograph
Sharpening creates the appearance of increased detail by increasing contrast along edges.
Used carefully, it can improve perceived clarity.
Used aggressively, it creates halos, harsh boundaries, crunchy texture, and exaggerated noise.
Those artifacts can become part of the evidence the CapCut Image Upscaler analyzes.
An artificial halo may be interpreted as an actual edge.
Noise may become exaggerated texture.
Compression artifacts may gain definition they should never have had.
Start conservatively.
If sharpening is still needed after the upscale, apply it to the higher-resolution version while comparing the result with the original.
Preserve the original file
Never overwrite an irreplaceable source.
Keep the untouched version and create a separate working copy.
This matters because AI editing is not merely another version of conventional resizing. The model can reinterpret visual information.
If you later discover that a face changed, a label became incorrect, or a texture looks unnatural, the original provides your reference point.
A preserved source also allows you to test different processing methods without losing the ability to start over.
For family photos, client work, product photography, or any valuable visual asset, this should be standard practice.
Judge quality at 100% instead of relying only on the preview
Editor previews are designed to make working convenient.
They do not always reveal every artifact.
After running the CapCut Image Upscaler, zoom to 100% and inspect meaningful details.
This is where you may discover:
- duplicated strands of hair;
- fake eyelashes;
- strange skin texture;
- warped text;
- oversharpened edges;
- repeated patterns;
- smeared backgrounds.
Then zoom back out.
Both views matter.
The 100% view exposes technical problems.
The normal-size view tells you whether those problems are actually visible in real use.
Quality control requires both perspectives.
What to Look for After AI Upscaling—Because “Sharper” Doesn’t Always Mean “Better”
People naturally associate sharpness with image quality.
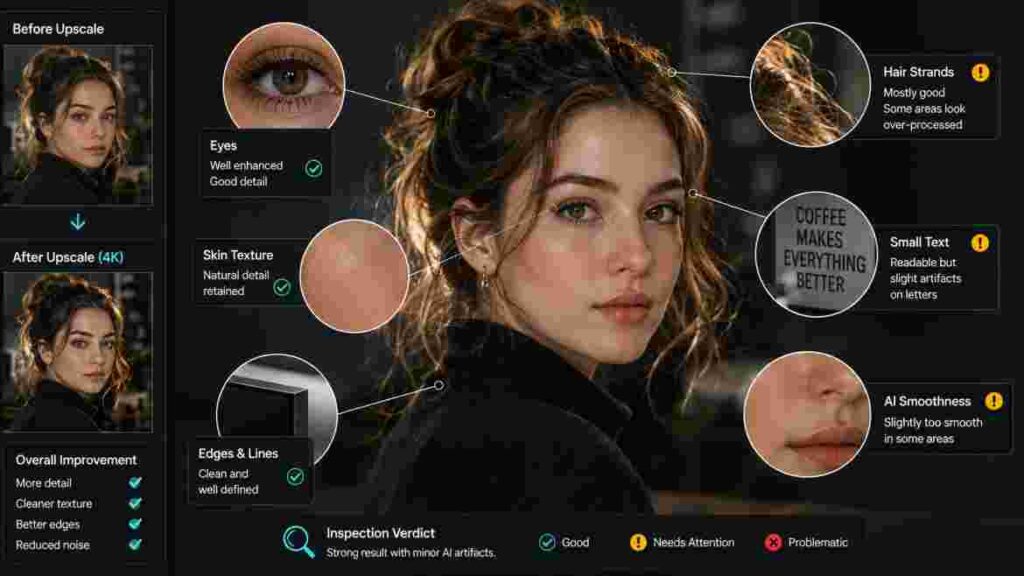
Put two versions of the same photograph next to each other and the sharper one often looks better immediately.
That makes before-and-after demonstrations persuasive.
It can also hide problems.
AI can create a stronger impression of clarity by changing local contrast, smoothing noise, reconstructing texture, and defining edges. Those changes may improve the image significantly, but they may also alter details.
The CapCut Image Upscaler should therefore be evaluated for both attractiveness and fidelity.
Check eyes, hair and skin on portraits
Start with the eyes because subtle errors are easy to notice.
Are the pupils still positioned naturally?
Do the catchlights make sense?
Did one eyelid change shape?
Do eyelashes look realistic?
Then examine the hair.
Hair is difficult because a low-resolution image may contain only broad masses rather than individual strands. AI can create additional strand-like detail, but sometimes the pattern becomes too regular or sharp.
Skin presents a different challenge.
Heavy smoothing can produce waxy faces.
Excessive reconstruction can create texture that looks almost too perfect.
The strongest portrait output usually preserves a balance between clarity and natural imperfection.
Inspect lettering and straight edges
Text is unforgiving.
If your image contains a sign, product label, book cover, shirt print, poster, screen, or packaging, read the output carefully.
Do not assume that text which looks more readable is actually correct.
AI may generate letter-like forms from ambiguous shapes.
Straight edges are another useful quality indicator.
Look at:
- buildings;
- railings;
- furniture;
- electronics;
- vehicles;
- shelving;
- tiles;
- packaging.
If the CapCut Image Upscaler creates waves, doubled edges, or inconsistent geometry, the result may need another approach.
Look for invented textures and unnatural detail
AI reconstruction works by predicting plausible visual structures.
That can create details which look believable until you compare them carefully with the source.
Typical areas include:
- grass;
- leaves;
- fur;
- hair;
- patterned fabric;
- brick;
- wood;
- stone;
- skin;
- distant crowds.
Ask whether the new detail improves readability without changing the character of the surface.
If every patch of grass develops identical texture or a patterned shirt gains invented shapes, the enhancement has become too aggressive for accuracy-sensitive use.
Compare noise reduction against lost texture
Noise and fine detail often occupy similar parts of an image.
Removing one can damage the other.
A denoised photograph may look beautifully clean while losing subtle skin texture, fabric grain, wood detail, or atmospheric character.
CapCut currently describes its AI upscaler as capable of denoising and adding detail as part of the enhancement process.
That can be helpful, but inspect whether the cleaned output still looks like the original material.
A little grain can be more natural than a perfectly smooth but plastic-looking surface.
View the image at its intended display size
After pixel-level inspection, return to reality.
Where will the image actually appear?
A thumbnail viewed at 300 pixels wide does not need the same microscopic precision as a 24-inch print.
A social-media image may perform perfectly even if you can find tiny AI artifacts at extreme magnification.
An ecommerce zoom image may fail for exactly the same reason.
This is why the correct question after using the CapCut Image Upscaler is not simply, “Does the image look sharper?”
Ask:
Does this image look accurate and convincing at the size where people will actually use it?
Match the CapCut Image Upscaler Workflow to the Image You’re Trying to Rescue
A single upscaling workflow cannot be ideal for every image because different images serve different purposes.

The best settings and quality checks depend on what you need the final asset to accomplish.
The CapCut Image Upscaler becomes more useful when the process is built around the image’s job rather than around the tool itself.
Making social-media images cleaner
Social images often suffer from repeated compression.
A photograph may have been uploaded once, downloaded, edited, shared through a messaging app, and uploaded again.
That history can leave it looking soft even if its dimensions seem reasonable.
When improving a social asset, focus on clarity at realistic mobile viewing size.
The main priorities are usually:
- a clear subject;
- readable text;
- defined edges;
- natural-looking faces;
- correct aspect ratio;
- manageable file size.
If you plan to add text after upscaling, it is usually better to add new text as an editable layer rather than rely on AI to improve tiny text already embedded in the image.
Preparing product images for ecommerce
Ecommerce imagery has a different objective: helping a customer understand what they are buying.
CapCut specifically presents product-photo enhancement as a use case for its super-resolution technology, including higher-resolution assets for marketplaces and zoomable product-detail experiences.
Use the CapCut Image Upscaler to increase usable resolution, but compare the result closely with the original product.
Inspect:
- logos;
- label text;
- seams;
- buttons;
- ports;
- materials;
- surface grain;
- stitching;
- color boundaries;
- decorative patterns.
If AI changes a product detail, the improvement becomes a liability.
For ecommerce, faithful enhancement is more valuable than dramatic enhancement.
Improving thumbnails and creator assets
Thumbnails need immediate clarity.
People often see them at small sizes while scanning many competing options.
Fine texture matters less than:
- subject separation;
- recognizable faces;
- strong focal points;
- clean edges;
- readable typography;
- useful contrast.
A CapCut Image Upscaler workflow can help when the source photograph is too small for the thumbnail canvas or when you need extra room for cropping.
After enhancement, judge the asset at thumbnail size.
Do not let pixel-level perfection distract from composition.
Enlarging portraits
Portrait upscaling should be conservative.
A slightly soft portrait that clearly preserves identity is better than an ultra-sharp version in which the person subtly looks different.
Work from the best source.
Run the upscale.
Inspect facial identity.
Avoid stacking aggressive skin smoothing and sharpening afterward.
If the portrait is intended for a profile image or standard social use, you may not need the maximum available resolution.
If it is intended for printing, higher output can be useful—but identity and texture remain more important than a resolution label.
Working with old family photographs
Old photographs can contain multiple problems simultaneously:
- low scan resolution;
- scratches;
- dust;
- faded color;
- tears;
- film grain;
- softness;
- stains;
- physical deterioration.
The CapCut Image Upscaler can contribute to the restoration workflow by increasing dimensions and improving perceived clarity. CapCut’s current upscaler also promotes old-photo enhancement and restoration-oriented use cases.
But upscaling alone cannot solve every form of damage.
A heavily scratched photograph may need repair.
A faded image may need tonal or color correction.
Missing areas may require reconstruction.
Faces deserve careful comparison with the original because personal identity matters more than making the photograph look modern.
Improving AI-generated artwork
AI-generated images often begin at dimensions smaller than a final campaign, presentation, or print project requires.
This makes them natural candidates for upscaling.
Because the source is already generated, some concerns about restoring historical truth are less relevant.
However, AI-generated art often contains its own weaknesses:
- malformed hands;
- tiny text errors;
- inconsistent patterns;
- strange jewelry;
- duplicated objects;
- unusual anatomy.
Upscaling may make those errors more visible.
Inspect the source first.
If a structural problem already exists, correct it before or during the broader editing process rather than assuming additional resolution will hide it.
Preparing images for presentations and websites
A photograph that looks sharp in a small editing window can appear noticeably softer when projected across a large screen.
Upscaling can help provide enough resolution for presentations, particularly for full-slide images and backgrounds.
Website images require an additional concern: performance.
Do not upload a giant 4K file simply because the CapCut Image Upscaler can produce one.
Determine how wide the image actually appears on the site.
Export sufficient resolution.
Then use an appropriate web-delivery workflow, including modern image formats and compression where supported.
Image quality and page speed should not be treated as opposing goals.
A good website asset is both visually appropriate and efficiently delivered.
Upscaling, Resizing, Sharpening and Restoration Solve Different Problems
“Improve image quality” sounds like a single task, but image editing contains many distinct operations.
Understanding those differences helps you avoid using the CapCut Image Upscaler when the real problem requires another approach.
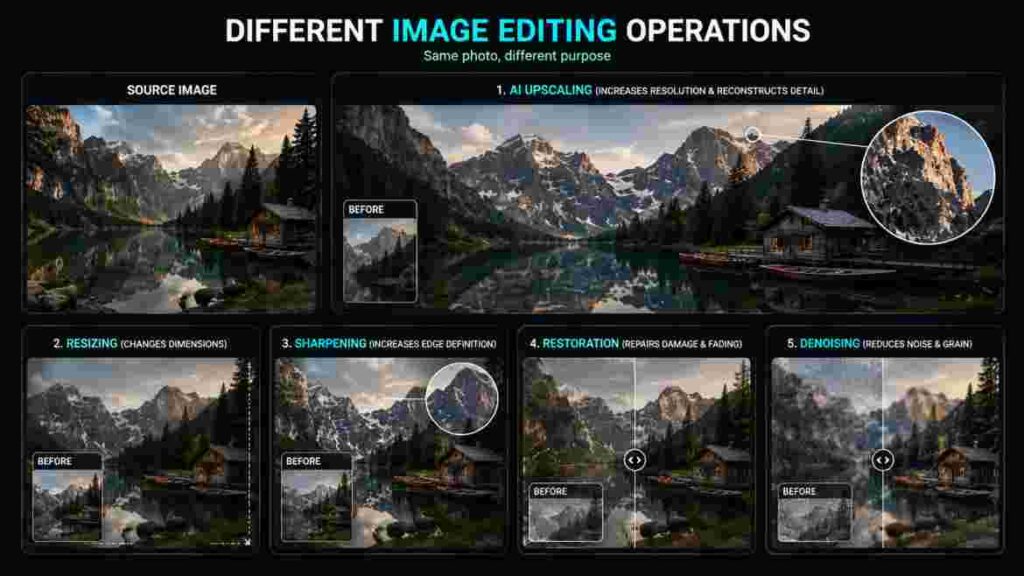
Upscaling when the file lacks resolution
Upscaling is appropriate when the source is too small for the intended destination.
Perhaps you have a 700-pixel photograph that needs to become a large website hero.
Maybe an old scan needs to be printed larger.
Perhaps a small AI-generated asset needs to fit a high-resolution design.
In each case, the central limitation is pixel dimensions.
AI upscaling increases those dimensions while attempting to preserve or reconstruct useful detail.
Resizing when the dimensions are simply wrong
Resizing is broader.
An image can have plenty of resolution but still have the wrong dimensions for a particular layout.
For example, a 5000 × 3000 photograph may need to become a 1200 × 1200 square.
You do not necessarily need AI upscaling.
You may simply need cropping and resizing.
Likewise, reducing a large image for a website is a downscaling operation, not an upscaling problem.
Use the CapCut Image Upscaler when you actually need more resolution, not simply because the image dimensions need changing.
Sharpening when edges lack definition
Sharpening increases perceived edge contrast.
It can make a slightly soft image look clearer without creating a dramatically larger file.
This can be useful when an image already contains enough pixels but looks a little soft after resizing or capture.
Sharpening and upscaling can complement each other, but they should not be confused.
Over-sharpening also creates visible artifacts, so more is not always better.
Denoising when grain or compression is the bigger problem
Noise appears as random variation in brightness or color and is particularly common in low-light photographs.
Compression artifacts are different but can create similarly distracting visual patterns.
A noisy high-resolution image may not need more pixels at all.
It may need noise reduction.
CapCut’s current AI upscaling workflow includes denoising-oriented enhancement as part of its processing, but noise reduction always involves a tradeoff because real texture can be removed along with unwanted variation.
Restoration when the original photograph is damaged
Restoration is a broader process.
A damaged photograph may require:
- scratch removal;
- tear repair;
- dust cleanup;
- missing-area reconstruction;
- color correction;
- contrast restoration;
- stain removal;
- resolution enhancement.
Upscaling can be part of that process.
It is not the entire process.
This is particularly important with archival images.
If the goal is to preserve the character of the original, restoration should improve usability without unnecessarily rewriting visual history.
Why Your CapCut Upscale Can Still Look Blurry, Artificial or Overprocessed
Running an image through AI does not guarantee a perfect result.
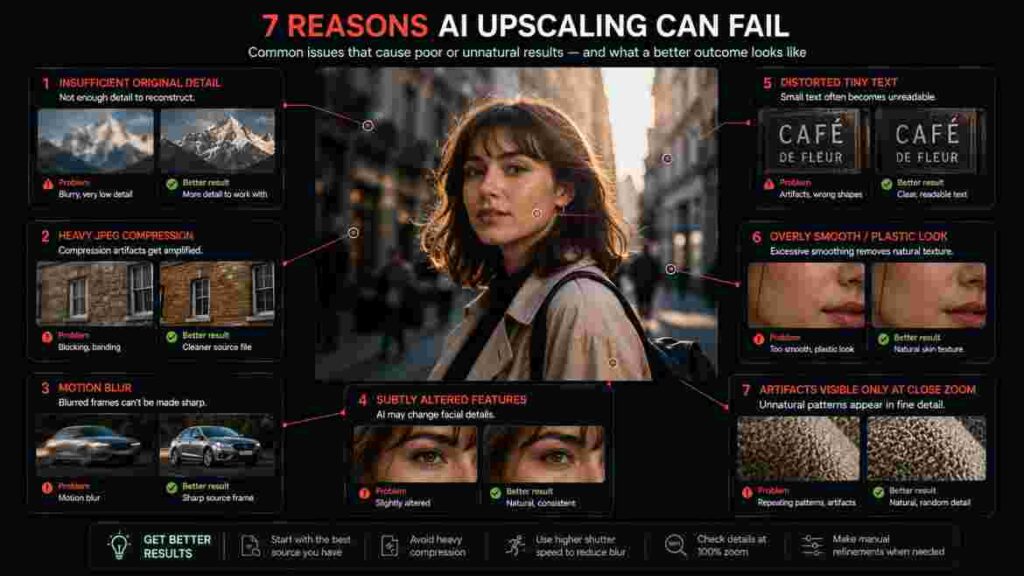
Sometimes the output is significantly larger but only slightly better.
Sometimes it looks sharper but artificial.
Sometimes faces change, text becomes strange, or textures appear overprocessed.
When the CapCut Image Upscaler gives you a disappointing output, repeatedly clicking the same enhancement is rarely the best response.
Identify why the result failed.
The original contains too little usable information
This is the most fundamental limitation.
AI needs evidence.
A 40-pixel-wide face cannot provide the same information as a 400-pixel-wide face.
An extremely small product photo may not contain the stitching, label detail, or texture you want the final image to show.
The model can reconstruct plausible details, but the result becomes increasingly interpretive.
What to do: Look for a better source first. If none exists, try a more conservative enlargement and judge whether the result is acceptable at the actual display size.
Heavy JPEG compression is already baked into the file
JPEG compression can permanently discard visual information.
Once blockiness, ringing, or smeared detail is present in the source, AI is not working with the original scene. It is working with an already altered version.
The CapCut Image Upscaler may reduce the visible impact of some artifacts, but it cannot perfectly reconstruct all information removed during compression.
What to do: Find the original file or the earliest available copy. Avoid repeatedly exporting JPEG during the editing process.
Motion blur isn’t a resolution problem
When the camera moves during exposure—or when the subject moves significantly—the recorded image spreads detail across multiple pixels.
Increasing the number of pixels does not automatically restore the original sharp scene.
AI may estimate cleaner edges, but severe motion blur remains a fundamentally different defect.
What to do: Try appropriate deblurring tools or locate another photograph. If the blur is modest, AI enhancement may still improve perceived clarity.
AI enhancement changes facial details
Faces contain complex information.
When the source is too small, AI may reinterpret eyebrows, eyelashes, teeth, wrinkles, hair, or eye detail.
The result may look technically sharper but slightly unlike the person.
What to do: Compare the output directly with the original. Use a less aggressive enhancement where possible, and prioritize identity over sharpness.
For archival family photographs, this is especially important.
Fine text becomes distorted
Tiny text gives AI very little information.
A few blurred pixels can potentially represent several different letters.
The model may generate a plausible-looking word shape that is not actually correct.
What to do: If the wording matters, obtain a better source or recreate the text manually using the correct font and layout.
Do not use AI-reconstructed text as evidence of what a severely blurred original actually said.
Excessive processing removes natural texture
A photograph can become too clean.
Skin turns waxy.
Wood looks plastic.
Fabric loses fibers.
Grass becomes a smooth green texture.
These problems often occur when denoising, smoothing, sharpening, color enhancement, and AI reconstruction are stacked too aggressively.
What to do: Return to the original or the first clean upscale. Reapply only the edits that solve visible problems.
The best CapCut Image Upscaler output may be less dramatic but more believable.
The output looks good small but fails under close inspection
This is not always a failure.
Suppose an image is intended for an Instagram graphic displayed relatively small on a phone.
At normal size, it looks clean.
At 400% magnification, hair texture looks slightly strange.
Does that matter?
Probably not.
Now imagine the same image is going into a large print or an ecommerce zoom gallery.
The artifact becomes more important.
What to do: Judge quality according to final use.
Pixel-level inspection helps identify weaknesses, but the audience’s actual viewing conditions determine whether those weaknesses are meaningful.
CapCut Image Upscaler vs. Traditional Image Enlargement: Where AI Makes the Biggest Difference
Traditional resizing and AI upscaling both create larger images, but they approach the task differently.
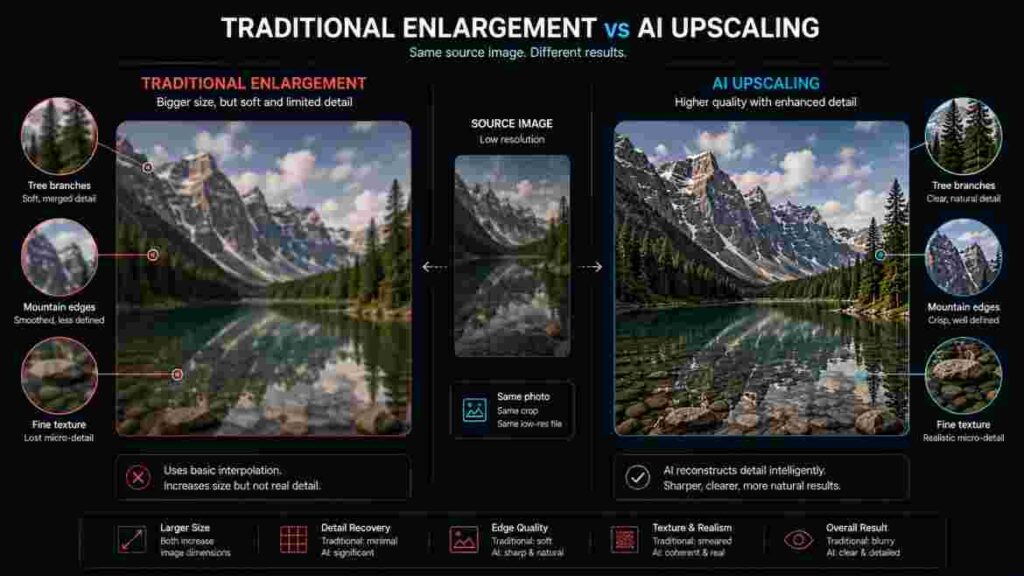
The easiest way to understand the difference is to consider what happens when the software needs to create pixels that did not exist in the original file.
Traditional interpolation looks at neighboring pixel values and mathematically estimates new ones.
AI enhancement attempts to understand larger visual patterns and generate pixels that make sense within those patterns.
That gives the CapCut Image Upscaler several potential advantages.
Apparent detail: AI can create a stronger impression of texture and definition. Ordinary interpolation tends to make the same existing information larger and smoother.
Edge handling: Diagonal edges, hair, object boundaries, and fine structures can appear more natural when the model reconstructs their likely shape.
Noise handling: CapCut’s current AI upscaler combines enlargement with denoising and enhancement rather than treating scaling as an isolated operation.
Processing effort: Traditional professional workflows can involve separate resizing, denoising, sharpening, and retouching stages. An AI upscaler may automate part of that process.
But traditional enlargement has one important advantage: predictability.
Interpolation does not intentionally invent a new eye, texture, letter, or surface pattern.
It may look soft, but the process is comparatively conservative.
AI can look substantially better because it is willing to infer more.
That creates a tradeoff between apparent detail and literal fidelity.
For ordinary content creation, marketing, social graphics, AI artwork, and general photography, the tradeoff may be worthwhile.
For scientific imaging, evidence, archival documentation, or other accuracy-sensitive applications, you need to know which parts of the output are reconstruction rather than original captured information.
Neither method is universally superior.
The CapCut Image Upscaler is most valuable when your priority is creating a visually convincing higher-resolution asset and the source contains enough recognizable structure for AI to work with.
Traditional enlargement remains useful when predictable transformation matters more than inferred detail.
Where CapCut Fits—and When a Dedicated Image Tool May Be the Better Choice
A good editing tool does not need to be the best possible option for every specialist workflow.
It needs to solve the user’s problem efficiently.
This is where the CapCut Image Upscaler has an obvious appeal.
CapCut combines AI enhancement with a broader creative editing environment. Current official instructions allow users to continue working on an image after upscaling, including additional edits and export steps within the same general workflow.
For many creators, that is more valuable than having the most technically complex software available.
CapCut’s integrated workflow is not limited to improving images. Creators working with both visual and video content can also automate time-consuming editing tasks such as generating subtitles. If captions are part of your content workflow, our guide to CapCut Auto Caption explains how the feature works and how to use it effectively.
CapCut makes sense when speed and simplicity matter
If you need to improve:
- a social-media image;
- a blog visual;
- a product photograph;
- a presentation image;
- a creator thumbnail;
- an AI-generated asset;
- an old personal photograph;
you may not need an advanced professional imaging workflow.
You may simply want to upload, enhance, inspect, make a few corrections, and export.
The CapCut Image Upscaler fits that use case well because upscaling is integrated into a broader creative process rather than requiring a dedicated technical environment.
Staying inside one creative workflow can be convenient
Every additional tool creates another step.
You may need to export from one application, upload to another, process the file, download it, reopen it elsewhere, and continue editing.
That creates opportunities for:
- inconsistent exports;
- repeated compression;
- file-management confusion;
- unnecessary format conversion;
- wasted time.
An integrated workflow can reduce those transitions.
This matters particularly for creators and small teams who produce high volumes of content.
Convenience is not merely about making the interface easy.
It can also improve consistency.
Specialized editing may be better for precision work
There are situations where simplicity is not the main priority.
Professional retouching may require precise masking.
Print production can require color-management workflows.
Advanced photo restoration may involve manual layer-based reconstruction.
Scientific or technical imaging may demand strict controls over processing.
A professional photographer may want granular sharpening and noise-reduction parameters.
A large ecommerce operation may require repeatable batch processing with tightly controlled output specifications.
In those cases, a specialist application can provide control that a general AI workflow does not prioritize.
The CapCut Image Upscaler can still be useful as part of the process, but it may not need to be the entire process.
Professional restoration requires more than increasing resolution
A historic photograph with fading, cracks, tears, stains, missing sections, uneven exposure, and low scan resolution presents several separate problems.
Increasing pixel dimensions is only one of them.
Professional restoration may involve:
- high-quality rescanning;
- tonal correction;
- dust removal;
- scratch repair;
- selective reconstruction;
- color restoration;
- grain management;
- careful sharpening;
- final resolution preparation.
AI can accelerate portions of that work.
It does not remove the need for judgment.
The more valuable or historically important the photograph, the more carefully you should separate “looks better” from “is faithful to the original.”
A Practical Quality Checklist Before You Publish, Print or Deliver the Upscaled Image
The final review often determines whether an AI-enhanced image looks professional.
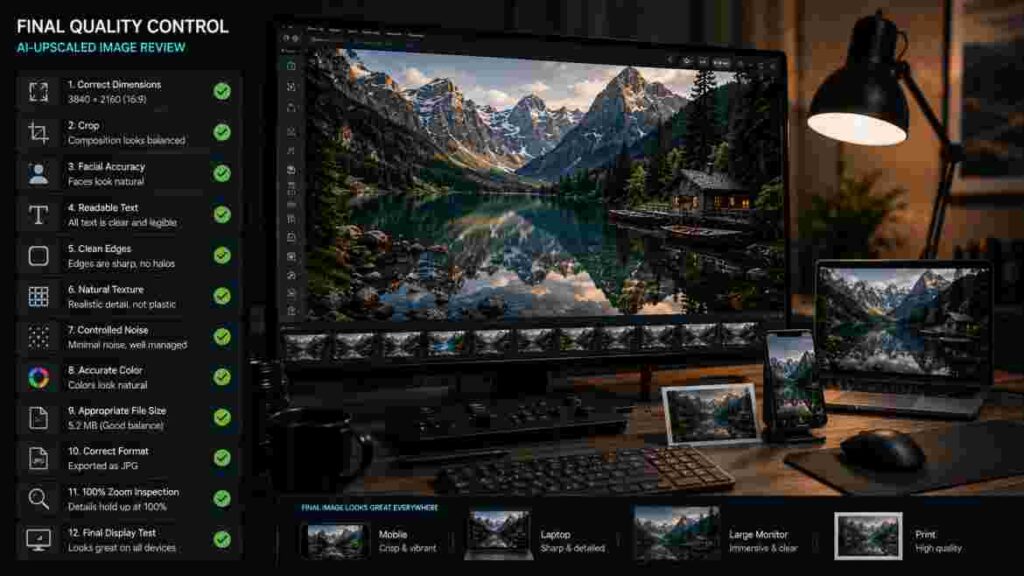
Before you upload, print, send, or publish anything produced with the CapCut Image Upscaler, work through the following checks.
- Compare against the original. Make sure the new version improved the image without unexpectedly changing important details.
- Confirm the dimensions. Check that the output is large enough for the final destination but not unnecessarily oversized.
- Inspect the crop. Make sure the composition still works after enhancement and resizing.
- Check faces. Look closely at eyes, hairlines, teeth, glasses, skin texture, ears, and facial identity.
- Read all important text. Verify packaging, clothing, labels, signs, screens, logos, and any lettering embedded in the image.
- Inspect geometric edges. Straight lines, grids, building details, products, and repeating structures should remain believable.
- Look for AI artifacts. Repeated textures, strange hair, invented details, doubled edges, and unnatural surfaces can reveal excessive reconstruction.
- Evaluate noise and texture together. A cleaner image is not automatically better if natural texture has disappeared.
- Check color. Make sure enhancement has not pushed skin tones, product colors, or important brand elements away from the source.
- View the file at 100%. This exposes problems hidden by a small editor preview.
- View it again at the intended size. Decide whether any remaining artifacts are actually visible in real use.
- Check the file format. Use a format appropriate for the destination.
- Check file size. Website assets should not become unnecessarily heavy after upscaling.
- Test the final platform. Websites, social networks, ecommerce platforms, and presentation software may apply their own scaling or compression.
- Keep the untouched original. Never make the AI-enhanced output your only surviving copy.
The checklist takes little time compared with creating the asset, and it catches the kinds of problems that are easiest to miss while you are focused on how dramatically the image has improved.
What the CapCut Image Upscaler Can Realistically Do for a Poor-Quality Photo
The CapCut Image Upscaler can be genuinely useful when an image contains recognizable detail but does not have enough resolution for the way you want to use it.
It can create a larger file, improve apparent edge definition, reduce the visibility of some noise or imperfections, and reconstruct detail more intelligently than ordinary enlargement alone. CapCut’s current official upscaling tools support high-resolution enhancement and position the technology for photographs, artwork, ecommerce assets, old scans, social content, and other creative uses.
The strongest results usually begin with a simple condition:
The original needs to contain useful information.
A clear but small photograph gives AI edges, textures, and recognizable structures to work from.
A severely blurred, tiny, or heavily compressed source forces the model to make more assumptions.
That difference should shape your expectations.
Use the best original file you can find. Choose a resolution according to where the image will actually appear. Inspect faces, text, products, and repeating patterns after processing. Avoid stacking unnecessary enhancement. Compare the output with the source rather than judging it in isolation.
Most importantly, remember what AI upscaling actually does.
It can make a low-resolution image substantially more useful.
It cannot guarantee recovery of visual information that was never captured.
Used with that understanding, the CapCut Image Upscaler is more than a button for making pictures bigger. It becomes a practical part of a controlled image workflow—one that can turn undersized or imperfect assets into cleaner, higher-resolution images while keeping you aware of where genuine enhancement ends and AI reconstruction begins.