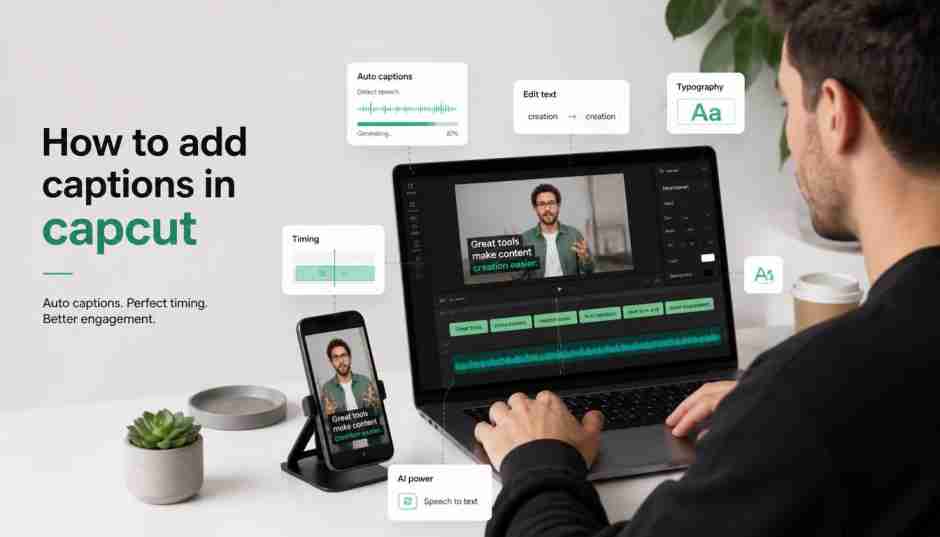
If you create videos for YouTube, TikTok, Instagram, Facebook or other social platforms adding captions can make your content easier to understand and more accessible. Captions allow viewers to follow content even when the audio is muted while also helping people who have difficulty hearing or understanding the original audio.
If you’re searching for how to add captions in CapCut the good news is that you don’t have to type every sentence. CapCut includes caption tools that can analyze your videos speech and turn it into editable text. After the captions are generated you can review the transcript, mistakes adjust timing and customize the appearance to match your videos style.
This makes CapCut particularly useful for creators who regularly publish talking-head videos, tutorials, interviews, podcasts, educational content, short-form videos and promotional clips.
Why Are Captions Important for Videos?
Captions are more than text placed over a video. They can influence how easily viewers understand and interact with your content.
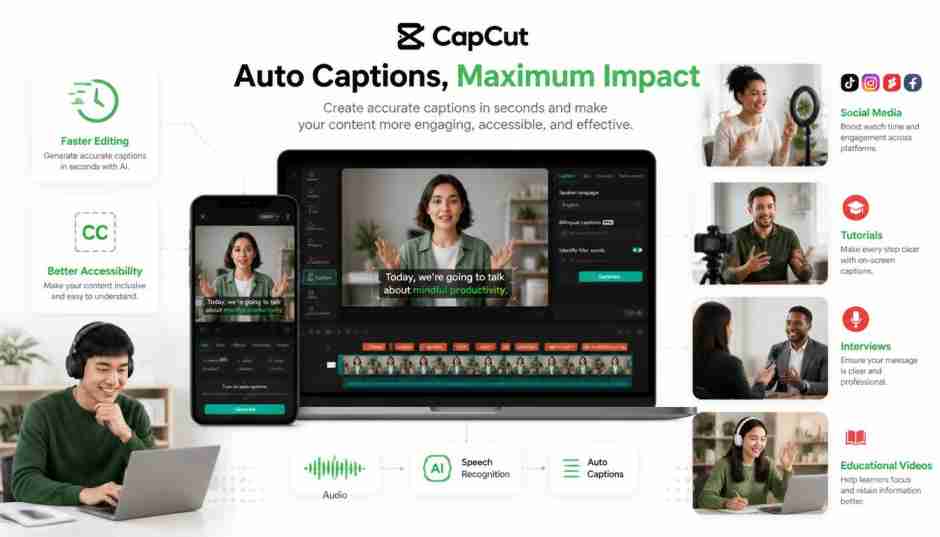
Many people watch media videos without sound especially when they are in public places at work or in environments where playing audio isn’t convenient. Captions allow the message to remain understandable without requiring the viewer to turn the volume on.
Captions can also improve accessibility. A viewer who cannot hear the audio clearly can still follow the dialogue through on-screen text.
For creators captions provide another opportunity to emphasize words explain complex information and create a recognizable visual style.
What Can You Do With CapCut Captions?
CapCuts captioning workflow can be useful for both beginners and experienced creators. Depending on your version and platform you can generate captions automatically edit the generated text adjust timing customize fonts and colors and create a style that fits your content.
The basic process is:
Import your video → generate captions → review the transcript → mistakes → customize the captions → preview → export.
Automatic caption generation is particularly useful when a video contains a lot of dialogue. Of manually typing every sentence you can start with an automatically generated transcript and focus your time on editing and correcting it.
Automatic Captions Are Not Always Perfect
One thing to understand before learning how to add captions in CapCut is that automatic transcription can make mistakes.
Speech-recognition tools may misunderstand:
- Names
- Technical terminology
- Accents
- Unclear pronunciation
- Words spoken quickly
- Multiple speakers
- Speech mixed with background music
- Audio affected by noise
For this reason you should always review generated captions before publishing your video.
A few minutes of proofreading can make a difference in the final result.
What This Guide Covers
This complete guide explains how to add captions in CapCut from beginning to end. We’ll cover the PC workflows, automatic and manual captions, caption customization, timing, translation, accuracy improvements, troubleshooting and professional captioning practices.
You’ll also learn how to create captions for types of content including short-form social media videos, YouTube content, tutorials, interviews, podcasts, educational videos and business videos.
By the end you’ll know not how to add captions in CapCut but also how to make those captions readable accurate well-timed and appropriate for the platform where you plan to publish your video.
What Are Captions in CapCut?
Before learning how to add captions in CapCut it’s useful to understand what captions actually are and how they differ from types of on-screen text.
Captions are text displayed over a video to represent dialogue and help viewers understand the audio. In CapCut captions can be generated automatically from speech. Created and edited manually. Once added they become part of your editing workflow. Can be adjusted for wording, timing, position, font, color, animation and other visual properties.
For a creator this means captions aren’t simply a transcript. They are also a part of the finished video.
Captions vs. Subtitles
The terms captions and subtitles are often used interchangeably. They can serve slightly different purposes.
Subtitles generally focus on translating or displaying dialogue for viewers who may not understand the language being spoken.
Captions can also support viewers who cannot hear the audio or who are watching without sound. Depending on the type of content captions may include information that helps communicate what is happening in the audio.
For social media editing however you may see both terms used to describe on-screen dialogue.
The important thing understands what your audience needs.
If you’re creating a tutorial for an English-speaking audience you may primarily need accurate English captions. If you’re publishing the video for audiences who speak different languages translated subtitles may be more appropriate. So learning how to add captions in capcut is important.
What Are CapCut Auto Captions?
CapCut auto captions use speech recognition to identify spoken words in your videos audio and convert them into text.
Of manually typing the entire dialogue the application generates caption segments based on the detected speech.
For example if someone says:
“Today we’re going to learn how to edit a video in CapCut.”
The automatic caption system attempts to recognize those words and place them into a corresponding text segment on the timeline.
You can then review the generated caption. Make corrections if necessary.
This approach can save time particularly when you’re working with videos that contain several minutes of continuous dialogue.
How Automatic Caption Generation Works
The basic process involves speech-to-text transcription.
Your videos audio is analyzed spoken words are identified and those words are converted into text. The system then divides the text into caption segments. Associates those segments with specific points in the videos timeline.
The result is a caption track.
This is why learning how to add captions in CapCut is not about pressing the automatic caption button. You also need to understand what happens after the captions are generated.
A good workflow usually looks like this:
Generate → Review → Correct → Synchronize → Customize → Export
The first stage saves time.
The remaining stages improve quality.
Why Do Automatic Captions Sometimes Make Mistakes?
Speech recognition depends heavily on the quality and clarity of the audio.
For example if someone says a person name that isn’t commonly recognized the system may replace it with a sounding word.
Technical terms can create problems.
Background music, traffic, wind, microphone distortion, multiple speakers and fast speech can also make transcription less accurate.
This doesn’t mean automatic captions aren’t useful.
It simply means you should treat the generated transcript as a starting point that needs review than assuming every word is automatically correct.
Why Add Captions to Your Videos?
There are several practical reasons to learn how to add captions in CapCut, from improving accessibility and viewer engagement to making videos easier to understand when watched without sound.
1. Viewers Can Watch Without Sound
Social media users frequently encounter videos while their devices are muted.
Captions allow your message to remain understandable when the viewer isn’t listening to the audio.
2. Captions Improve Accessibility
Captions can make video content easier to follow for people who’re deaf or hard of hearing.
They can also help viewers who have difficulty understanding speech or unfamiliar accents.
3. Captions Reinforce Important Information
A timed caption can draw attention to an important phrase, statistic, instruction or call to action.
For tutorials and educational videos this can make complicated information easier to follow.
4. Captions Can Strengthen Visual Branding
Creators can develop a caption style using the same:
- Font
- Size
- Color
- Position
- Background
- Animation
- Highlight style
When the same visual language appears across videos viewers can begin to associate that style with the creator or brand.
How to add captions in capcut : Automatic Vs Manual
There are two approaches to creating captions.
Automatic captions are generated from the videos audio.
Manual captions are created by typing the text yourself and synchronizing it with the video.
Automatic captions are generally more efficient for dialogue- videos.
Manual captions provide control and can be useful when:
- The video contains very little speech
- The audio is difficult for transcription software to understand
- You need exact wording
- You are creating stylized text
- You need precise timing
- Automatic transcription repeatedly produces errors
In cases the most efficient approach is actually a combination of both.
Generate the captions automatically then manually. Refine them.
What Makes a Good Caption?
A good caption should be accurate, readable, synchronized and visually appropriate.
Accuracy means the words match what the speaker actually says.
Readability means viewers can comfortably read the text without struggling.
Synchronization means the caption appears at the moment.
Visual appropriateness means the caption doesn’t distract from the video or cover elements.
For example placing captions directly over someones face can make an otherwise polished video difficult to watch.
Similarly using complicated animations for every word may make the text distracting rather than helpful.
The goal should always be to make the spoken message easier to understand not to compete with it.
Captions Are More Than Text on a Screen
Once you understand the purpose of captions the next step is learning the workflow.
Knowing how to add captions, in CapCut allows you to turn dialogue into an editable text track but professional results come from what you do afterward.
You’ll need to review the generated transcript fix words adjust timing choose an appropriate style and make sure the captions remain readable across different screen sizes.
That process becomes much easier once you understand how CapCuts automatic caption tools work.
Why CapCut Auto Captions Are Useful for Video Creators
For creators who publish videos regularly manually typing every sentence can become one of the most time-consuming parts of the editing process. CapCut auto captions can simplify that workflow by converting speech into text giving you a starting point that can then be reviewed and refined.
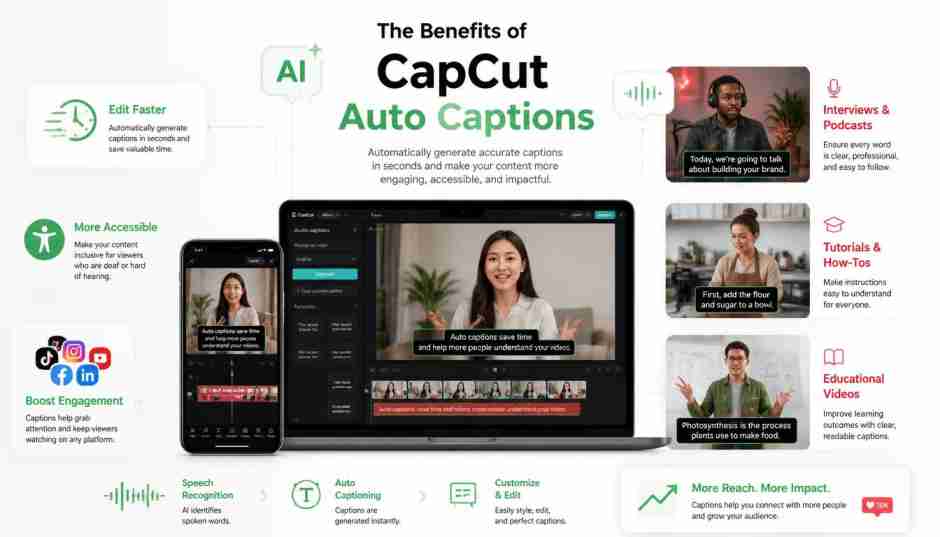
This is particularly useful for short-form creators who need to produce content but it can also help with longer tutorials, interviews, educational videos, podcasts and business content.
Faster Video Editing
One of the advantages of automatic captions is speed.
Without transcription you would need to listen to your video type the dialogue divide it into smaller text sections and then synchronize those sections with the speaker.
That process becomes increasingly difficult as the video gets longer.
Automatic transcription handles much of the typing for you. Of starting with an empty timeline you begin with generated caption segments that you can edit.
This makes the process of how to add captions in CapCut more efficient for videos with continuous speech.
You still need to proofread the result. Proofreading an existing transcript is generally faster than creating the entire transcript manually.
Useful for Short-Form Content
Short-form platforms move quickly.
Creators often need to turn an idea into a video without spending excessive time on repetitive editing tasks.
Automatic captions in CapCut can significantly reduce the workload involved in adding and editing captions, making the how to add captions in CapCut process faster and more efficient.
For example imagine you’re creating a 45- talking-head video. Of manually adding text for every sentence you can generate captions and then focus on:
- Correcting mistakes
- Highlighting words
- Adjusting timing
- Choosing a style
- Positioning captions correctly
- Preparing the final export
This allows you to spend more time on the creative side of editing.
Easier Caption Editing
Another benefit is that generated captions can be edited after transcription.
Suppose CapCut recognizes:
“content creator”
as:
“content creators”
You don’t need to regenerate the caption track.
You can locate the segment edit the text and continue working.
How to add captions in capcut and edit them is particularly helpful when a video contains names, brands, locations or industry-specific terminology that automatic transcription may not recognize correctly.
Better Control Over Caption Timing
Captions need to appear at the moment.
If the text appears early viewers may read it before hearing the corresponding words.
If it appears late the viewer may already have moved on to the next part of the video.
Automatic caption generation provides a timing structure, which you can then refine.
After generating captions move through the timeline. Check whether each segment matches the speakers natural rhythm.
Look for moments where:
- A caption begins early
- A caption remains too long
- Two ideas are combined into one block
- A sentence is split
- A caption changes in the middle of an important phrase
Small timing adjustments can make captions feel significantly more natural.
Helpful for Talking-Head Videos
Talking-head content is particularly suitable for captions because the main audio usually consists of one person speaking clearly.
Examples include:
- Tutorials
- Reviews
- Personal stories
- Educational videos
- Commentary
- Product demonstrations
- Business presentations
For this type of content automatic transcription can provide a useful first draft with relatively little manual work.
However the final accuracy still depends on the recording quality and the clarity of the speaker.
Useful for Interviews and Podcasts
Interviews and podcasts can contain more dialogue than ordinary short-form videos.
Typing all of that dialogue manually can be extremely time-consuming.
Automatic caption generation can provide a starting transcript that can then be corrected and divided into segments.
Multiple speakers can create challenges because the transcription system may not always distinguish speakers perfectly.
For interviews carefully review transitions between speakers.
If necessary adjust the caption structure manually so viewers can clearly follow the conversation.
Helpful for Educational Videos
Captions can be particularly useful for content.
Students may want to read along while listening to an explanation.
They can also pause the video. Review a specific sentence or term.
For subjects however transcription accuracy becomes especially important.
A single incorrect word can change the meaning of an explanation.
For example a term software command, mathematical concept or business term may be interpreted incorrectly by an automatic transcription system.
Always check terminology manually.
Useful for Multilingual Content
Creators who target audiences can also benefit from automatic captions.
Once the original spoken dialogue has been transcribed captions may provide a starting point for creating translated versions depending on the features in the CapCut version you’re using.
This can help creators adapt the video for different audiences without rebuilding the entire project from scratch.
However automatic translation should also be reviewed carefully.
Literal translations can sometimes sound unnatural especially when the original speaker uses slang, expressions, humor or specific language.
Consistent Caption Styling
Automatic transcription isn’t about saving time.
Once your caption track is created you can develop a visual style.
For example a creator might use:
Bold text + dark background + centered positioning
For educational videos.
Another creator might use:
Bold text + highlighted keywords + subtle animation
For short-form entertainment content.
The right choice depends on the videos purpose and audience.
Consistency is usually more important than complexity.
You don’t need an animation for every sentence.
A simple recognizable caption style can look more professional than a design.
Captions Can Support Silent Viewing
One of the advantages of captions is that they allow viewers to understand the main message without relying completely on audio.
This can be particularly useful on platforms where users encounter content while their phone is muted.
Captions should therefore be understandable on their own.
Avoid relying on only information if the visual message is important.
For example if the speaker says:
“The third step is the important.”
The caption should clearly display that information than relying on the viewer hearing it.
Captions Save Time, They Don’t Replace Editing
This is a distinction.
Automatic captions can make transcription faster. They don’t eliminate the need for human review.
Think of the generated transcript as a draft.
Your job is to turn that draft into polished captions.
That means checking:
- Accuracy
- Spelling
- Punctuation
- Timing
- Line breaks
- Readability
- Position
- Visual consistency
This is where the real quality improvement happens.
When Auto Captions May Not Be the Best Choice
Although automatic captions are useful they aren’t ideal for every project.
Manual captioning may be better when the video contains:
- Background noise
- Music louder than speech
- Several people speaking simultaneously
- Extremely fast dialogue
- Unusual terminology
- Very little spoken content
- Creative text effects
In these cases generating captions automatically can still be a starting point but expect to make more corrections.
The Best Workflow for Creators
For creators a practical caption workflow looks like this:
1. Import the video
2. Generate captions
3. Review the transcript
4. Correct inaccurate words
5. Adjust caption timing
6. Break sentences into readable segments
7. Apply a visual style
8. Preview the video
9. Make final corrections
10. Check the finished file
This approach gives you the speed of automatic transcription while retaining the control of manual editing.
Ultimately the biggest advantage of learning how to add captions in CapCut is not simply being able to place text over a video. Its being able to create a workflow that combines AI transcription with human editing and creative control.
What You Need Before Adding Captions in CapCut
Before starting the caption-generation process take a few minutes to prepare your video. Good preparation can improve transcription accuracy reduce editing time and make the final captions easier to read.
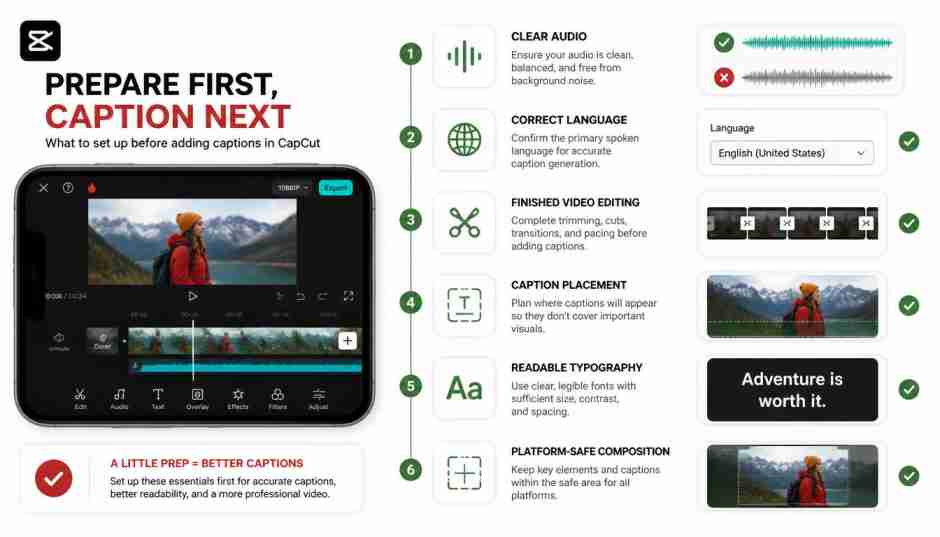
If you’re learning how to add captions in CapCut don’t think of the process as generating text and exporting the video. The quality of your captions depends partly on the quality of the source audio the language you select and how clearly the speakers words can be recognized.
Use Clear Audio
Audio quality has an effect on automatic transcription.
If the speakers voice is clear and separated from background noise speech recognition generally has a chance of identifying the correct words.
Before generating captions listen to your video. Check for:
- Background music
- Traffic noise
- Wind
- Echo
- Microphone distortion
- Multiple people speaking
- Very low-volume dialogue
- Sudden changes in audio volume
You don’t necessarily need studio-quality audio. However noisy recordings can make automatic transcription less reliable.
If background music is overpowering the speaker consider reducing its volume before generating captions.
For example a talking-head video with a voice and quiet background music is usually much easier to transcribe than a video where the music is almost as loud, as the dialogue.
Choose the Correct Language
When learning how to add captions in CapCut, pay close attention to the caption language selection during automatic caption generation, as choosing the correct language can improve transcription accuracy.
If your video is spoken in English select the English language option. If the video is spoken in Urdu, Hindi, Arabic or another supported language choose the option when available.
Choosing the language can produce significantly worse results.
This is especially important for creators who publish content in languages.
If a video has languages check the captions carefully because automatic transcription might not handle every language change perfectly.
Check Your Video Before Creating Captions
Before you learn how to add captions in CapCut watch the video or at least the important parts.
You don’t have to watch the video again if you have already edited it but you should know the structure of the audio.
Ask yourself:
Is there one person speaking or many?
One person usually makes the caption process easier.
Is the speech clear?
Fast unclear or strongly accented speech might need corrections.
Is there music in the background?
Music that is too loud can make it hard for speech recognition to work.
Are there words?
Words from medicine, technology, finance, science, software or other fields may need checking.
Are there names or brand names?
Proper nouns are places where transcription tools can make mistakes.
Finding these problem areas before making captions helps you know where to pay attention.
Keep the Project Original
Always keep an editable version of your project before making big changes to captions.
This is especially helpful when you are trying:
- Caption styles
- Different fonts
- Different animations
- Different text positions
- Different timing
- Different highlight effects
- Backgrounds
- Different caption versions
If something goes wrong you can go back to the original project instead of starting over.
A copy of the project can also help when you are making versions of the same video for different platforms.
For example you might want one caption style for YouTube and another for TikTok or Instagram.
Decide Where the Captions Should Go
When learning how to add captions in CapCut, consider caption placement and safe positioning before choosing a style, font, size, or animation to keep your video captions readable and professional.
The bottom of the screen is common. It is not always the best.
If the bottom part of your video has information, buttons, product details or platform elements captions may be hard to read.
Also captions should not cover a persons face if possible.
Before fixing the position think about:
- Where the speaker’s
- Where important images appear
- Whether the video is vertical or horizontal
- How people will watch the video
- Whether platform controls might cover the captions
This is very important for short videos that are vertical.
Choose a Caption Style That Matches the Video
Don’t wait until the end to think about the design.
Think about the kind of video you are making.
A professional video may need clean captions.
A fun video might use text and some emphasis.
An educational video may need text that stays visible longer.
The style should support the message. Not distract from it.
Consider the Platform You Are Using
The platform where you plan to upload the video can affect how captions look.
A vertical short video has space than a regular wide screen video.
A caption style that looks good on a computer may be too big or too crowded on a phone.
Before finishing how to add captions in CapCut think about where the video will be watched.
Ask:
- Is the video vertical or horizontal?
- Will most people watch it on a phone?
- Will platform controls cover part of the screen?
- Are the captions to read without zooming?
- Does the text stay inside the safe area?
Keep Important Visuals Visible
Captions should go with the visuals.
If your video shows something on the screen avoid putting captions over the part that people need to see.
For example if you are showing a button on the right of the screen putting big captions there could make the video hard to follow.
In that case move the captions to an important part of the screen.
Good caption placement needs a balance between being easy to read and not blocking the view.
Prepare for Manual Corrections
Even the automatic transcription can have mistakes.
So don’t plan to make captions. Then immediately export the video.
Leave time to check the captions.
A good way is to check them in steps:
First check: Make sure every sentence is there.
Second check: Fix spelling, names and special words.
Third check: Check timing and line breaks.
Final check: Watch the video normally. Make sure the captions feel right.
This way is more efficient than trying to find all problems at once.
Make a Simple Caption Checklist
Before making captions check these things:
| Check | Why it matters |
| Clear audio | Improves speech recognition |
| Correct language | Helps generate accurate transcription |
| Low background noise | Reduces recognition errors |
| Original project saved | Protects your work |
| Caption position planned | Prevents visual obstruction |
| Platform considered | Improves mobile readability |
| Caption style selected | Creates visual consistency |
| Review time available | Helps catch transcription errors |
Time to check Helps find mistakes. Once these are ready you are ready to start adding captions.
The next step is learning how to add captions in CapCut on your phone, where you can use speech recognition to make editable captions from the videos audio
How to Add Captions in CapCut on Mobile
For creators the mobile app is the easiest way to start because you can record, edit, add captions and export the video from the same phone.
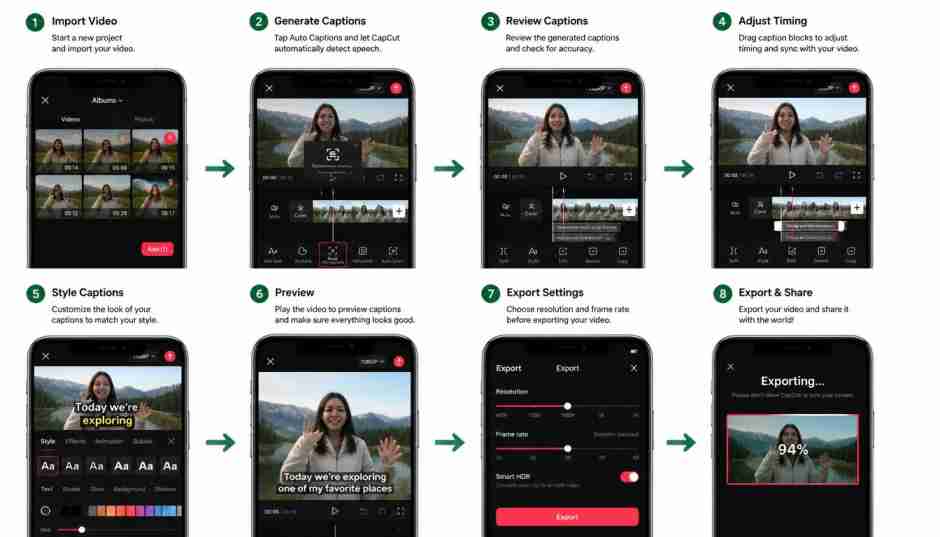
The exact screen may change as CapCut updates. The way to add captions stays similar.
Before starting make sure the video is on your phone and the app is updated if possible.
Step 1: Open CapCut and Make a Project
Open CapCut on your phone and start a project.
Depending on the app version you may see a New Project button or a similar option.
Choose the video you want to add captions to from your phones media.
If you are using clips choose them in the order you want them to appear.
Once the video is added CapCut will place the clips on the editing timeline.
At this point don’t worry about the caption style. First make sure the video is arranged properly.
Step 2: Import and Check the Video
After adding the video play it from the beginning.
Check that:
- The correct video was added
- The audio is working
- The clips are in the order
- The speech is clear
- There are no parts you need to remove
It is usually better to finish cutting the video before adding captions.
For example if you add captions and then cut a part of the video you will have captions to check.
So it is better to:
Edit the video add captions second → check captions third.
Step 3: Open the Text or Caption Tools
Look through the editing tools for the text or caption options.
The mobile version of CapCut can change, so the exact name or location may differ.
Depending on the version the automatic captions option may be in the text or caption area.
The important thing you are looking for is Auto Captions or a similar option.
Step 4: Choose Auto Captions
Once you find the caption feature tap it.
CapCut might ask where the captions should come from. If your video has spoken words in the audio choose the option that looks at the speech or audio.
The app will then prepare the audio for transcription.
This is the step in how to add captions in CapCut because the app is turning speech into text.
Step 5: Pick the Language
Before making the captions choose the language of the video.
For example if you are making a video pick the correct English option.
If your video has another language choose that instead.
Picking the language is important because speech recognition uses different patterns for each language.
If the wrong language is picked the captions may have mistakes.
Step 6: Make the Captions
Start the caption process.
CapCut will look at the audio. Try to turn it into text.
The time it takes depends on:
- How long the video is
- What the audio has
- How fast your phone is
- Your internet connection
- How the app is working
videos may be quick.
Long videos may take time.
Don’t make changes while captions are being made.
Once done CapCut should place the captions on the timeline.
Step 7: Check the Captions
Don’t export the video away.
First look at the text.
Play the video. Follow the captions as the speaker talks.
Look for problems like:
- Wrong words
- Missing words
- Repeating words
- Wrong punctuation
- Wrong names
- Wrong numbers
- Incorrect terms
This is one of the most important steps in how to add captions in CapCut because automatic captions are a first draft, not the final version.
Step 8: Fix the Mistakes
When you find a caption tap the text and fix it.
Pay attention to words that can change the meaning of a sentence.
For example a small mistake, in a tutorial can change an instruction into a wrong one.
Check:
- Names
- Brand names
- Product names
- Software terms
- Numbers
- Dates
- Locations
- Acronyms
If you’re learning how to add captions in CapCut for educational or technical content, take extra time to review the generated captions and verify that all technical terms, terminology, names, and important words are accurate.
Step 9: Adjust Caption Timing
After fixing the text look at the timing.
A caption should come on the screen when the person starts speaking and go off when the person stops speaking.
If a caption comes on soon or too late move it on the timeline where the program lets you do that.
Also check how one caption moves to the one.
Avoid situations where:
- A sentence is split in the middle of a part
- A caption stays on the screen too long
- A new caption comes on before the previous one is done
- Many words appear too fast to read
Good timing makes captions feel like part of the video instead of something added on top.
Step 10: Customize the Caption Style
Once the text and timing are right move on to how it looks.
Depending on the version of CapCut you are using you may be able to change things like:
- Font
- Text size
- Color
- Alignment
- Position
- Background
- Outline
- Shadow
- Animation
- Style settings
Pick a look that matches what the video is about.
For instance a teaching video may work best with white text and a small outline while a fun video might use more eye-catching effects.
Don’t use many effects at the same time.
Step 11: Check Caption Placement
Watch the video with the captions on.
Make sure the text does not cover:
- The person speaking
- Important items
- Buttons on the screen
- Charts
- Images
- Logos
- Text already in the video
For videos made for phones watch the top and bottom parts carefully because some parts of the screen may be covered by the phone interface.
When learning how to add captions in CapCut, keep important caption text within a clear, visible safe area so it remains easy to read without being covered by video elements or social media interface controls.
Step 12: Preview the Whole Video
After working on the captions watch the video.
Don’t just check each caption one by one.
A full preview can show problems that’re not obvious when you are editing.
For example:
- A caption may go away fast
- A style may change without warning
- A caption may overlap something else on the screen
- The text may be hard to read against a bright background
- The timing may slowly get off from what the speaker says
A full preview is therefore a very important step to make sure everything is good.
Step 13: Export the Captioned Video
When you’ve finished how to add captions in CapCut, review the final captioned video before exporting.
Check the video resolution, frame rate, format, and export settings based on where you plan to share it. Captions added directly to the video will remain visible in the exported file.
After exporting, watch the final video again to verify caption timing, readability, positioning, and synchronization, because the exported result may not always look exactly as it did on the editing timeline.
Quick Mobile Workflow
To remember the phone process is:
Open CapCut → New Project → Import Video → Text/Caption Tools → Auto Captions → Select Language → Generate → Review → Fix → Adjust Timing → Customize → Preview → Export
That is the way to add captions in CapCut on a phone.
After you’ve finished adding and styling your captions, preview the video carefully before exporting. If you’re also concerned about the branding or watermark that may appear on your exported video, you can learn how to remove CapCut watermark before publishing.
How to Add Captions in CapCut on PC
Editing captions on a computer can be easier when you have videos, multiple people talking, detailed timelines or many captions. The bigger screen makes it easier to see the video, audio and caption tracks.
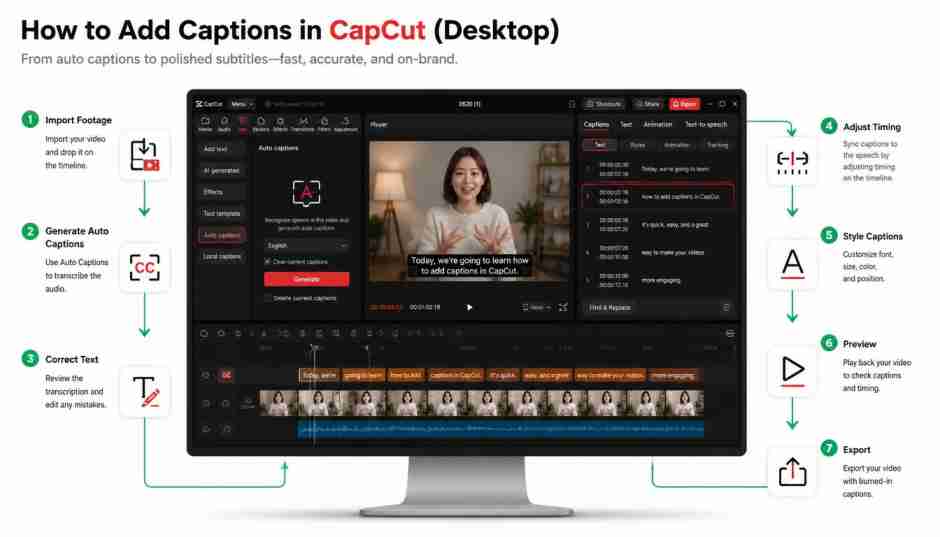
If you are learning how to add captions in CapCut on a computer the overall process is similar to the phone version: import the video make captions check the text fix mistakes change the look and export the video.
The exact place of tools can be different in versions of CapCut so focus on the steps instead of looking for a specific button.
Step 1: CapCut on Desktop
Start CapCut on your computer and make a new project.
If you are using a project open that instead.
A computer process is especially helpful when your video has:
- Long talks
- Multiple parts
- Interviews
- Instructions
- Screen videos
- Educational videos
- Podcasts
- Business presentations
The bigger space helps you see the connection between the video, the sound and the captions.
Step 2: Import Your Video
Add the video you want to add captions to your project.
Then put the video on the timeline.
Before making captions watch the video and make sure it is already edited.
If you need to cut parts out do that before making the captions.
This way you won’t waste time fixing captions for parts you later remove.
A good way to work is:
Video editing → sound cleaning → caption making → caption fixing → style → export
Step 3: Find the Caption Tools
Look around the computer editing screen for text, captions or automatic writing tools.
The computer version of CapCut can change over time. The exact place of the tools may not stay the same.
Look for an option that relates to Auto Captions, writing or voice to text.
This is the part that turns what people say into text you can edit.
Step 4: Make Automatic Captions
Choose the captions feature and pick where the words are coming from.
If the video has people speaking in the sound let CapCut look at that sound.
The program will process the speaking. Make caption parts based on what it hears.
Longer videos can take time than short videos.
Once done the captions will appear on the editing timeline.
Step 5: Choose the Right Language
Pick the language that the video uses when asked.
This step is easy to miss. It can make a big difference in how accurate the writing is.
For example if the speaker is using English but another language is chosen the words might be wrong.
For videos with than one language check language changes carefully.
If the video has than one language don’t think that everything will be perfect.
Step 6: Look at the Captions You Made
Once the captions are made start checking from the beginning.
You can usually move through the captions while watching the video.
Make sure the text shows what the speaker is saying.
Watch out for:
- Names
- Numbers
- Technical words
- Brand names
- Short words
- Places
- Product names
- Dates
One mistake in the writing can change what a message means in technical or teaching content.
Step 7: Fix Wrong Caption Words
When you find a word or phrase change it.
For example the program might think a word that sounds similar is the one.
Change it to the one.
Keep going through the video instead of fixing only the clear mistakes.
If the video is long go through it in parts.
For example:
- 0:00–2:00 → Check
- 2:00–4:00 → Check
- 4:00–6:00 → Check
This can make a long caption task easier to handle.
Step 8: Fix Caption Timing
Editing on a computer gives a timeline, which can help with timing.
Watch the person talking while checking when each caption starts and ends.
If a caption starts soon move the start point.
If it stays long make it shorter.
Also think about how the sentence’s broken.
For instance avoid making a caption that splits awkwardly:
“Today we’re going to learn / how to edit…”
Split the words where it makes sense and is easy to read.
The person watching should be able to read the caption without missing anything.
Step 9: Split Long Captions
Much text in a caption can be hard to read.
If the automatic writing makes a caption with many words think about making it shorter.
This is important for:
- Mobile videos
- Short videos
- Long videos
- Video with one person speaking
How long the caption should be depends on how fast the person talks and the screen size but the main idea is:
Give people enough time to read the words without making the caption too big.
Step 10: Make the Captions Look Good
After the words and timing are right make the captions look good.
Depending on what your program has you can change:
- Font
- Font size
- Color
- Alignment
- Position
- Background
- Outline
- Shadow
- Animation
- Style options
Start with making it easy to read.
A fancy caption that people can’t read is not a caption.
For videos, high contrast and a simple font will be better than complicated effects.
Step 11: Put the Captions in the Right Place
Use the preview screen to check where the captions go in the video.
Avoid covering things.
For example if you are editing a video that shows software buttons the captions should not cover the buttons the person needs to see.
If you are editing an interview make sure the captions are not, over the persons face.
For video products make sure the captions don’t cover the product itself.
Good positioning should change according to the content of using the same spot for every video.
Step 12: Preview the Complete Project
After editing all the caption parts play the video.
This final check is very important.
You might find that individual captions looked okay while editing but feel uncomfortable when seen together.
Look for:
- Timing issues
- Changes in style
- Missing words
- Captions that disappear too fast
- Captions that stay too long
- Poor visibility
- Graphics that overlap
- Unusual formatting
Make changes where needed.
Step 13: Export the Video
Once everything looks right export the project using settings that fit your platform.
Check the quality and other export options.
After the video is ready open the exported file. Watch at least part of it.
This confirms that the captions actually show up as expected in the video.
Mobile vs. PC Caption Editing
Both tools can be helpful. They work better for different tasks.
| Feature | Mobile | PC/Desktop |
| Quick social videos | Excellent | Excellent |
| Long videos | Good | Better |
| Timeline precision | Good | Better |
| Screen space | Limited | Larger |
| Caption proofreading | Good | Easier |
| Detailed editing | Good | Better |
| On-the-go editing | Excellent | Limited |
If you are making a quick Reel or Short mobile editing may be all you need.
If you are adding captions to an interview course, tutorial or podcast a desktop workflow can make reviewing hundreds of caption parts more comfortable.
A Practical Desktop Workflow
A good way to add captions in CapCut on PC is:
Import → Edit video → Generate captions → Choose language → Read the transcript → Fix text → Adjust timing → Split captions → Style → Position → Preview → Export
The main point is that automatic generation is just the start.
The final result comes from checking the text and making changes before exporting.
How to Edit Captions in CapCut
Generating captions is the first step in the captioning process. Even when CapCut gives a transcript you should check the text before publishing the video.
Learning how to add captions in CapCut becomes more useful when you also know how to edit those captions. A few changes can make the video more accurate, easier to understand and more professional.
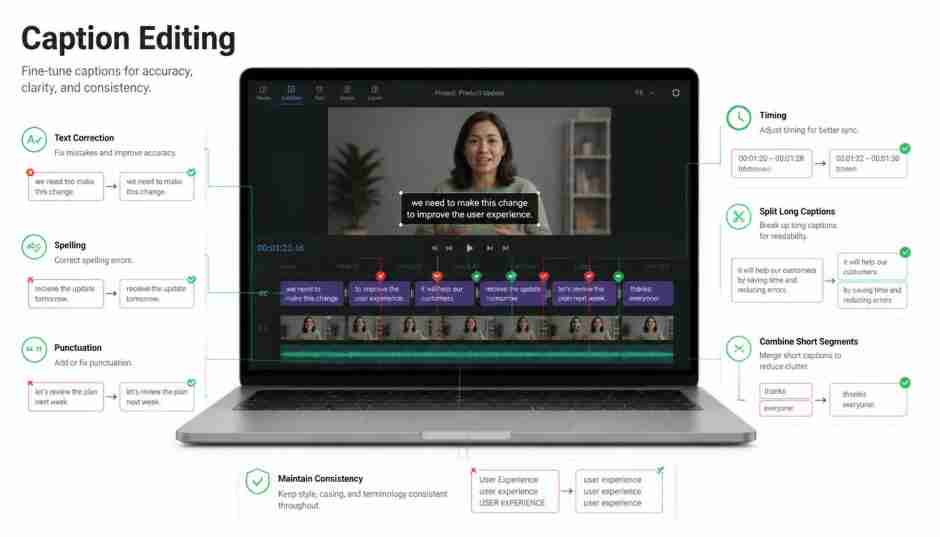
Edit Caption Text
After creating your captions select a caption part in the timeline or preview area.
Then you can change the text to fix any mistakes in the transcription.
For instance if CapCut misunderstood a sentence replace the words with what the speaker actually said.
When editing don’t just look for spelling mistakes. Make sure the meaning of the sentence is correct.
Pay attention to:
- Names
- Numbers
- Dates
- Brand names
- Technical terms
- Locations
- Product names
- Abbreviations
A caption can be correct in grammar but still wrong if the wrong word was recorded.
Spelling and Grammar
Automatic transcription can sometimes have spelling or grammar issues.
Fix these before you export the video.
Don’t change everything the speaker said unnecessarily.
Captions should show what was said clearly and accurately.
For videos you can keep informal language, contractions or casual expressions.
For educational content you may want to fix obvious grammar issues while keeping the original message.
Fix Punctuation
Punctuation helps captions be easier to read.
Without it people might not know where one thought ends and another begins.
For example:
Today we’re going to learn how captions work. Why they’re important
Is understandable but:
Today we’re going to learn how captions work and why they’re important.
Is easier to follow.
You don’t have to make every caption into a paragraph.
The goal is just to make the text easy to read.
Use punctuation where it helps especially when the speaker moves between ideas.
Correct Names and Technical Terms
This needs attention because automated speech recognition can have trouble with rare words.
Imagine a video about:
- Adobe Photoshop
- Google Analytics
- WordPress
- JavaScript
- Artificial intelligence
- Search engine optimization
A transcription tool may get one of these terms wrong.
If you are making content check these words manually.
The same goes for names, company names, places, product names and special terms.
Change Caption Timing
Just fixing the words isn’t enough.
The timing must match the speech.
If a caption appears early people might read it before they hear it.
If it appears late the text might not match the speaker.
Use the timeline to change when each caption starts and ends.
While editing, watch the speaker of only looking at the text.
Ask yourself:
- Does the caption appear when the speaker says the words?
- Does it stay visible enough to read?
- Does the next caption come in naturally?
These simple checks can make the watching experience much better.
Split Long Captions
Long captions can be hard to read.
This is especially true on phones, where the screen’s small.
If a caption has much text break it into smaller parts where it makes sense.
For example of showing:
Today we’re going to show you how to add captions in CapCut and customize them for social media videos.
You could split it into two parts:
Today we’re going to show you how to add captions in CapCut.
Then we’ll customize them for media videos.
The exact split should follow the speakers rhythm.
Don’t split a sentence in a place just to make it shorter.
Combine Short Caption Segments
Sometimes automatic captioning does the opposite.
A sentence might be broken into short parts that appear and disappear too fast.
If the splitting feels strange combine text where possible.
For example:
Today
followed by:
we’re going
followed by:
to learn
may feel too broken.
A better caption could be:
Today we’re going to learn.
The viewer gets an experience without unnecessary movement.
Delete Unnecessary Captions
Not every word spoken needs to be in text.
Depending on the content you might find parts like:
- Repetition
- Unintended speech
- Starting over
- Filler sounds
- Background noise
If removing a part doesn’t change the meaning decide if it should stay.
Be careful not to remove important words just because they sound casual.
Preserve the Speakers Meaning
Caption editing should make things clearer not change what the speaker meant.
For example if someone says:
“I think this method works better for beginners.”
don’t change it to:
“This method is definitely the best.”
The second sentence changes the meaning.
Good caption editing makes things look better while keeping the message.
Keep Caption Segments Consistent
Consistency matters when a video has caption parts.
Try to keep similar:
- Line lengths
- Timing patterns
- Punctuation style
- Capitalization
- Formatting
Inconsistent captions can make a video feel incomplete.
For example if one caption uses sentence case and another suddenly uses all caps the change can be distracting.
Edit Captions for Different Content Types
The way you edit can also depend on the kind of video.
- For a tutorial focus on being accurate and clear.
- For a podcast keep the flow of conversation.
- For a media video, shorter and more lively captions may work better.
- For a video make sure the technical words are correct.
- For a business presentation use professional language.
The same captioning tool might need changes depending on the audience.
Review Captions From Start to Finish
After making changes watch the video from the beginning again.
This second check helps you find problems that were not obvious when working on parts.
Look for:
- Words
- Missing text
- Strange line breaks
- Timing issues
- Long captions
- Too short parts
- Inconsistent formatting
Captions hiding parts of the video
If the video is long check it in small sections instead of trying to find everything at once.
Use the Video Preview, Not the Timeline
The timeline shows when captions appear.
The preview shows how they actually look.
Both are important.
A caption might have timing but still be hard to read because it blends with the background.
Similarly a caption might look good. Be, in the wrong place.
Always check the captions while watching the video.
A Simple Caption Editing Checklist
Before you move to styling check:
| Editing task | What to check |
| Text | Does it match the speech? |
| Spelling | Are words written correctly? |
| Names | Are proper nouns accurate? |
| Punctuation | Is the text easy to understand? |
| Timing | Does text match the speech? |
| Length | Are caption blocks readable? |
| Segments | Are sentences divided naturally? |
| Consistency | Is formatting uniform? |
| Meaning | Does the text preserve the speaker’s message? |
The best way to add captions in CapCut is not about making a transcript as fast as possible. It is about building a process where automatic transcription does the repeated work while you do manual editing to make sure the final captions are right and easy to follow.
Once your text is correct the next step is to make those captions look good with fonts, colors, backgrounds, placement, animation and other options.
How to Customize Auto Captions in CapCut
Once your caption text is correct and matches the video the next step is to make it look good. Caption customization can make a video easier to read. Can also help keep a consistent look across your videos.
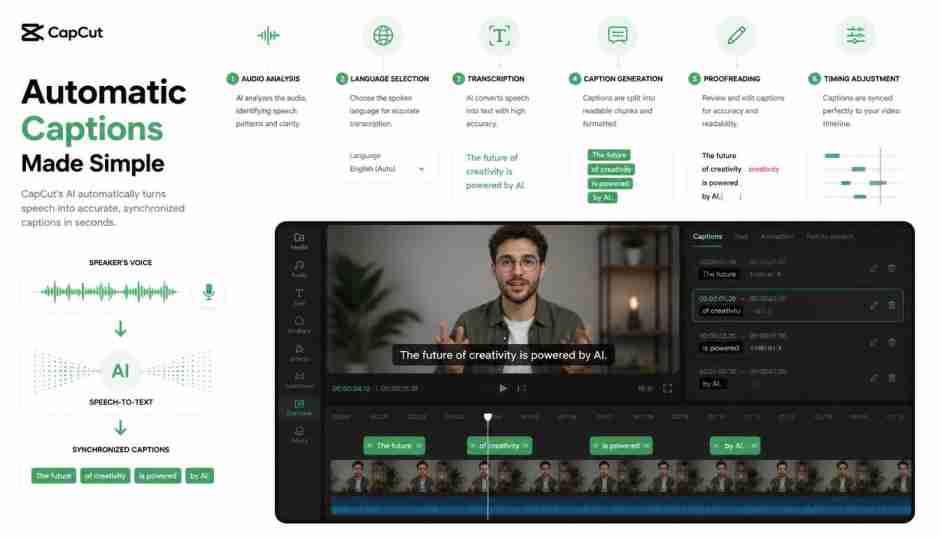
When learning how to add captions in CapCut it is easy to focus on the words and forget about how they look.. Captions are part of the video’s design so their font, size, color, position and animation should work with the rest of the video.
The options for customizing captions can be different depending on the version of CapCut, the device the account and the project. Some templates and advanced styles may have different controls. The ideas below are still helpful no matter what the exact screen looks like.
Change the Caption Font
The font is one of the things people see.
Choose a typeface that’s easy to read at the size your audience will actually see it.
For videos simple sans-serif fonts are a safe choice because their letters stay clear on small screens.
Avoid fonts when captions need to be read quickly.
A stylish font might look nice in a title but it can be hard to read when people have only a second or two to look at each caption.
For business and tutorial content focus on clarity.
For entertainment and social media content you can try unique styles as long as the words are still easy to read.
Adjust Caption Size
Caption size should be big enough to read without taking over the screen.
This is especially important for videos because phones have limited space.
If the text is too small people might have to work to read it.
If it is too big the captions can cover the subject or important parts of the video.
A good idea is to watch your video at the size your audience’s likely to see it.
Do only test captions on a big computer screen.
A caption that looks good on a 27-inch monitor might be too small on a phone.
Change Caption Color
Color can help captions stand out from the video background.
White text is often used because it works well with backgrounds but it can disappear in bright areas.
If your video has a background that changes a lot consider using help like:
- Text outlines
- Shadows
- Background boxes
- Highlight effects
The aim is not to make captions colorful. The aim is to make them visible and easy to read.
For branded content you can also use your brand colors. Don’t make the contrast worse just because a color matches your brand.
Add a Caption Background or Highlight
A background can make captions easier to read when the video has complicated visuals.
For example a dark background behind text can make the caption stand out clearly.
Highlight effects can also help make certain words stand out.
Use them carefully.
If every word has a highlight the captions can look too busy.
A simple background or a consistent highlight style usually looks better.
Add an Outline
An outline or stroke can help separate the text from the video.
This is especially helpful when the background changes a lot.
For example white text with a dark outline can stay readable on both light and dark areas.
The outline should support the text not be the focus.
If the outline is too thick the text can look heavy and harder to read.
Use a Text Shadow
A shadow can help the text stand out from the background.
This can be useful for videos with moving parts or changing lights.
Like outlines use it in moderation.
A strong shadow can make the captions look blurry or too dramatic.
Use contrast to make the text easy to read without making it look disconnected from the video.
Adjust Caption Position
Position is one of the important parts of caption design.
Many people automatically put captions near the bottom. That is not always the best place.
Before choosing where to put the captions look at the videos composition.
For example:
- Is someone’s face near the bottom?
- Is there text already on the screen?
- Is a product in the center?
- Are there interface elements near the bottom?
- Are there subtitles or graphics elsewhere?
Move the captions to an area that’s clear and does not hide important parts.
Keep Captions Inside a Safe Area
For media videos safe placement is very important.
Different platforms may show buttons, descriptions, usernames or other elements around the edge of the video.
If captions are too close to the edge some text may be hard to see.
Try to keep caption text away from the edges as much as possible.
This is especially important for videos made for phones.
Adjust Text Alignment
Caption alignment affects how the text looks.
Centered captions can work well for videos and videos with people talking.
Left-aligned captions may feel more natural for educational or informative videos.
The right choice depends on your video.
More important than the specific alignment is consistency.
Don’t change alignment randomly between captions unless it has a purpose.
Use Caption Animations
Animated captions are popular in short videos.
They can make videos feel more lively and help highlight words.
For example captions might:
- Fade in
- Slide in
- Pop in
- Grow in size
- Highlight words
- Change emphasis as someone speaks
But animation should support the message.
If every caption jumps, spins, changes size and changes color the viewer might not focus on the message.
A simple animation used the way can look better than constant movement.
Apply Caption Styles
CapCut might offer caption styles that let you change the look of your captions quickly.
These can be helpful when you are making content fast.
Don’t choose a style just because it looks cool in the editing app.
Think about whether it fits the purpose of your video.
A bold animated style might work for fun content. Might not fit a professional presentation.
Highlight Words
Strategic emphasis can make captions more interesting.
For example if someone says:
“There are three steps you need to remember.”
you could highlight the three steps instead of making all words stand out.
This helps the viewer focus without getting overwhelmed.
Keyword highlighting is especially useful for:
- Tutorials
- Product demos
- Marketing videos
- Short social content
Maintain a Consistent Caption Style
If you are making a series of videos consistency is even more important.
Try to use the same:
- Font
- Colors
- Text size
- Position
- Animation style
- Highlight method
This helps create a look.
For example a creator might always use captions with a dark outline and highlight important words in their brand color.
Over time people might start to recognize the style even before they know the creator.
Don’t Let Captions Compete With the Video
The goal of captions is to help people understand the video.
They shouldn’t be more noticeable than the content unless it is part of the creative idea.
If the viewer is watching the captions more than the speaker or the action the design might need to be simpler.
A good caption style should feel part of the video.
Test Captions Against Backgrounds
If your video has scenes preview the captions in several of them.
A style that works on a background may be hard to read on a bright outdoor scene.
Test captions on:
- Dark videos
- Bright videos
- Skin tones
- Fast-moving scenes
- Screenshots
- Product images
If the text is hard to read make the contrast stronger or add a consistent background.
Caption Design for Different Video Types
- Different types of videos need different styles.
- Educational videos: Keep fonts simple and text easy to read.
- Business videos: Use colors and professional looking text.
- TikTok-style content: Strong emphasis and animation can work well.
- YouTube tutorials: Focus on text and consistent placement.
- Product videos: Avoid covering the product with captions.
- Interviews: Keep the style quiet so the conversation is the focus.
A Professional Caption Style Formula
If you are not sure where to start try this idea:
Readable font + strong contrast + moderate size + consistent position + subtle animation
This works for many types of videos.
You can then change the style based on your audience and the platform.
Eventually the goal of how to add captions in CapCut is not just to put words on the screen. A good caption process combines transcription with smart design.
Once the text is right and the style is good the next step is to make sure the captions are correct—making sure that CapCuts automatic transcription has caught every word.
Best Caption Settings, for TikTok, Instagram Reels, YouTube Shorts and YouTube
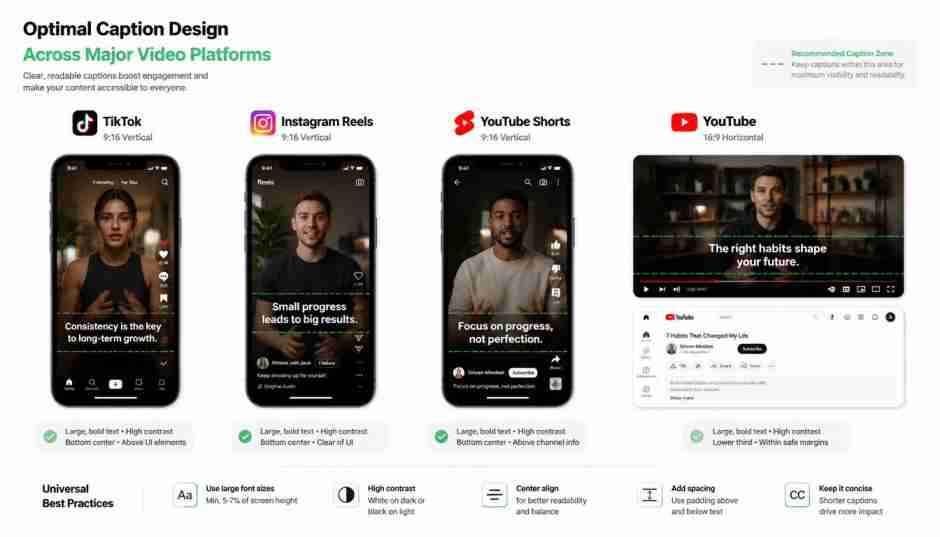
The best caption settings depend on the platform the video format and the way people watch the video. Even though the basic way to add captions in CapCut is similar the size of the captions, where they appear the style and when they show should be changed for each platform.
TikTok
For videos make captions big, easy to read and full of energy because most people watch on phones. Use a bold font good contrast and a caption size that is easy to read on a small screen.
Keep captions away from the bottom and the right side of the screen because TikTok’s tools can hide important text.
Short parts of captions work well for videos. You can also make important words stand out with a color or a simple animation especially for how-to videos, product videos and lessons.
Instagram Reels
Instagram Reels also need captions that’re easy to read on a phone. Use a font with good contrast and avoid putting important text too close to the edges.
Keep captions inside the safe area so they do not get in the way of Instagram’s tools.
For Reels being consistent is more important than much animation. If you make a series of videos use the font same caption color and same style for highlights across your videos.
This helps people recognize your style and keeps your videos looking professional.
YouTube Shorts
YouTube Shorts work better with captions that’re clear, short and match the speech closely.
Because Shorts are vertical and often fast avoid sentences that take up many lines. Break speech into smaller parts that feel natural.
Use contrast and make sure captions are easy to see on different backgrounds.
Using highlights on words can also help. For example if the speaker explains three steps making the important words stand out helps viewers understand better.
When learning how to add captions in CapCut for Shorts always check the video on a screen before sharing.
YouTube Videos
Traditional YouTube videos have space so you can use a more simple caption style.
For tutorials, lessons, reviews and talks focus on clarity. Make it easy to read instead of using flashy animations.
Long videos need attention to when the captions show because people might watch for a long time.
Avoid many text effects that can feel distracting during longer videos.
If your video has screen demonstrations, place captions where they do not block menus, buttons, charts or other important parts.
Recommended Caption Settings
| Platform | Format | Caption Style | Main Priority |
| TikTok | Vertical | Bold and dynamic | Mobile readability |
| Instagram Reels | Vertical | Clean and branded | Safe positioning |
| YouTube Shorts | Vertical | Clear and engaging | Timing and readability |
| YouTube | Usually horizontal | Clean and professional | Comfortable reading |
No matter the platform always check your captions before you finish the video. Make sure they are the size have good contrast appear at the right time are in the right place and are easy to read on the kind of screen your audience uses most.
The best caption settings are not always the exciting ones. They are the ones that help people understand what is being said without taking from the video itself.
How to Fix CapCut Auto Caption Errors and Improve Accuracy
Auto captions can save a lot of time but they are not perfect. CapCut can sometimes get words wrong miss parts of a sentence have breaks or have trouble with names and technical words.
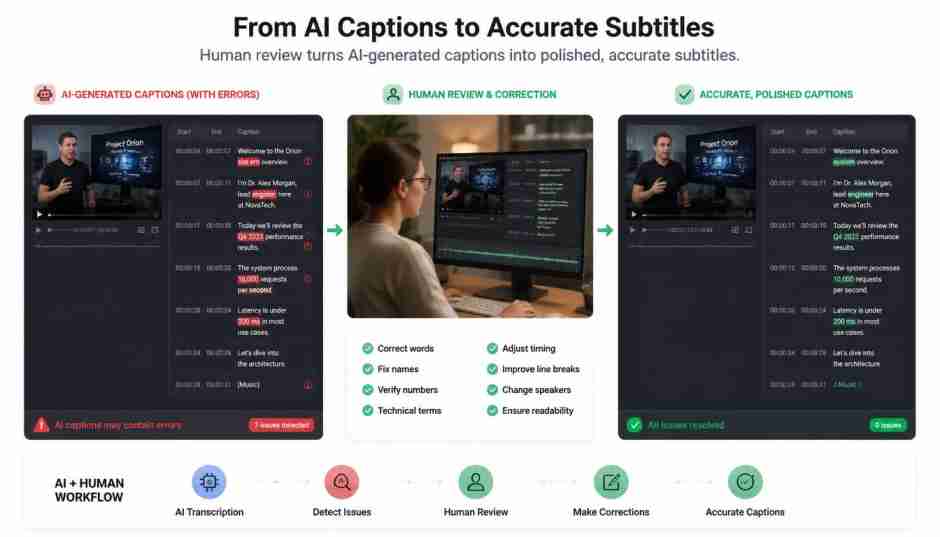
If you are learning how to add captions in CapCut for videos that need a quality fixing these mistakes is just as important as making the captions in the first place.
The goal is not to fix every mistake right away. Instead create a way to find and fix the errors that matter most to your viewers.
Why CapCut Auto Captions Make Mistakes
Automatic speech recognition depends on a things.
The system has to find words in an audio file understand the language tell the speech apart from other sounds and turn it into text.
Problems can happen when:
- The speaker talks fast
- The audio has background noise
- The music is too loud
- The microphone has bad sound
- More than one person is speaking at the same time
- Words are not clear
- The video has words that are not commonly used
- Names or brands are not common
- The language setting is incorrect
Understanding these problems helps you get better results.
Check the Important Words First
When looking at captions not every word is equally important.
Focus on words that can change the meaning of your video.
These usually include:
- Numbers
- Names
- Places
- Product names
- Words
- Instructions
- Prices
- Dates
- Measurements
- URLs
- Brand names
For example if a tutorial has a caption that gets a software feature wrong viewers might do the wrong thing.
Fixing that mistake should be more important than a spelling error.
Improve the Source Audio
One of the ways to get better captions is to fix the audio before it is transcribed.
If the voice is hard to hear the system has less to work with.
Try to record where:
- Voice is louder than background noise
- Voice is louder than music
- You don’t need studio equipment.
- Even small changes can help.
Record the speaker closer to the mic reduce background noise and keep music during important parts.
Reduce Background Music
Music can make it harder for the system to understand the voice.
If your video has music lower it when making or checking captions.
The voice should be clear.
After captions are made you can adjust the music again for the mix.
Select the Correct Language
If the captions are wrong check the language setting.
A wrong language can cause errors.
For example if the speaker uses English but the system is set to another language the text may be hard to fix.
Before making captions check the language.
Watch for Similar Sounding Words
Sometimes the system picks a word that sounds like the right one but is not.
For example a caption might say “content”. Actually be “concent.”
These mistakes can be hard to see when just reading the captions.
Always check the captions against the audio.
Read the caption while listening to the speaker.
Correct Names Manually
Proper names need care.
The system may have trouble with names that’re not common.
Check:
- People names
- Company names
- Places
- Product names
- Websites
- Tools
If your video uses the same special name many times look through the captions and check each one.
Check Numbers Carefully
Numbers are another place where errors happen.
The system might mix up:
- 15 and 50
- 13 and 30
- Dates
- Percentages
- Money
- Measurements
This can be a problem for business, financial, educational and tutorial videos.
For example changing “50 percent” to “15 percent” changes the meaning
Always check numbers against what the speaker said.
Review Technical Terminology
If your videos are about tech, SEO, finance, science, medicine or something else expect to check words.
The system might pick a word instead of a special one that sounds similar.
For example a tech video may have:
- API
- HTML
- CSS
- JavaScript
- WordPress
- SEO
- AI automation
Check these words carefully.
A video that is correct in content should have captions that’re correct too.
Fix Line Breaks
Sometimes the words are right. The way the caption is split is wrong.
For example:
“You can download the”
followed by
“video, from the website.”
This might be okay. A better split depends on the speaker’s words and the screen space.
Try to break captions where there are pauses or at the end of a thought.
Avoid splitting words that’re close together if it makes the sentence harder to read.
Fix Captions That Appear Quickly
If a caption disappears very fast people may not have time to read it.
This can happen if the system creates many small parts.
Watch the video. Find captions that are too fast.
You can improve the experience by changing the timing or combining parts.
Fix Captions That Stay Long
The opposite problem can happen too.
A caption might stay on screen after the speaker is done.
This can confuse people because they think the text matches something the speaker’s about to say.
Change the end time so the caption disappears at a moment.
Check Caption Synchronization
Make sure captions match the audio from start to finish.
A good way to test is to listen to the speaker and watch the caption.
Pay attention to:
- When sentences start
- When sentences end
- Fast talking
- Pauses
- When the speaker changes
- When scenes change
If captions are always a little early or late fix the parts that’re wrong instead of ignoring it.
Review Multiple-Speaker Videos Carefully
Interviews and group talks can be harder.
When people talk over each other or speak fast the system may have trouble separating the voices.
Check every time a speaker changes.
If needed use caption styles or manually add speaker identification.
The viewer should always be able to understand who is speaking.
Don’t Over-Correct Natural Speech
Not every informal phrase needs to be rewritten.
People naturally use:
- “uh”
- “um”
- contractions
- slang
- expressions
- repeated words
Whether you keep or remove these depends on the videos purpose.
A casual social media video may benefit from preserving speech.
A corporate presentation may benefit from captions.
The important thing is consistency.
Use a Two-Pass Proofreading Method
Trying to check everything at can make caption editing tiring.
Instead use two passes.
Pass 1: Accuracy
Focus on whether the captions correctly represent the speech.
Check words, names, numbers and terminology.
Pass 2: Presentation
Focus on timing, line breaks, punctuation, readability and visual consistency.
Separating these tasks makes proofreading more systematic.
Use the Audio as the Final Authority
When you’re unsure whether an automatic caption is correct don’t guess from the text.
Listen to the audio.
The audio is the source of truth.
If a phrase is unclear after repeated listening consider whether the caption should represent the uncertain speech accurately rather than inventing a word that merely seems likely.
When You Should Regenerate Captions
Sometimes the generated transcript contains many errors that correcting it manually would take longer than generating it again.
Consider regenerating when:
- The wrong language was selected
- The audio was significantly improved
- The wrong audio source was analyzed
- The transcript is corrupted
A major section of the video was changed
However if a few words are incorrect manual editing is usually more efficient.
Accuracy Checklist
Before considering your captions finished check:
| Area | Question |
| Words | Do captions match the speech? |
| Names | Are all proper nouns correct? |
| Numbers | Are figures and dates accurate? |
| Terms | Are technical words spelled correctly? |
| Timing | Do captions match the dialogue? |
| Line breaks | Are sentences divided naturally? |
| Speed | Can viewers comfortably read each segment? |
| Speakers | Can viewers follow speaker changes? |
| Language | Is the transcription language correct? |
The best approach to how to add captions in CapCut is therefore a combination of transcription and careful human review. CapCut can handle much of the work while you make the decisions that determine whether the final captions are accurate and useful.
Once accuracy is under control you can move on to advanced caption techniques such as highlighting keywords creating dynamic captions and using caption animations to make important parts of a video stand out.
Conclusion: How to Add Captions in CapCut
Learning how to add captions in CapCut is more than generating automatic text. A good captioning workflow combines transcription, manual editing, timing adjustments and thoughtful caption design to create a video that is easier to understand and more engaging to watch.
For creators the simplest approach is to import the finished video use CapCut auto captions to generate the initial transcript select the correct language and then carefully review the results. Correct spelling mistakes, names, numbers, technical terms and other transcription errors before moving on to styling.
Your captions should also be easy to read. Choose a font maintain strong contrast use an appropriate text size and position captions where they don’t cover important visual elements. For media videos remember that viewers are often watching on small smartphone screens so readability should always come before excessive visual effects.
The effective workflow can be summarized as:
Edit the video → Generate captions → Check accuracy → Fix timing → Customize the style → Preview → Export
Automatic captioning can save significant editing time but it shouldn’t replace human judgment. AI transcription creates the starting point; your editing decisions create the result.
Whether you’re creating TikTok-style videos, YouTube tutorials, educational content, interviews, business videos or social media clips edited captions can make your content more accessible and easier to follow.
Once you understand how to add captions in CapCut, experiment with caption styles while keeping one principle in mind: make the message easier to understand, not harder to watch.