
You open CapCut import your video and start looking for the Loop button—. No matter where you look it isn’t there. If you’ve been wondering how to loop a video in CapCut you’re not alone. It’s one of the common questions among beginners mainly because CapCut doesn’t use a traditional one-click loop feature.
Instead it gives you editing tools that let you loop a video manually giving you much more control over how your video looks. Once you understand the workflow creating a professional-looking loop becomes surprisingly easy.
In this guide you’ll learn the ways how to loop a video in CapCut Mobile, Desktop and CapCut Online. You’ll also discover how to create loops avoid common editing mistakes choose the right looping method for different projects and export your videos without losing quality. By the end you’ll have everything you need to create clean engaging looping videos with confidence.
Why Can’t You Find the Loop Button in CapCut?
If you’ve spent minutes exploring CapCuts interface you’re probably wondering why such a basic feature seems to be missing. All many media players and video apps include a simple Loop or Repeat button so its reasonable to expect CapCut to offer the same option. The truth is that you’re not overlooking a hidden menu—CapCut simply doesn’t include a loop button inside its video editor.
This often surprises users, especially those editing their first video. They search through the toolbar open the editing panels and even check the export settings expecting to find a one-click solution. When they can’t it’s easy to assume the feature doesn’t exist. In reality CapCut supports video looping. It approaches it differently than traditional playback software.
The reason comes down to CapCuts purpose. Its designed as a video editing application, not a media player. A media player only needs to replay the video from beginning to end. A video editor however gives you the freedom to control every part of your project including how a loop starts, ends and transitions between repeated clips. This timeline-based workflow allows you to create loops that feel much smoother than a repeat function ever could.
Imagine you’re creating a product showcase where a smartwatch slowly rotates on a table. If you simply replay the clip viewers may notice the moment it starts again because the final frame doesn’t perfectly match the first. In CapCut you can trim the clip duplicate it reverse it or add transitions to make the movement appear continuous. The result is a loop that feels intentional than repetitive.
This is one of the reasons experienced creators prefer editing their video looping manually. Of relying on automation they decide exactly how the transition should look. That extra control makes a difference particularly for content shared on TikTok, Instagram Reels, YouTube Shorts or digital displays where smooth playback improves the viewing experience.
Another common misunderstanding is confusing video playback with video editing. When people talk about how to loop a video in capcut they may mean one of two things:
| Playback Loop | Editing Loop |
| Repeats the video automatically after it finishes. | Creates a sequence by editing the timeline. |
| Common in media players like VLC. | Created using editing tools such as Duplicate, Reverse, Split and Transitions. |
| Requires no editing. | Gives creative control over the final result. |
Understanding this difference makes CapCut much easier to use. Of searching for a missing button you’ll know that the software expects you to build the loop yourself. While it takes a little effort the results are cleaner more flexible and far more professional.
The good news is that once you understand this editing workflow creating a loop becomes straightforward. Whether you’re making a repeating clip or a seamless cinematic loop CapCut provides all the tools you need—you just need to know which method works best for your project.
Can You Actually Loop a Video in CapCut?
Yes you can loop a video in CapCut. Not in the way many beginners expect. Than providing a one-click repeat feature app uses its editing timeline to let you create customized loops that suit different types of content.
This gives you flexibility and produces better-looking results than simply replaying a clip from the beginning.
The simplest method is to duplicate your video clip and place the copy after the original. When the first clip ends, the duplicated clip starts, creating the appearance of a loop. For edits this method works well and only takes a few seconds.
However not every video looks good when duplicated. If the final frame is very different from the opening frame viewers will notice a jump between repetitions. That’s why professional editors often combine duplication with techniques such as trimming, reverse playback, keyframes or crossfade transitions.
These adjustments help blend the end of one clip into the beginning of the next creating an more natural loop.
The best video looping method depends on the type of footage you’re editing. Moving action clips, product videos, animations and cinematic scenes each require a slightly different approach. Choosing the technique not only improves the visual quality but also reduces the amount of editing needed later.
The table below provides an overview of the most common looping methods available in CapCut.
| Looping Method | Best For | Difficulty | Recommended? |
| Duplicate Clip | Short social media videos | Easy | ⭐⭐⭐⭐⭐ |
| Reverse + Duplicate | Nature scenes walking shots motion | Medium | ⭐⭐⭐⭐⭐ |
| Split and Repeat | Highlighting a specific moment | Easy | ⭐⭐⭐⭐☆ |
| Keyframes | Motion graphics and animations | Advanced | ⭐⭐⭐⭐☆ |
| Transitions | Product videos and cinematic edits | Medium | ⭐⭐⭐⭐☆ |
One of CapCuts advantages is that these techniques work across multiple platforms. Whether you’re looping a video on Android, iPhone, Windows, Mac or CapCut Online the core principles remain the same. Once you understand how works on one device you’ll find it much easier to recreate the process elsewhere.
Before choosing a looping method it’s worth remembering that the quality of the result depends as much on your footage as it does on your editing. A recorded clip with stable movement and a clear subject will always produce a better loop than footage with sudden camera shakes or abrupt scene changes.
Now that you know CapCut can create videos the next question is even more important: How does CapCut actually build those loops behind the scenes? Understanding that process will help you choose the editing technique instead of relying on trial and error.
How to Loop a Video in CapCut (Step-by-Step Guide)
Whether you’re using CapCut on Android, iPhone, Windows, Mac or CapCut Online, the process of creating a looping video is almost identical. The only difference is where certain tools appear in the interface. Once you understand the workflow you’ll be able to create looping videos on any version of CapCut with confidence.
Of searching for a dedicated Loop button you’ll use CapCuts editing timeline to repeat your clip and refine the transition until it appears smooth and natural.
Now that you understand the basics, lets learn how to loop a video in capcut step by step.
Step 1: Import Your Video
Start by creating a project and importing the video you want to edit.
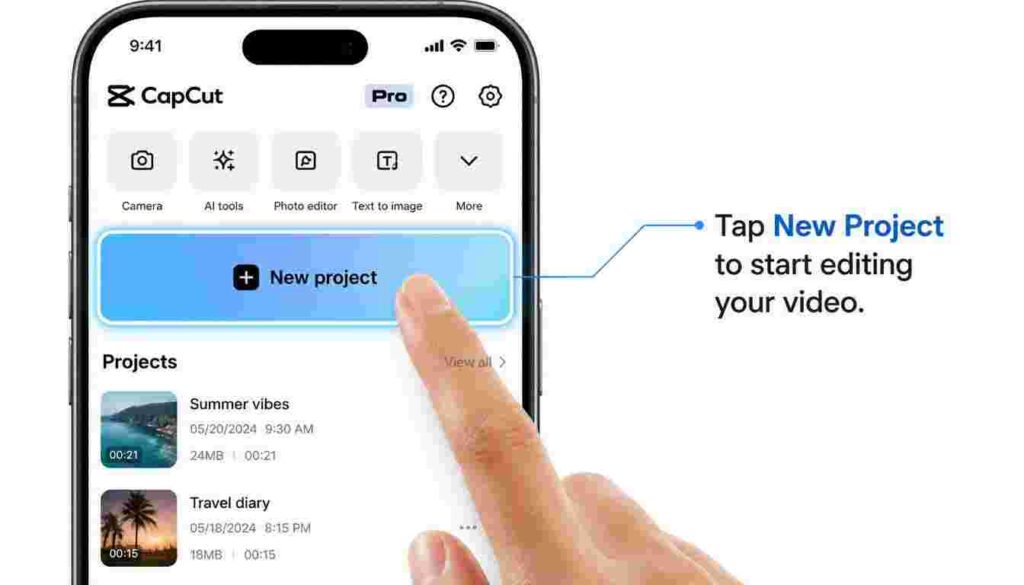
• Mobile: Tap New Project. Select your video.
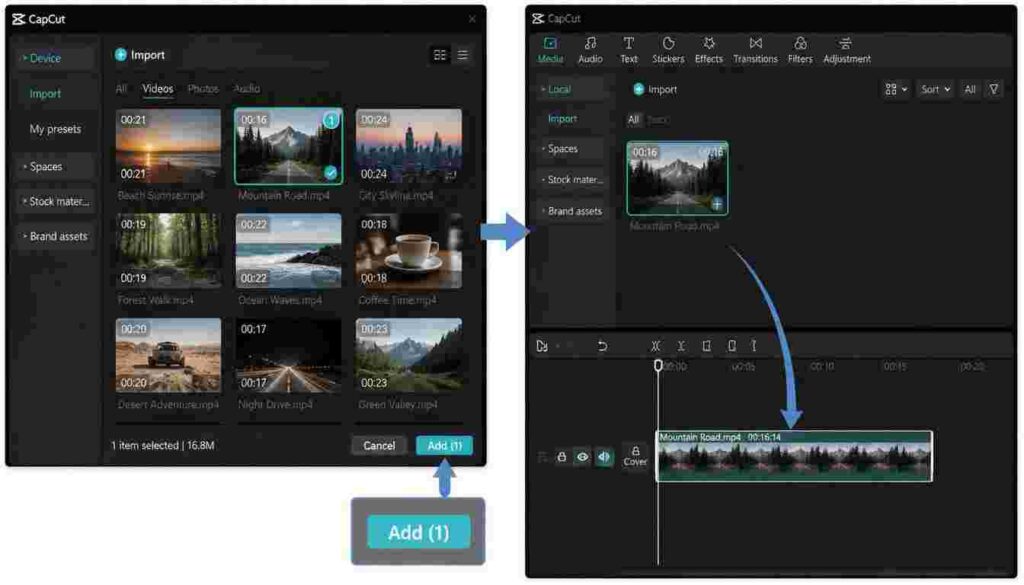
• Desktop: Click Create Project import your video and drag it onto the timeline.
• CapCut Online: Open a project in your browser and upload your video.
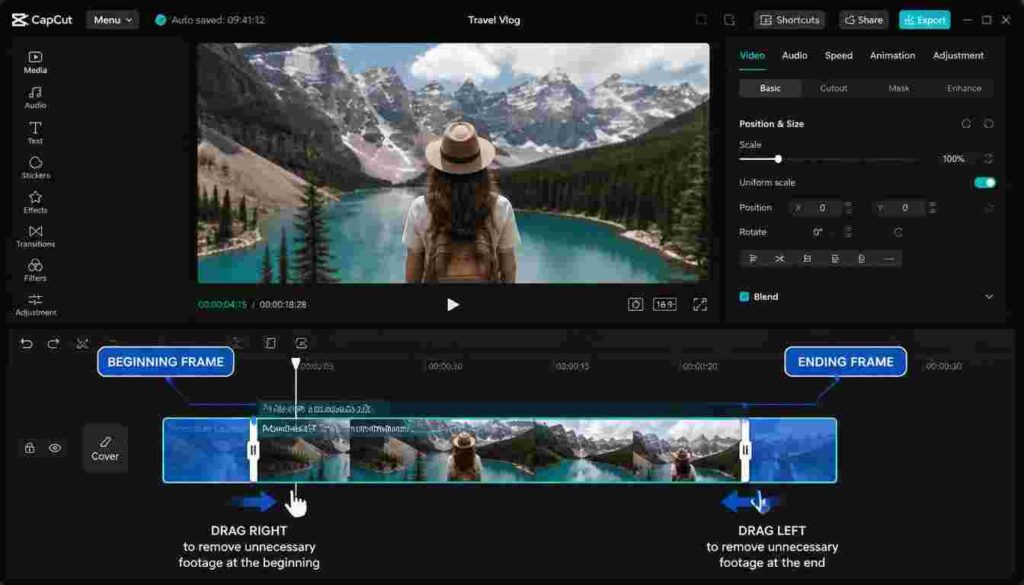
Once your clip appears on the timeline play it from beginning to end before making any edits. Pay attention to the first and last few seconds because these determine how smooth your loop will look.
Pro Tip: Videos with a camera, consistent lighting and smooth movement are much easier to loop than clips, with sudden camera shakes or abrupt scene changes.
Step 2: Prepare Your Footage
Before duplicating the clip take a moment to look at it
Ask yourself:
• Does the video end in a way?
• Is the frame the same as the last?
• Are there any movements at the start or the end?
If needed cut a few frames from the start or the end of the clip. This small change often makes the difference when making a loop that looks smooth.
Step 3: Copy the Video Clip
Choose your video on the timeline and use the option.
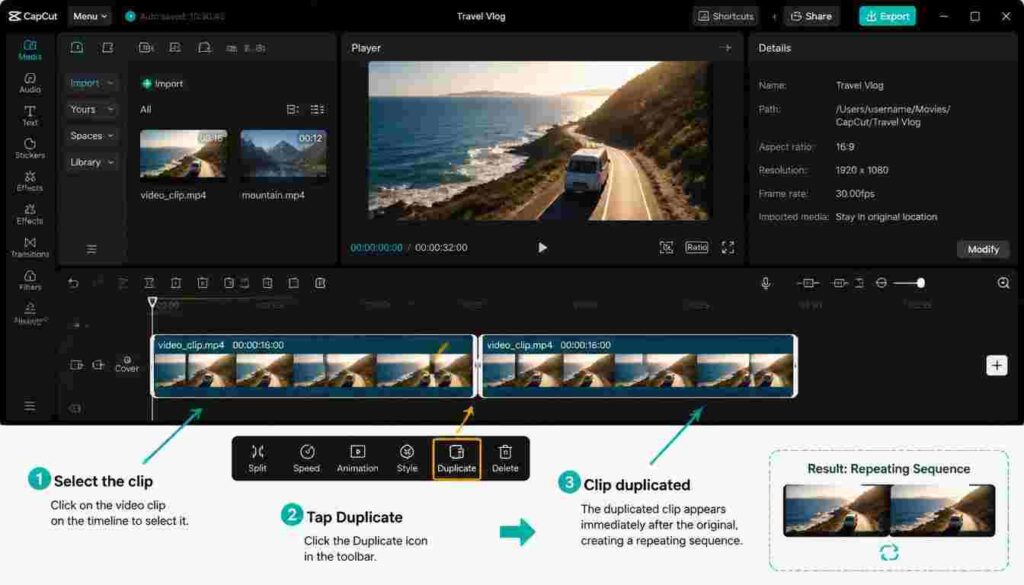
CapCut makes a copy. Puts it right after the original. Soon as the first clip ends the second one starts automatically creating a basic loop.
Even though this way works for projects do not stop here. Watch the point where the first clip ends and the second begins. This is where most loops either work or fail.
Step 4: Make the Transition Smooth
This is when your loop starts to look good.
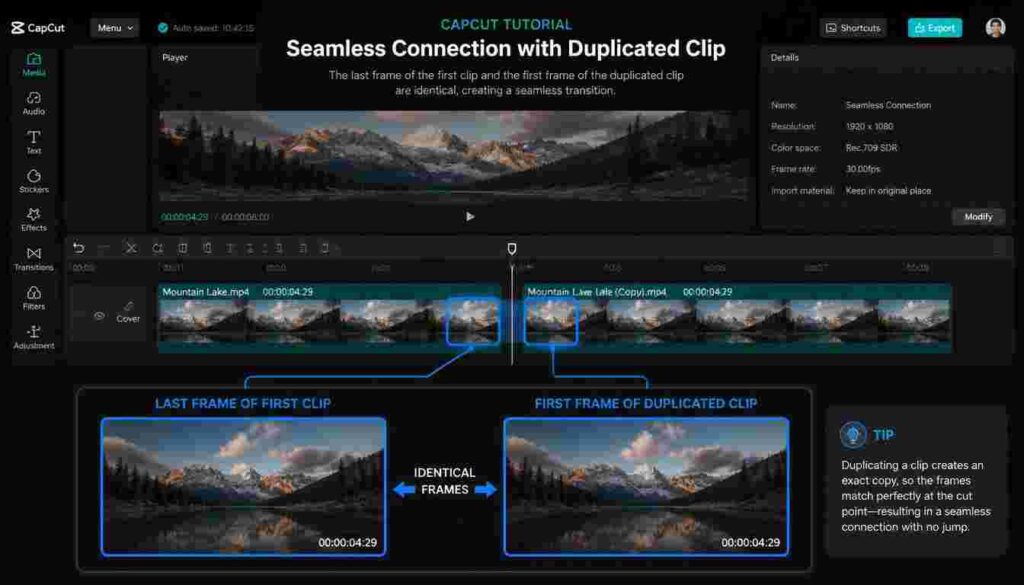
Zoom in on the timeline. Check the point where the original clip changes to the copy.
If you see a jump try one of these methods:
• Cut a few frames from the end of the clip.
• Cut the start of the copy.
• Move the copy a little on the timeline.
• Add a Crossfade if it helps the flow.
• Use the Reverse tool if the subject moves back to the starting position.
Small changes usually work better than flashy transitions.
Expert Tip: Editors often spend time making the transition perfect than making the loop. A difference of two or three frames can make a loop into a perfect one.
Step 5: Make the Loop Longer
If you want the video to last longer copy the clip again.
For example:
| Original Clip | Copies Added | Final Duration |
| 5 Seconds | 1 | 10 seconds |
| 5 Seconds | 3 | 20 seconds |
| 10 Seconds | 2 | 30 secconds |
| 15 Seconds | 3 | 60 seconds |
Avoid copying a short clip too many times as viewers may notice the repetition quickly. If you want a loop use copying with reverse play, keyframes or transitions to keep the video interesting.
Step 6: Watch the Loop
Before exporting play the repeated video times.
Pay attention to the part where the clips change than the video itself.
Ask yourself:
• Does the movement feel smooth?
• Can you see where the loop starts again?
• Does the restart smoothly?
• Is there any jump or flicker?
If something feels wrong go back to the timeline. Make small changes until the loop looks natural.
Remember: Do not decide on a loop after watching it once. Editors watch loops times before exporting.
Step 7: Export the Video
Once you are happy with the result export the project using settings that fit your platform.
Setting | Recommended Value | Why It Matters |
| Resolution | 1080p | video for most platforms |
| Frame Rate | 30 FPS or 60 FPS | Smooth playback and natural motion |
| Format | MP4 | Widely supported across devices and platforms |
| Quality | High | Preserves detail while keeping the file size reasonable |
If you are uploading to TikTok, Instagram Reels or YouTube Shorts these settings offer a good balance between quality and file size.
Does the Process Change Between Mobile, Desktop and CapCut Online?
Not really. The editing process is the same in all versions of CapCut. The only differences are the layout and the location of tools.
| Feature | Mobile | Desktop | CapCut Online |
| Workflow | Same | Same | Same |
| Timeline Editing | ✔ | ✔ | ✔ |
| Duplicate Tool | ✔ | ✔ | ✔ |
| Reverse Tool | ✔ | ✔ | ✔ |
| Export Options | ✔ | ✔ | ✔ |
| Best For | Quick edits | Precision editing | Browser-based editing |
No which version you use, the key to a good loop is not finding a secret button—it is making a smooth change between the end and the beginning of your video.
Congratulations! Now you know how to loop a video in capcut using any reliable medium.
How CapCut Creates Loops Behind the Scenes
At glance creating a loop in CapCut may seem like a hidden feature but the process is actually based on a simple editing principle. CapCut doesn’t generate a looping video automatically. Instead it uses its timeline-based editing system to let you decide how a clip repeats and how smoothly it transitions back to the beginning.
Think of the timeline as the foundation of your project. Every video, image, sound effect or animation you add is placed on this timeline in sequence. When one clip ends the next begins. Creating a loop simply means arranging these clips so that the transition between the frame and the first frame feels natural instead of abrupt.
For example if you duplicate a five-second clip and place the copy after the original CapCut plays both clips back-to-back. If the ending frame closely matches the opening frame the viewer may not even notice where the first clip ends and the second begins. This is the concept behind most looping videos.
However not every video loops by duplication alone. Imagine recording a person walking from left to right across the screen. If the duplicated clip starts again with the person on the left the sudden jump will immediately catch the viewers attention. That’s because the movement isn’t continuous.
Professional editors solve this by adjusting the footage before repeating it. They might trim a frames reverse the second clip reposition the starting point or add a subtle transition to hide the change. These small edits create the illusion of motion.
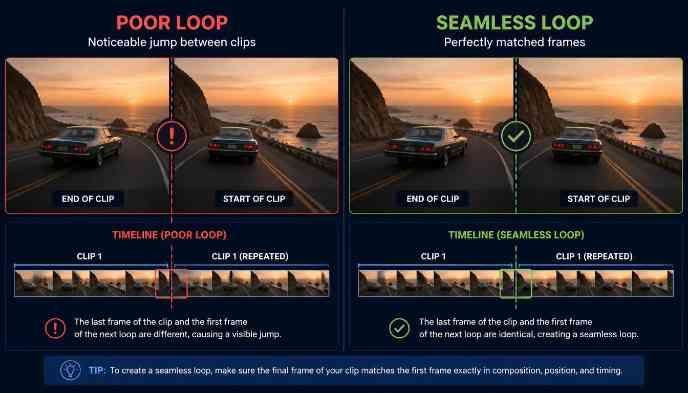
Another important factor is frame continuity. Every video is made up of frames displayed in rapid succession. If the last frame is significantly different from the first the loop will always feel disconnected. The closer these frames are in appearance, motion, lighting and camera angle the the final result.
Audio follows the principle. If background music or sound effects stop abruptly at the end of a clip and restart from the beginning the break becomes obvious. This is why editors often trim audio apply fade effects or use music tracks that naturally repeat.
The diagram below summarizes how CapCut creates a looping video.
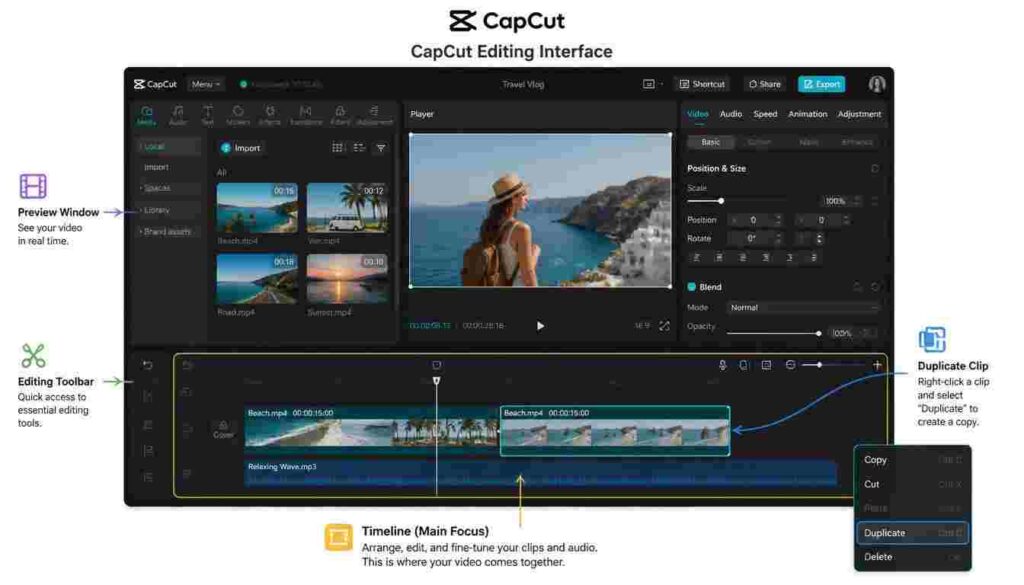
Editing Step What Happens Purpose
Import the clip Add the footage to the timeline Create the base of the project
Duplicate or repeat the clip Place another copy after the original Extend the playback
Refine the transition Trim, reverse or add transitions if needed Reduce noticeable jumps
Preview the loop Watch the repeated sequence several times Check if the loop feels natural
Export the project Save the video Create the final looping video
Once you understand this workflow creating loops becomes much more predictable. Of searching for a feature that doesn’t exist you’ll focus on improving the transition between repeated clips—the step that has the biggest impact, on the final result.
The next question is which looping technique should you use? Fortunately CapCut offers methods, each designed for different types of footage and editing goals.
Different Ways to Loop a Video in CapCut
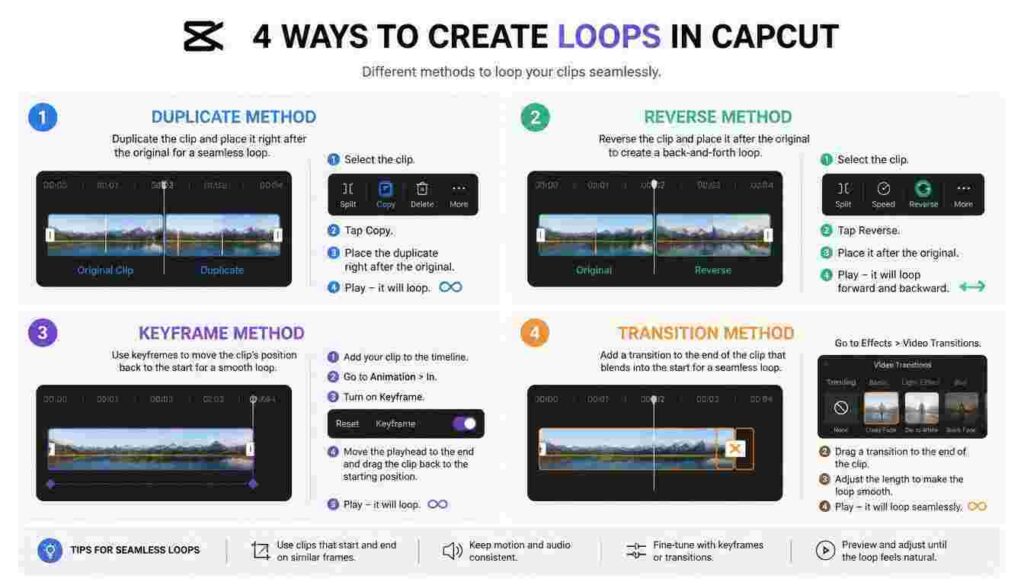
There isn’t one way to create a looping video in CapCut. The best method depends on the type of footage you are editing the effect you want to achieve and how smooth you want the result to look. While many beginners rely on duplicating a clip experienced editors often combine techniques to create loops that feel almost invisible.
‘
Understanding these methods before you start editing can save time. Help you choose the right workflow for your project.
| Looping Method | Best For | Difficulty | Loop Quality |
| Duplicate Clip | Short videos, social media content | Easy | ⭐⭐⭐⭐☆ |
| Reverse Playback | Walking shots, waterfalls, simple motion | Medium | ⭐⭐⭐⭐⭐ |
| Keyframe Animation | Motion graphics, zoom effects | Advanced | ⭐⭐⭐⭐⭐ |
| Transition Blending | Cinematic clips, product videos | Medium | ⭐⭐⭐⭐☆ |
Duplicate Method to loop a video
The Duplicate method is easist way how to loop a video in CapCut. It works by placing a copy of your clip immediately after the original on the timeline. When the first clip finishes the duplicate begins automatically creating a repeated sequence.
This method is ideal for videos where the first and last frames already look similar. Product rotations, animated graphics, moving scenes and certain social media clips often loop well with little or no additional editing.
Although its quick and beginner-friendly duplicating a clip isn’t always enough. If the ending frame differs significantly from the opening frame viewers will notice a jump. In these situations trimming a frames before duplicating the clip can significantly improve the result.
For beginners, this remains the fastest method for how to loop a video
Reverse video looping Method
If you are looking how to loop a video in capcut for smother animation, using the reverse method is worth trying
The Reverse method creates a loop by playing the duplicated clip backward. Of jumping directly from the last frame back to the first the video returns along the same path it followed originally.
Imagine filming a pendulum swinging or waves gently reaching the shore. Reversing the clip allows the movement to flow naturally back to its starting position making the repetition much harder to detect.
This technique is especially effective for footage with predictable movement. However it may look unnatural if the video contains people speaking, readable text or actions that clearly shouldn’t happen in reverse.
Best for: Nature scenes, product rotations, camera pans and slow-motion footage.
Keyframe Method for loop a video
Keyframes provide another powerful approach to how to loop a video.
Keyframes offer the level of creative control and are commonly used by professional editors. Of repeating the entire clip you animate specific properties such as position, scale or rotation allowing the movement itself to become the loop.
For example you can slowly zoom into a product move text across the screen or create floating motion for graphics without needing footage. Because the animation is generated within CapCut the movement can repeat smoothly while maintaining quality.
Although keyframes require practice than duplication or reverse playback they produce highly polished results and are particularly useful for promotional videos, presentations and motion graphics.
Best for: Motion graphics, animated text, logo. Professional marketing videos.
Transition Method for video looping
Sometimes the footage itself can’t create a loop. In these cases transitions help soften the connection between repeated clips.
A short crossfade, dissolve or timed transition blends the ending of one clip into the beginning of the next. When used subtly this technique reduces jumps without distracting the viewer.
It’s important not to rely on transitions to fix footage. If the first and last frames are completely different even the best transition won’t create a loop. Think of transitions as a finishing touch than a shortcut.
Best for: Product showcases, lifestyle videos, cinematic edits and clips with movement.
Which video Looping Method Should You Choose?
By now you know that CapCut offers ways to create a looping video. The next question is which method should you actually use for video looping? The answer depends on your footage your editing goal and how seamless you want the result to look.
Many beginners make the mistake of using the looping technique for every video. While the Duplicate method works well for some projects it isn’t always the choice. A moving action clip for example requires a different approach than a slow product showcase or an animated graphic. Choosing the method from the beginning not only saves editing time but also produces a cleaner and more professional result.
The table below compares the four looping techniques available in CapCut and highlights when each one works best to loop a video.
| Looping Method | Best For | Difficulty | Seamless Result | Recommended For Beginners |
| Duplicate Clip | Social media clips, simple edits, product showcases | Easy | ⭐⭐⭐⭐☆ | ✅ Yes |
| Reverse Playback | Walking shots, nature videos, slow camera movements | Medium | ⭐⭐⭐⭐⭐ | ✅ Yes |
| Keyframes | Motion graphics, logo animations, zoom effects | Advanced | ⭐⭐⭐⭐⭐ | ❌ No |
| Transitions | Cinematic videos, promotional content, storytelling | Medium | ⭐⭐⭐⭐☆ | ✅ Yes |
Each method has its own strengths and understanding them will help you choose the most effective workflow for your project.
Choose the Duplicate Method for Quick and Simple Loops
If you’re creating short-form content for platforms like TikTok, Instagram Reels or YouTube Shorts duplicating your clip is usually the solution. It takes a few seconds requires no advanced editing skills and works well when the beginning and end of the clip already look similar.
This method is ideal for product demonstrations rotating objects, simple animations and short lifestyle clips where viewers aren’t likely to notice the repeated sequence.
Choose Reverse Playback for Natural Motion
Reverse playback is one of the ways to create the illusion of endless movement. Of abruptly restarting the video the duplicated clip plays in reverse allowing the subject to return naturally to its starting position.
This technique works well for flowing water swinging objects, camera pans or slow walking shots. Because the movement retraces its path the transition feels much smoother than a simple duplicate.
However avoid using playback when your footage contains speaking people moving vehicles, readable text or actions that look unrealistic when played backward.
Choose Keyframes for Creative Projects
If you’re working with text animations logo reveals or motion graphics keyframes provide the level of creative control. Than repeating the video itself keyframes animate specific elements within the project creating continuous motion without relying on duplicated footage.
Although this method requires experience it delivers polished professional results that are difficult to achieve with basic looping techniques.
Choose Transitions When the Loop Needs a Finish
Sometimes your footage is almost perfect. Still contains a slight jump between the ending and the beginning. Of re-editing the entire clip a subtle transition can smooth the connection and make the loop less noticeable.
Transitions work best when they’re used sparingly. A short dissolve or crossfade often looks more professional than a dramatic effect. The goal is to hide the transition—not draw attention to it.
Quick Recommendation Based on Your Project
If you’re unsure how to loop a video effectively use this guide to choose the right technique.
| If You’re Creating… | Recommended Method | Why It Works |
| TikTok or Instagram Reel | Duplicate Clip | Fast, simple, and ideal for short videos. |
| Product Showcase | Reverse + Duplicate | Creates smooth, continuous movement around the product. |
| Cinematic Travel Video | Transitions + Trim | Helps blend scenes naturally without visible jumps. |
| Animated Logo | Keyframes | Produces precise and professional motion. |
| Nature or Landscape Video | Reverse Playback | Keeps movement flowing naturally. |
| Tutorial or Educational Video | Duplicate Clip | Easy to follow and quick to edit. |
Pro Tip
Don’t choose a video looping method simply because its the easiest. Start by looking at your footage. Ask yourself:
• Does the first frame closely match the last?
• Is the subject moving in a direction?
• Will reversing the clip look natural?
• Is the loop meant to be obvious or completely seamless?
Answering these questions before you begin editing will save time. Help you create a loop that feels intentional rather than repetitive.
How Professionals Make Perfect video looping
Anyone can copy a video clip but making a loop that feels completely smooth takes effort. If you have ever watched a loop and not noticed where it restarted that is not by chance. Editors plan both the recording and the editing to make the change almost invisible.
The secret is not a hidden CapCut feature—it is understanding how people see movement. When the last frame joins with the first the brain sees the video as motion rather than a repeated clip.
When you’ve mastered how to loop a video in capcut, you can start creating loops that look almost invisible.
Let us look at the ways experienced creators make this happen.
Start with Footage That Works for Loops
Before you learn how to loop a video in CapCut, remember that the smoothest loops begin with footage recorded specifically for seamless repetition.
Many new creators try to fix footage during loop a video but professionals know that a good loop begins before they even open CapCut.
For example imagine filming someone walking across the frame from left to right. When they leave the frame the clip jumps back making the loop obvious.
Now compare that with footage of a rotating product moving clouds, ocean waves or a spinning object. These scenes naturally go back to positions making them easier to loop.
When you record your video try to:
• Keep the camera steady.
• Keep the lighting the throughout.
• Avoid zooms or shaking.
• End the movement in a position to where it started.
The the difference between the first and last frame the easier your editing becomes.
Cut Frames of Using Big Effects
One of the most common mistakes is trying to hide a bad transition with flashy effects.
Editors rarely do this.
Instead they look closely at the timeline. Remove just a few frames from the start or the end of the clip. A change of two or three frames can make the loop feel natural.
Think of transitions as a touch—not a shortcut. If the footage doesn’t connect well no transition will hide the problem.
Use Reverse Play When It Helps
One popular approach to loop a video is using reverse playback to create a seamless looping effect. but it only works for some types of footage.
These scenes usually look good in reverse:
| Works Well in Reverse | Avoid Reversing |
| Ocean waves | Talking people |
| Waterfalls | Moving vehicles |
| Swinging objects | Sports highlights |
| Camera pans | Text or logos |
| Rotating products | Hand gestures |
Before using reverse ask yourself:
Would this movement look natural when played backward?
If the answer is no try a way to loop.
Make the First and Last Frame Match
One of the tricks in loop a video is frame matching.
Of looking at the middle of the video editors check the very first frame and the very last.
If they are the same the loop will feel smooth.
If they are very different viewers will notice where the loop starts.
CapCut helps with this because you can look at the timeline closely and move frame by frame to find the match.
This small change often helps more than adding effects.
Do Not Forget About Sound
creators spend all their time fixing the video but ignore the sound.
Unfortunately audio can ruin video looping.
Imagine a music track that restarts every five seconds or a sound that stops before repeating. Even if the video is perfect the audio will tell viewers the clip has started again.
To avoid this:
• Make the music fade in and gently.
• Cut any sounds at the start or end.
• Use royalty- music made for loops.
• Remove any noise at the beginning and the end.
A perfect loop should feel as smooth in sound as it does in video.
Watch the Loop Like a Viewer
A habit that separates experts from beginners is never judging a video looping after watching it
Instead they watch it times and ask themselves:
“Can I immediately see where the video starts again?”
If the answer is yes the loop still needs work.
Experienced editors watch the loop five or six times before exporting. Sometimes stepping away and coming back with eyes helps find small mistakes that were hard to see before.
Professional Looping Checklist
Before you export your project use this checklist:
| Checklist | Completed? |
| First and last frames match naturally | ☐ |
| Camera movement remains smooth | ☐ |
| No noticeable jump between clips | ☐ |
| Audio transitions sound natural | ☐ |
| Video has been previewed multiple times | ☐ |
| Export settings are optimized | ☐ |
If you can check every box your loop is ready to share.
Common Mistakes When Making Loops in CapCut
Making a looping video in CapCut is simple. Loop a video that feels smooth and professional takes attention to detail. Many new users follow the steps but still end up with a loop that feels awkward or repetitive. In cases the problem is not, with CapCut—it is a few small mistakes that can be avoided.
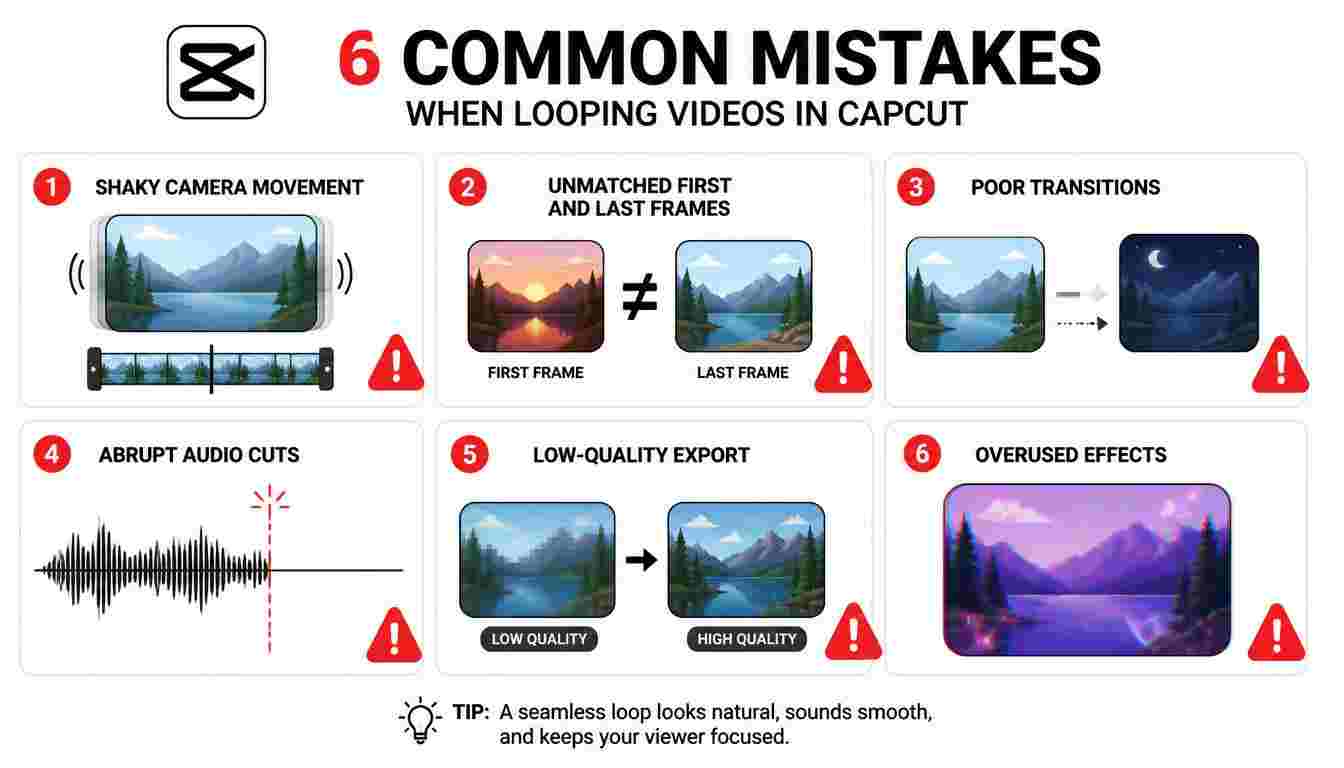
The good news is that once you know how to loop a video in capcut these issues become easier to fix. Below are the common mistakes new editors make and the best ways to avoid them.
1. Looking for a video Button That Does Not Exist
One of the misunderstandings is thinking that CapCut has a special loop button.
Many users spend time looking through menus, settings and export options before realizing they cannot find it.
As explained earlier CapCut is designed as a video editor, not a media player. Of providing a one-click repeat feature it allows you to create loops manually using the timeline.
How to avoid it:
Focus on learning the editing workflow than searching for a hidden feature. Once you understand duplication, trimming, reverse playback and transitions creating loops becomes much easier.
2. Duplicating the Clip Without Checking the Last Frame
Simply duplicating a clip is rarely enough to create a seamless loop.
If the final frame is very different from the opening frame viewers will immediately notice where the video restarts.
For example imagine a person walking out of the frame at the end of the clip. When the duplicated clip begins the person suddenly reappears at the starting position creating a jump.
How to avoid it:
Before duplicating your clip compare the last frames. If they don’t match naturally trim the footage. Consider using reverse playback to make the transition smoother.
3. Using Long or Flashy Transitions
Transitions can improve a video looping—. Only when they’re used correctly.
A common beginner mistake is applying long effects to hide poor editing. Of making the loop smoother these effects often make the repetition even more noticeable.
Professional editors usually prefer transitions or no transition at all. A trimmed clip often creates a cleaner result than an unnecessary animation.
How to avoid it:
Use transitions when they genuinely improve the flow. If a transition becomes the noticeable part of the video it’s probably too strong.
4. Ignoring Audio Continuity
One common mistake when learning how to loop a video is focusing only on the visuals while ignoring the audio transition.
Imagine a background music track that suddenly restarts every seconds. Even if the video looks seamless the audio immediately tells viewers that the clip has repeated.
The same problem occurs with effects, voiceovers and ambient noise.
How to avoid it:
Use music that loops naturally.
Apply fade-in and fade-out effects where necessary.
Trim sounds near the beginning and end of the clip.
Preview both the video and audio before exporting.
A great loop should sound as smooth as it looks.
5. Recording Poor Footage
Editing can improve a video. It can’t completely fix poorly recorded footage.
Shaky camera movement, lighting changes or unpredictable subject movement make seamless looping much more difficult.
Looking loops usually begin with well-planned recordings.
How to avoid it:
Use a tripod. Stabilize your phone whenever possible.
Keep the camera movement slow and consistent.
Maintain similar lighting throughout the recording.
Record a few extra seconds at the beginning and end to give yourself more editing flexibility.
6. Exporting at Low Quality
Some users spend time creating the loop but lose quality during export.
A low resolution or reduced frame rate can make movement appear smooth especially on larger screens.
How to avoid it:
Whenever possible export your project using:
| Setting | Recommended Value |
| Resolution | 1080p or higher |
| Frame Rate | 30 FPS or 60 FPS |
| Format | MP4 |
| Quality | High |
These settings provide a balance between visual quality and file size for most social media platforms.
Troubleshooting Common Looping Problems in CapCut
Even if you follow every step correctly your first looping video may not look the way you imagined. That’s completely normal. Creating a loop is often a process of making small adjustments rather than getting everything perfect on the first attempt.
The good news is that looping problems have simple solutions. In this section we’ll look at the issues users face often while creating looping videos in CapCut and explain how to fix them without starting your project from scratch.
My Loop Looks Choppy of Smooth
This is probably the common complaint among beginners.
After duplicating the clip the video suddenly jumps when it reaches the end and starts again. Of looking like one continuous movement it feels as if two unrelated clips have been joined together.
In cases the problem isn’t CapCut—it’s the footage itself.
A seamless loop depends on the relationship between the last frames. If those frames are too different the transition will always be noticeable.
The easiest solution is to zoom into the timeline and compare both ends of the clip. Trim a few frames from the beginning or the end until the movement flows naturally. You don’t need to remove portions of the video. Sometimes trimming a fraction of a second is enough to eliminate an awkward jump.
If trimming alone doesn’t solve the issue try combining it with playback or a subtle crossfade. These techniques can soften the transition without making it look artificial.
The Duplicate Method Looks Too Repetitive
Duplicating a clip several times is quick but viewers can often recognize the repeated pattern after watching it for a few seconds.
This usually happens when the clip contains a specific action, such as someone waving, jumping or turning around in exactly the same way every few seconds.
Of repeating the clip exactly as it is introduce small variations.
Reverse every clip adjust the playback speed slightly trim different starting points or add gentle camera movement using keyframes. These small changes break up the repetition while keeping the loop smooth.
Professional editors rarely rely on a duplicated clip. They create the illusion of variety without changing the core sequence.
My Reverse Video Looks Unnatural
Reverse playback can create video looping but it doesn’t work with every type of footage.
If your video includes people talking, text, vehicles moving through traffic or actions that follow a logical sequence reversing the clip often looks unrealistic.
The solution isn’t to force the effect—it’s to choose the right looping technique.
Reverse playback works best for movement that naturally looks believable in either direction. Flowing water, rotating products drifting clouds swinging objects and slow camera pans are all examples.
When the reverse effect feels distracting switch back to duplication. Improve the transition through trimming instead.
The Audio Restarts Suddenly
Many people spend hours perfecting the visuals but forget that audio can immediately reveal where a loop begins.
A song that suddenly restarts or a sound effect that cuts off halfway through can ruin a flawless edit.
Start by deciding whether the original audio is actually necessary.
If background sound doesn’t contribute to the video replacing it with a music track is often the better choice. If you want to keep the audio apply gentle fade-ins and fade-outs to soften the transition.
Always preview the video with headphones before exporting. Small audio problems are much easier to notice when you’re listening carefully.
My Exported Video Doesn’t Look as Good as It Did in CapCut
One of the biggest surprises when learning how to loop a video in CapCut is discovering that even a small editing mistake can make an otherwise smooth loop feel unprofessional.
Inside CapCut the preview looks sharp and smooth. After exporting however the video may appear blurry, compressed or less fluid.
Several factors can cause this.
Low export quality, reduced frame rates and excessive compression all affect the result. Exporting a high-quality project at a resolution throws away details that can’t be recovered later.
Always choose the practical export quality for your intended platform. If your original footage was recorded in resolution preserve that quality during export whenever possible.
It’s also worth remembering that social media platforms compress uploaded videos automatically. Even if your export looks perfect the platform may reduce the quality after upload. Starting with the possible file gives the platform more information to work with and usually produces better results.
The Loop Works on My Computer but Not on Social Media
This is more common than people realize.
A loop that appears smooth while previewing it on your computer may behave differently after being uploaded to TikTok, Instagram, Facebook or YouTube.
Different platforms process to loop video in ways. They may compress the file change the frame rate or introduce delays before the video repeats.
To minimize these issues export using formats such as MP4 with a stable frame rate. Before publishing upload the video privately. Test it on another device to make sure the loop behaves as expected.
Professional creators rarely publish content without testing it first.
My Timeline Feels Difficult to Edit
Sometimes the problem isn’t the loop itself—it’s the editing process.
Trying to trim frames while the timeline is fully zoomed out makes precise editing almost impossible.
Instead zoom into the timeline before making adjustments. Working frame by frame gives you more control over the transition and makes it easier to remove tiny imperfections that would otherwise go unnoticed.
This is especially important when editing clips where every frame has a visible impact on the final result.
My Loop Still Doesn’t Feel Professional
If you’ve tried everything and the loop still feels off don’t be discouraged.
Professional editors rarely create a loop on the first attempt. They preview the project repeatedly make adjustments and compare different versions before deciding which one works best.
Sometimes the solution is as simple as trimming two frames. Times it means recording better footage or choosing a different looping technique altogether.
The important thing is to treat looping as a process rather than a one-click feature. Every adjustment teaches you something, about timing, motion and visual continuity. As your editing experience grows, creating loops will become faster, easier and much more intuitive.
When You Should NOT Loop a Video
Looping can make a video more interesting improve the time people watch it and create attention-grabbing content for media. However it’s not the choice for every kind of video. One of the errors that new creators make is thinking that every clip will look better when it plays over and over again.
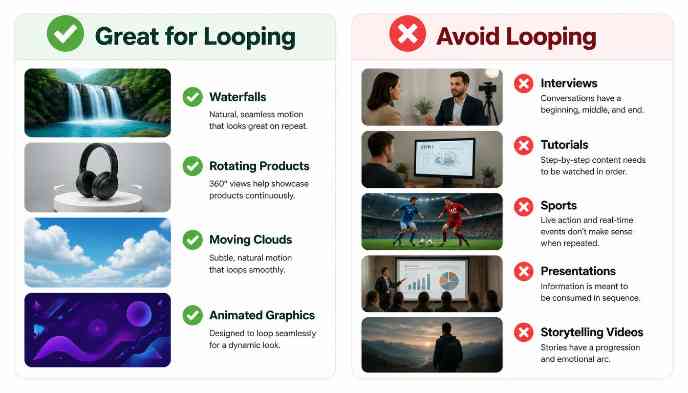
In reality a bad way to loop a video can confuse people break your message or even make your content worse. Experts in editing don’t just turn every video into a loop. They look at why the video was made what kind of movement is in it. What people expect before deciding if looping adds value.
If your goal is to make an professional edit it’s just as important to know when not to loop a video as it is to know how to make one.
Videos That Have a Clear Start, Middle and End
Some videos are made to tell a story. They start by introducing an idea build to a moment and then end naturally. Repeating these videos right after they finish can break the story. Make the content feel odd.
Imagine a travel video where the person reaches the top of a mountain after a walk. If the video suddenly goes back to the start the feeling of success is gone because the story starts again before people have time to think about the ending.
The same thing happens with movies, documentaries and short films. These videos are meant to be watched in a way and forcing them into a loop often makes them less powerful emotionally.
A key part of mastering how to loop a video in CapCut is knowing when to avoid it. If your content follows a story or delivers a message, allowing it to end naturally often creates a stronger impact than an automatic loop.
Talking-Head Videos and Interviews
Talking-head videos are some of the common types of content people share online. They include interviews, learning videos, business talks, podcasts, advice sessions and personal messages.
These videos depend on a flow of speech. If the last sentence connects back to the first the result usually feels confusing rather than smooth.
For example imagine someone saying:
“Thank you for watching. See you in the video.”
If the loop goes back to:
“Hi everyone welcome back!”
the change feels sudden because the conversation starts again without any background.
Even if the picture looks smooth the sound makes it clear that the video has repeated.
Of making a never-ending loop export these videos normally so people see the information in the right order.
Tutorials and Educational Content
Tutorials are made to show people how to do something step by step. Whether you’re explaining how to edit videos in CapCut bake a cake fix a bike or install software each step builds on the one before it.
Looping this kind of video can make things confusing.
Imagine a cooking tutorial where the last step jumps back to the beginning while someone is still watching. New people might not know where the lesson starts and others might think the repeated part is information.
Educational content works best when people can clearly see where the lesson starts and ends.
Sports and Paced Action
Fast-moving action videos rarely make good loops.
Sports highlights, dance performances, parkour, races and similar videos usually have movement, changing camera angles and unexpected actions. These changes make it hard to hide where the video restarts.
Imagine a soccer player scoring a goal. If the clip jumps back to before the kick the repetition feels obvious because the action follows an order.
The same problem comes up in arts, gymnastics, skateboarding and other performance videos where each move leads naturally to the next.
Of looping the whole clip use slow motion, replay effects or shorter highlight clips to focus on important parts.
Videos That Have Text or Captions
Text works differently from movement.
When a video with titles, subtitles or captions loops people often notice the restart away because the text suddenly appears at the beginning of the screen.
This can be distracting, in videos that are meant for ads, talks or social media where people are reading the content carefully.
If your video uses a lot of text avoid to loop a video unless the captions are meant to repeat.
For ads shown on screens many companies separate the text from the looping video so the message stays clear without drawing attention to the repetition.
Videos That Have Scene Changes
Some videos use camera angles, quick cuts or big transitions.
These editing techniques work well in videos but they make looping harder.
Imagine a travel video that moves from a beach to a city and then to a mountain. When the final mountain shot jumps back to the beach the change feels off because the scenes don’t look similar.
Loops work best when the ending looks like the beginning. If your video has scene changes making a smooth loop becomes much harder.
Videos With Complex Sound
Editing the picture is part of the job.
Some videos have spoken words, music, sounds and background noise that all change during the recording.
Even if the pictures loop perfectly the sound might restart suddenly. Show where the repeat starts.
This is especially clear in interviews, live shows, speeches and event videos where the sound follows an order.
Unless you’re ready to edit the sound these videos are usually better left as regular non-looping videos.
Videos That Are About Time or Information
Not every video is for fun. Some videos are made to share information quickly.
Examples include:
– Company updates
– Product launch videos
– News updates
– Safety directions
– Training videos
– Event schedules
– Help videos
In these cases people expect a start and a clear end. Making the video repeat automatically can take away from the message. Make it harder to understand.
If the point of the video is to share information of create a visual effect a normal video is usually the better choice.
When video Looping Hurts Engagement
Many creators think that looping automatically makes people watch longer. This can be true for entertainment videos but it doesn’t work for every kind of content.
If people immediately see the repeat they might lose interest. Stop watching.
This is especially true when:
– The repeated action is clear.
– The change is distracting.
– The loop feels forced of smooth.
– The video becomes boring after a few seconds.
Of making people watch more a bad loop can make them stop watching.
The goal is not just to make the video repeat—it’s to make the repeat feel planned and fun.
Final Thoughts
Learning how to loop a video in CapCut is more than finding the tool. It’s about understanding how movement, timing and picture flow work together to make a video feel natural from start to finish. While CapCut doesn’t have a Loop” button it gives you all the tools you need to make high-quality loops with full control.
Throughout this guide you learned that a good loop starts long before you open the editor. Recording footage, planning your shots matching the first and last frames and making small changes during editing all help the final result. Tools like Duplicate, Reverse, Keyframes and Transitions are helpful. They only work well when used carefully.
It’s also important to remember that not every video should be looped. The best editors know when loop a video improves the experience and when a normal start and end tell the story better. Choosing the way for your content is just as important as learning the editing steps.
If your first loop isn’t perfect don’t get upset. Even experienced editors rarely get it right the time. Small changes—like cutting a frames improving the transition or fixing the sound—often make the biggest difference. With time you will start to see what makes a loop feel smooth and what breaks the effect.
No matter if you’re making videos for TikTok, Instagram Reels, YouTube Shorts, product marketing, your website, digital signs or personal projects the tips in this guide that is how to loop a video in can capcut will help you make smoother and more professional loops.
The time you open CapCut don’t think about looking for a hidden Loop button. Instead focus on making a transition so smooth that people never notice where the video starts or where it starts again.
Get good at that skill and you will be able to loop a video that don’t just repeat—they keep people watching.